Sunday, October 30, 2011

Sakashita Photo Week: Kawa Ue

This is Dragon Falls, just north of Sakashita in Kawa Ue.

Yes, the weird foreigners jumped off it on a regular basis until the locals put up fencing around it to keep everyone in.

Let me tell you, that water is cold.


See the guy on the bottom left? That's where I jumped off from. It's about a 6 foot drop down, and that was more than enough for me. And, let me tell you, I thought I was pretty badass even doing that...

... at least until I slipped on the rocks, fell to my knees and almost bashed my head. Then, I felt distinctly less badass and much more scared for my life. I should have taken my clumsiness into account!

That was the first and only time I got into the waterfall, but I loved watching people jump into it. Such a magical, prehistoric looking place.

Monday, October 24, 2011

Miso Ramen with Poached Egg and Spinach

Unlike many students who were forced - out of poverty - to subsist on a diet of dehydrated ramen noodles throughout their university years, I was lucky enough to live at home and, you know, eat healthily. That's not to say that I didn't have the occasional msg and sodium laden convenience product. My brother and I would regularly split a package when we watched WWE Raw that we would stir fry with veggies instead of turning it into soup.

Yes, I said WWE. I love Shakespeare, Jane Austen and the WWE. I also play video games. It weirds my students out to no end, but I like to say that my interests don't fit into nice, neat boxes.

The first time I went out and ate ramen noodles outside of my house was in my husband's town in Japan. There was a great shop in Toki-shi along Route 19 that served the most gloriously gigantic bowls of noodles. The first time we ate there, it was a painfully chilly, rainy Sunday night in November. The rain was pounding umbrellas with icy fury and we were both exhausted. We'd come back from Nagoya and with a long line at our regular Sunday night sushi joint, we decided to brave the vicious weather and try somewhere new.

Let me tell you, ramen is the perfect antidote to combat the bone chilling rain of an autumn storm. When your monster sized bowl arrives, you're immediately bathed in steam from the broth. On first bite, the noodles are so hot you almost burn your tongue, but you slurp them down anyway. And then, as you begin spooning the salty broth into your mouth, a warmth uncurls itself in your belly and begins to radiate throughout your limbs.

Frankenstein's monster could have been brought to life with ramen. If he had been, he probably would have been in a much better mood.

That first night, I had miso-butter ramen with corn, an egg, and bamboo shoots. And though I tried many other different varieties in my time there, I always returned to the comfort of miso ramen to warm myself.


I don't make ramen much for myself these days - only a handful of times for those chilly days in autumn and winter. The dehydrated stuff just doesn't do it for me. Luckily, there's a company in the GTA (Marufumi Foods) that makes fantastic fresh ramen and freezes it. Their stock base is a miso based paste, not a powder. If you can get hold of fresh or frozen ramen, you're working in a whole new ballpark of awesome.


Miso Ramen with Poached Egg and Spinach

(serves 1)

Ingredients

1 package ramen with seasoning mix (preferably miso)
1 tbsp white vinegar
1 egg
1 handful baby spinach leaves
shichimi, or chili-garlic paste to taste


Directions

1. Cook ramen according to package directions. Meanwhile, bring a pot with 1" water in it to a boil. Add vinegar and reduce heat to a gentle simmer. Crack egg into a small dish and slide into simmering water. Cook for 1-2 minutes or until your desired doneness.


2. Add spinach leaves to ramen and broth. Cook for 30 seconds, just until wilted. Ladle into a large bowl. Remove egg from poaching water with a slotted spoon and place on top of noodles. Sprinkle with shichimi to taste.

Saturday, October 22, 2011

Seven Years Ago Today (A Haiku)

Autumn city, my
imagination captured
in breathless embrace


The Golden Pavillion


The boat house of the Golden Pavillion


Temple in Nara


My husband and I seven years ago. I wish I was still that skinny!

Last week, during Saturday's drama class, we were focused on the topic of home. We talked, and talked about where we'd been and how many places we've called home (my count: 14).

But, we really got to sharing stories of what it was like to move away from home. And, although I moved out of my parents' house a year before I left for Japan, I feel like I really didn't leave home until I left the country.

I only have a few pictures of those first few months in Japan - for some reason, at that time, I didn't realize that you needed a large memory card to take pictures, so I could only take 12 at a time. The ones I've posted today were of my first trip (of many!) to Kyoto back on October 22nd, 2004. We went with friends and explored the city and, I remembered thinking to myself that this was what my life was supposed to be like. Adventure and exploration and beauty.

Also on this trip, in the lobby of our guest house (yes, I still remember where we stayed!), we met a mid-30s American man who'd arrived in Kyoto the previous day and hooked up with a prostitute in a love hotel ("I didn't think either would cost so much!"). He'd run out of money and had only brought his debit card (bad idea, as the bank machines are on incompatible networks).

I'll be honest, I didn't feel particularly sorry for him.

I believe he decided to cut his trip short and head home early.

So, now we've circled back around to home. Tell me, can you remember all the places you've lived? Were some of them more home than others? What place was the first place you remember being your own home?

Friday, October 21, 2011

Dorie's Provençal Olive Fougasse

It's been one of those weeks where I start to consider bringing a paper bag everywhere I go, just, you know, so I can deal with all of my hyperventilating. We're gearing up for both Hallowe'en and Remembrance Day at school (although, we've been banned from using the word Hallowe'en) - both of which were things I didn't involve myself in before, but as one of teachers attached to the student council, I'm involved in all of their activities this year, And, since my drama class was doing the bulk of the work for Remembrance Day, I decided that it was easier and less stressful for me to manage the whole thing.

We'll see if that thought holds true.

We also got news that we'd have a news crew at our school for the Remembrance Day assembly, so the pressure is on!

I used to find the stretch between Thanksgiving and Christmas to be the longest and most painful to teach, but being so busy this year is making the time fly by too quickly. I never thought I'd hear myself beg for more weeks of school, but I could definitely do with some extra days.

Alas, my own schooling is taking up a ton of my time. We had both Saturday and Wednesday classes this week, so I'm thoroughly looking forward to a weekend that's longer than one day. I will say that, if I have to be in school on top of working, there's no place I'd rather be than taking drama. Yesterday I realized how sad I'll be to have this drama class be my last at the university/teacher's college level. It's nice to meet new people, learn lots and bond in a short period of time!

Knowing how little time I'd have to myself this week, I made some bread on Sunday with the intention of munching on it throughout the week. I returned Mario Batali's Molto Italiano to the library and took out Dorie's Around My French Table, and was immediately taken with her recipe for Provençal Olive Fougasse.

You've probably noticed my love of dough by this point (bread is so easy to make, and everyone is terribly impressed when you do it because they think it's hard) and my love of olives means that I spend way too much on Whole Foods' olive bar... I wish I could quit it, I really do. They're just so bloody tasty.

Turning bread into shapes (other than little round buns) isn't something I'd tried before. Fougasse typically has slashes through it to make it resemble a leaf. Again, easily done, and it makes the bread dead easy to pull apart.


You can find the recipe and directions here. I made absolutely no adjustment to the recipe, though next time, I'll go for the orange rind instead of the lemon, I think. And, I'd love to try this out with green olives too.

Monday, October 17, 2011

Pumpkin Biscotti with White Chocolate and Ginger

As the leaves fall, this autumn is becoming busier and busier for me. Not only is my infinite pile of marking getting larger by the minute, but my Wednesday & Saturday drama classes have begun (I'm taking my specialist in drama right now), leaving me with less and less time for baking and cooking and, by extension, blogging. So, fair warning, the prolific 5-6 posts a week is definitely going down to 2-3.

It's exhausting. We also had our school's curriculum night last week, so I feel like I've barely seen our apartment since returning from the cottage last Monday.

Our apartment.

We've been living here for just over 4 years now. It was built back in the 1800's as one of the original landowners mansions in Toronto, served as a convent for a while and was transformed again into a 5 apartment unit back in the '70s. When my husband (then-boyfriend) and I did a scouting trip to Toronto back in '07, we spent the first day of our trip looking at soulless concrete highrises off of Yonge.

I was going to be a student at University of Toronto, while my husband had yet to find employment. And although we had the money saved up for rent, no one in any of those soulless, cramped spaces would rent to us.

It was easily one of the most depressing, spirit-destroying days I have ever spent in this city.

But, like most things in life, what originally seemed like disaster turned into a great blessing (also see: moving to Japan, getting into teacher's college, having my first LTO finish early, getting bumped from my high school to my current school), we were SO lucky that no one in those buildings wanted us.

On day two, we stepped back out into the smoggy world of Toronto, and had an early morning appointment for a place in the Annex. For the first time in more than 24 hours, we were walking down tree-lined streets. I felt as though I could breathe again. And then, we were at a huge house. It was set back off the street on a green grassy lawn, with bright, wide windows. And when we stepped inside, we loved it instantly. It felt like home. Those same windows, viewed from the inside, reminded me of the windows in my grandparents' house in Victoria. We signed for it on the spot. Our landlady liked and trusted us enough to rent to us.

We've been really, really happy here. But, as we've grown busier and older (read: have more stuff), we've outgrown our space. At some point in the nearish future, we'd like to have an addition to our family. So, we've known for a while that we'll have to give up this space.

I've been scouring the MLS site for more than a year now. All I can say is that the Toronto real estate market depresses me. The reality is we cannot afford to buy a place that allows us to have the lifestyle we want to live (pedestrian friendly). More to the point, we're not interested in raising a family here. I desperately want to get back to Ottawa within the next 5 years.

So buying can't be an option right now. And the reality of having to move into a lesser quality apartment was looming in front of us.

Then: magic once again. Our next door neighbours on our floor decided that they would be moving out, meaning their 2 bedroom + solarium + wood burning fireplace 1500 sq ft space was up for grabs.

We grabbed it. I'm excited to say we'll be moving the shortest move in the history of moves (approximately 5 feet from our door to theirs) to a flat that is simply spectacular. I couldn't be happier! I intend to get a Christmas tree this year as we'll suddenly have space for it!


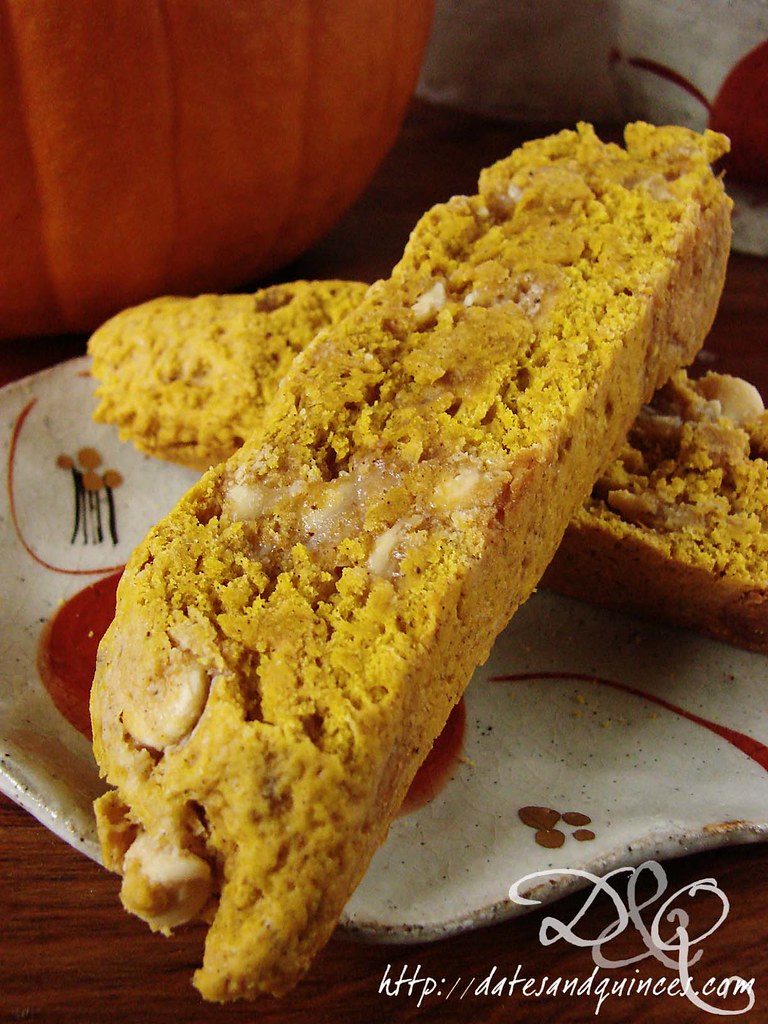
This brings us all the way (via the long, windy route) to today's recipe! It's here I made because we're hoping that tonight will be the last showing of our apartment. I hope to entice some awesome new neighbours into the space, who will love it as much as we have (and as much as the tenant before us, who was here 7 years)! And nothing says love me quite as much as the scent of cinnamon, chocolate and pumpkin, right?

I hope you're all warm and cozy in your home tonight!

Pumpkin Biscotti with White Chocolate and Ginger

(adapted from Chatelaine)

Ingredients

2½ cups all purpose flour
½ cup granulated sugar
½ cup packed brown sugar
1½ tsp baking powder
1½ tsp cinnamon
¼ tsp ground cloves
¼ tsp grated nutmeg
¼ tsp salt
¼ cup minced crystalized ginger
2 eggs
½ cup canned pumpkin puree
½ cup unsalted butter, melted
1 tsp vanilla extract
½ cup white chocolate chips

Directions

1. Preheat oven to 300º. Line a large baking sheet with parchment paper or a silpat mat.

2. In a large bowl, stir together flour, sugars, baking powder, cinnamon, cloves, nutmeg, salt and crystallized ginger. In a separate bowl, stir together eggs, pumpkin puree, melted butter and vanilla. Pour wet ingredients into dry and mix until almost combined.

3. Stir in white chocolate chips, until evenly distributed. Divide dough in half. Gently form each half into a log shape, about 15" long and place on prepared baking sheet. Bake in oven for 30 minutes.

4. Remove tray from oven. Reduce temperature to 275º. Let logs of dough sit for 5 minutes. Carefully remove one log from the pan, and, using a serrated knife, slice diagonally into ½" slices. Place, with cut side down back on baking sheet. Repeat with the second log of dough.

5. Return biscotti to oven to bake for an additional 35 minutes, or until dried and crispy. Let cool on rack.

You could glaze these with the spice glaze from the pumpkin scones, if desired.

Wednesday, October 12, 2011

Pumpkin Angel Food Cake with Salted Cinnamon Caramel

One of the challenges of cooking at the cottage is we don't have access to clean running water. Each weekend, we lug up three gigantic blue jugs and use that water to wash our dishes, fruits and vegetables.

And that has a huge impact on what we make up there. There's a limited amount of dishes we want to get dirty, because we can only do a limited number of dishes.

I don't know what Thanksgiving looks like at your house, but at ours, it's mess-tastic.

So, when we're at the cottage, it's often easier to turn to recipes that involve pre-packaged ingredients. It's not something I usually do at home; but up there, it's the sensible thing to do.

Thankfully, there are amazing recipes out there that turn packaged mixes into home-cooked delights.


This recipe comes from Grin and Bake It, and was a total hit. Angel food cakes and my family go way back. When I was a teen, I'd always ask for my birthday cake to be an angel food cake covered with whipped cream that had been mixed with crushed up Crispy Crunch Bars.

Be still my beating heart.

So, there was a big cheer when we brought angel food cake back into the fold this Thanksgiving. As I cut it at the table, it was universally declared to "wobble seductively".

Who doesn't love a good seductive wobble?

Pumpkin Angel Food Cake with Salted Cinnamon Caramel


(source)


Ingredients


1 package angel food cake mix
1 tbsp.  all-purpose flour
1 tsp. cinnamon
¼ tsp. ginger
1/8 tsp. nutmeg
1/8 tsp. cloves
¾ cup canned pure pumpkin
1 cup cold water


¼ cup butter, salted
¼ cup dark brown sugar
¼ cup granulated sugar
½ cup whipping cream
¼  tsp. sea salt
2 tsp. cinnamon

Directions

1. Preheat oven to 350º. Place all cake ingredients (food cake mix through water) in a bowl and beat with a hand held mixer for one minute. Pour into an angel food cake tin and bake for 35-45 minutes, or until cake is browned and bounces back when lightly poked. Remove from oven and place upside down on the neck of a glass bottle. You'll do this because you don't want the cake to fall at all. Let cool for at least 2 hours.

2. To make the glaze, heat butter with sugars in a small saucepan. Bring to a boil over medium heat, then stir in cream. Bring back to a boil and let cook for 2 minutes, stirring constantly. Remove from heat, stir in cinnamon and sea salt. Let cool to room temperature before pouring over top of cake.

Might I recommend some whipped cream on the side?

Tuesday, October 11, 2011

Thanksgiving Weekend at the Cottage

I'm back, complete with a bruised thumb bone from a hand-to-wheelbarrow collision - so this post will contain as few words as I can possibly get away with.

I love this place.


Wednesday, October 05, 2011

Baked Crème Brulée French Toast Casserole

For reasons only known to them, my parents decided to get up at the ungodly hour of 3 am to drive the 5 or so hours to get to Toronto to drop off several boxes of books that I still have at their house. All they requested of me in return for these treasures was breakfast.

And they'd be there around nine, thank you very much.

Have I mentioned that I don't do mornings very well? And, when we do have breakfast on weekends, it's a long, leisurely affair that usually wraps up around noon.

Since my parents wanted to get back on the road for their adventure through Prince Edward County, something easy and make-ahead was in order.

After googling different recipes for about an hour, I settled on a baked french toast casserole. Throw in the flavours of crème brulée, and you're in for a luxurious tasting and incredibly easy meal.


It was such a success that we've decided this will be our Christmas morning breakfast this year.

Crème Brulée French Toast Casserole

(adapted from here)

serves 4


Ingredients

2/3 cup packed brown sugar
1/3 cup unsalted butter
1 tbsp corn syrup
½ loaf french bread, cut into 2" slices on the diagonal
4 eggs
1¼ cups milk
2 tsp grand marnier
1 tsp vanilla
pinch salt

Directions

1. In a small saucepan, heat brown sugar with butter and corn syrup. Bring to a simmer, then remove and pour into an 8" baking pan.

2. Place slices of french bread over caramel mixture.

3. Whisk together eggs, milk, grand marnier, vanilla and salt. Pour over bread. Cover and refrigerate over night.

4. In the morning, preheat oven to 325º. Bake casserole for 45-55 minutes, or until golden brown and puffy, with caramel bubbling around the edges.

You can invert and serve at the table or just scoop out the french toast, which will have absorbed most of the caramel goodness.

Tuesday, October 04, 2011

Mario Batali's Polpettine di Tacchino

Oh, Mario Batali. Having just cooked from one of your cookbooks for the first time, I can understand why you weigh what you weigh. Your recipes are outstanding.

And seriously, 2 lbs of meat to serve 4 people? Holy moly man, that serves way more in our household.

I don't know what possessed me to pick up Batali's cookbook Molto Italiano from the library a couple of days ago. Italian food just doesn't excite me. I would choose just about any other kind of restaurant before I would choose an Italian one. But, I'm beginning to think there are two reasons for that:

1) I haven't had a lot of great Italian food. President's Choice Lasagnes clearly don't give an accurate representation of the possibility for deliciousness.

2) Pasta makes me go "meh".

But, one of my friends was raving about his Batali iPad app, and so I picked up the book to see what the fuss was all about.


The best meatballs ever. That's what this cookbook is about. It's going on my Christmas list for this recipe alone.

I won't lie, I made a ton of adjustments to his recipe (2 tablespoons of salt?!? No one needs that much salt in a dish), mostly to the sauce. Given Gwyneth Paltrow's friendship with Batali, I figured he wouldn't mind if I replaced his tomato sauce recipe with hers (it was much simpler and I was out of carrots). Use your own recipe, use Paltrow's (found here) or use some store bought stuff. Just make sure it's low sodium, because these meatballs pack a punch.

And don't be turned off by the long ingredient list. Everything comes together relatively quickly!


Polpettine di Tacchino

(aka Turkey Meatballs)

from Mario Batali's Molto Italiano

serves 6-8

Ingredients

meatballs

1 lb lean ground turkey
1 lb lean ground pork
1½ cups panko
½ cup milk
2 eggs, lightly beaten
4 cloves garlic, minced
1 tsp dried rosemary, chopped
1 tbsp hot pepper flakes
1 tbsp kosher salt
2 tbsp freshly ground black pepper

sauce

3 tbsp olive oil
1 large sweet onion, cut in half vertically and thinly sliced horizontally to form half moons
6 cloves of garlic, thinly sliced
1 tbsp hot pepper flakes
½ cup water
½ cup red wine or dry sherry
1 tsp dried rosemary
2 cups tomato sauce
2 tbsp parsley

Directions

1. Preheat oven to 475º.In a large bowl, mix together all meatball ingredients. Use a light hand to do so. Form into 24-30 golf ball sized balls. Place on a large, sturdy, rimmed baking sheet and bake for 15-20 minutes or until golden. Remove from oven and set aside. Reduce oven temperature to 350º.

2. Meanwhile, heat olive oil in a large dutch oven. Add onion and garlic and sauté until golden brown, about 5-10 minutes. Stir in red pepper flakes, then water, wine and rosemary. Scrape up any brown bits on the bottom of the pan, and let liquid reduce to approximately half. Stir in tomato sauce and let mixture simmer for 10 minutes.


3. Add meatballs to sauce, tossing well to coat and bake in oven for 45-55 minutes, or until sauce is thick (and really, almost gone).

Serve in shallow bowls with a sprinkle of parsley.

Monday, October 03, 2011

Pumpkin Scones with Spiced Glaze

Last Monday, I was running early for a doctor's appointment, so I decided to hop off the subway and stop off for a coffee at Starbucks. Of course, as soon as I got in the line, the rumbling in my stomach reminded me that I had eaten my lunch (quiche) for breakfast at 9:45 that morning as I'd forgotten to pack breakfast.

It was 2 pm, and I was really hungry. In honour of the fact that it had recently become autumn, I bought myself a pumpkin scone, settled into a cushy seat with a new magazine and sipped my chai tea latte.

I regretted the scone immediately. The icing was far too sweet, and it was painfully dry. It felt like it was absorbing all the moisture from my mouth as I was eating it.

Frustrated (and still hungry), post appointment, my husband and I went grocery shopping and I bought several tins of pumpkin. By God, I was going to prove that I could make a better pumpkin scone than Starbucks.


And this is it. I brought the first batch in to work to share with my coworkers (positive reviews all around), much to my husband's chagrin. So, I whipped up another batch this past weekend.

With the use of a food processor, this recipe comes together in minutes.


Pumpkin Scones with Spiced Glaze

(lightly adapted from The Shoebox Kitchen)

Ingredients

2 cups all purpose flour
¼ cup brown sugar
3 tbsp granulated sugar
1 tbsp baking powder
½ tsp cinnamon
½ tsp nutmeg
¼ tsp ginger
¼ tsp ground cloves
pinch salt
1/3 cup unsalted butter, chilled, and cut into ½" cubes
½ cup pumpkin puree
3 tbsp milk
1 large egg

glazes

1 cup icing sugar, divided
2 tbsp milk, divided
1/8 tsp cinnamon
pinch each ginger, cloves, nutmeg


Directions

1. Preheat oven to 375º. In the bowl of a food processor, pulse together flour, sugars, baking powder, cinnamon, nutmeg, ginger, cloves and salt. Add butter, pulsing until you have small, pea sized clumps.

2. In a separate bowl, whisk together pumpkin, milk and egg. With motor running, pour pumpkin mixture through tube, pulsing just until mixture comes together and forms a ball.

3. Transfer dough to a lightly floured surface and shape into a rectangle, about 1" thick. Divide vertically into 4 rectangles, then divide those rectangles in half horizontally to form 8 squares. Cut each square diagonally to create 16 triangles.

4. Place on a parchment or silpat lined baking sheet and bake for 15-17 minutes, or until lightly golden on the bottom. Let cool on a rack.

5. Whisk together ½ cup icing sugar with 1 tbsp milk. Brush over tops of cooled scones. Let dry for 15 minutes. In a small plastic bag, massage together remaining icing sugar with 1 tbsp milk and the spices. Cut the corner of the bag off to create a piping bag, and pipe the spiced glaze over top of the regular glaze. Let harden for 1 hour before transferring to an air tight container.
Related Posts Plugin for WordPress, Blogger...