Showing posts with label bread. Show all posts

Friday, October 21, 2011

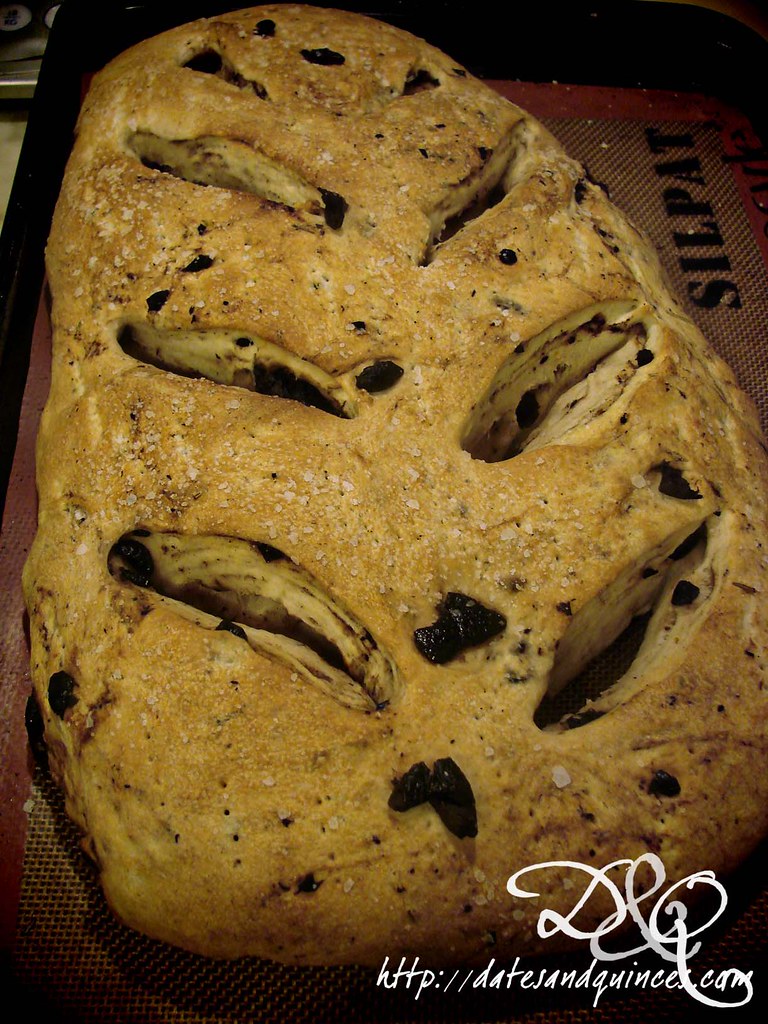
Dorie's Provençal Olive Fougasse

It's been one of those weeks where I start to consider bringing a paper bag everywhere I go, just, you know, so I can deal with all of my hyperventilating. We're gearing up for both Hallowe'en and Remembrance Day at school (although, we've been banned from using the word Hallowe'en) - both of which were things I didn't involve myself in before, but as one of teachers attached to the student council, I'm involved in all of their activities this year, And, since my drama class was doing the bulk of the work for Remembrance Day, I decided that it was easier and less stressful for me to manage the whole thing.

We'll see if that thought holds true.

We also got news that we'd have a news crew at our school for the Remembrance Day assembly, so the pressure is on!

I used to find the stretch between Thanksgiving and Christmas to be the longest and most painful to teach, but being so busy this year is making the time fly by too quickly. I never thought I'd hear myself beg for more weeks of school, but I could definitely do with some extra days.

Alas, my own schooling is taking up a ton of my time. We had both Saturday and Wednesday classes this week, so I'm thoroughly looking forward to a weekend that's longer than one day. I will say that, if I have to be in school on top of working, there's no place I'd rather be than taking drama. Yesterday I realized how sad I'll be to have this drama class be my last at the university/teacher's college level. It's nice to meet new people, learn lots and bond in a short period of time!

Knowing how little time I'd have to myself this week, I made some bread on Sunday with the intention of munching on it throughout the week. I returned Mario Batali's Molto Italiano to the library and took out Dorie's Around My French Table, and was immediately taken with her recipe for Provençal Olive Fougasse.

You've probably noticed my love of dough by this point (bread is so easy to make, and everyone is terribly impressed when you do it because they think it's hard) and my love of olives means that I spend way too much on Whole Foods' olive bar... I wish I could quit it, I really do. They're just so bloody tasty.

Turning bread into shapes (other than little round buns) isn't something I'd tried before. Fougasse typically has slashes through it to make it resemble a leaf. Again, easily done, and it makes the bread dead easy to pull apart.


You can find the recipe and directions here. I made absolutely no adjustment to the recipe, though next time, I'll go for the orange rind instead of the lemon, I think. And, I'd love to try this out with green olives too.

Tuesday, May 10, 2011

Hamburger Buns

After I'd gotten home from doing the grocery shopping yesterday, I'd realized I'd forgotten to pick up both the eggs (I had one) and butter required to make what look like the most amazing hamburger buns ever. Because, you know, I needed something awesome to go with last night's awesome burgers.

In spite of the fact that I had to go out again to Korea town to pick up some kimchee, I knew I wasn't going to be picking up the butter and eggs there. So, I had to throw out the old plan and come up with a new one.


Enter Epicurious. Of course, once finding a recipe that didn't have butter or eggs in it, I was hit with the challenge of milk. I only had 1% in the fridge and their recipe called for half and half AND 1 cup of whipping cream. While I'm sure the cream makes the buns insanely delicious, I'd prefer to spend my calories on the burger, you know?

This recipe takes a while, though most of that time is spent waiting for the dough to rise. Actual hands on time is about 15-20 minutes.

Hamburger Buns

(adapted and scaled down from Epicurious)

Ingredients

1 cup + 2 tbsp milk
2 tbsp warm water (105º-110º)
1¼ tsp active dry yeast
2 tbsp granulated sugar
2½ cups all purpose flour
1 tsp salt

1 egg, lightly beaten
1 tsp sesame seeds
1 tsp coarse salt


Directions

1. Warm milk either in a pot or in the microwave until just below simmering. Set aside and let cool to 105º-115º (any warmer and you'll kill the yeast).

2. In the bowl of your stand mixer (or in a large mixing bowl if you don't want to use a stand mixer), mix together the warm water and sugar. Sprinkle yeast over top and let proof. Mixture will be bubbly. Add in flour, salt and warmed milk mixture, scraping down the side of the bowl as necessary until the flour is all incorporated. Knead with dough hook for 6 minutes. The mixture will be sticky, and that's exactly what you want.

3. Set aside in a greased bowl (remember to turn dough to coat all over with grease), cover and let rise in a draft free place until doubled in bulk 1-2 hours.

4. Once doubled, punch dough down and turn onto a lightly floured surface. Roll (lightly) with a rolling pin into a circle that's about ½" thick. Using a sharp 3-4" cookie cutter (you can use a glass, which is what I did, but you'll be forcing a seal on the edge of the buns that way and they won't rise as well as they could), cut out as many rounds as possible. Gather scraps and re-roll and cut out more rounds. Discard any excess dough after the re-rolling. Place dough rounds on 3" apart on parchment or silpat lined baking sheets.

5. Loosely cover dough with plastic wrap that has been greased (the dough will still be sticky) and let rise again in a warm, draft free location for 2 hours.

6. Preheat oven to 375º, with racks in both upper and lower thirds of the oven. Brush dough with egg and sprinkle with sesame seeds and coarse salt. Bake for 20-25 minutes, rotating the position of pans in the oven half way through. Buns are finished when they sound hollow when tapped on the bottom. Transfer to racks to let cool completely.


Makes 9-12 buns, depending on the size of your cookie cutter!

Monday, April 18, 2011

Hot Cross Buns

The first year we were living in Toronto, the Cobs bakery chain left about 10 coupons for free Hot Cross Buns in the mail boxes of our and our neighbours' mail boxes. Luckily for my husband and I, our neighbours kept throwing their coupons into the recycle bin by the boxes.

So we probably ate 7-8 free Hot Cross buns that year. It was fantastic. I love free food!

Now, as sad as I am that there haven't been coupons for the past couple of years, I have to admit, while Cobs' buns are good, they're not the best I've ever had.

Homemade is always better - especially because it'll fill your home with the sweet smell of cinnamon.


My version has no candied peel in it, but a combination of currants and sultanas along with the zest of an orange and lemon.

Hot Cross Buns

(adapted from Canadian Living and Martha Stewart)

Ingredients

Dough

½ cup granulated sugar
¼ cup warm water
2¼ tsp active dry yeast (one package)
2 tbsp cinnamon
1 tsp nutmeg
½ tsp salt
¼ tsp ground cloves
3/4 cup milk, warmed
¼ cup melted butter
1 egg
1 egg yolk 
zest of one large orange
zest of one large lemon
cups all purpose flour
¼ cup each dried currants and sultanas

 
Glaze

2 tbsp granulated sugar
2 tbsp water 

Icing

½ cup icing sugar
½ - 1 tbsp fresh lemon juice

Directions

1. Mix 1 tbsp sugar, warm water and yeast in the bowl of a stand mixer. Let stand for 5 minutes, until yeast proofs. Using the dough hook, stir in remaining sugar with next 10 ingredients (through lemon zest). 

2. Add flour, one cup at a time until a soft dough is formed. Add currants and sultanas and beat for about a minute. Remove dough from bowl and knead just to evenly distribute the fruit. Place in a greased bowl, tossing to grease all over. Cover with a tea towel and set aside in a warm, draft free location to rise until doubled in bulk, about an hour.

3. Divide dough into 10 equal sections. Form each into a smooth tight ball, stretching and pinching dough underneath to make tops smooth. Place 2 inches apart on a parchment lined baking sheet. Cover with tea towel and let rise again for about 30 minutes. Meanwhile, preheat oven to 400º.


4. Using a serrated knife or a pair of scissors, slice a cross into the top of each bun. Bake in oven for approximately 15 minutes or until golden brown.

5. Meanwhile, whisk glaze ingredients together in a small saucepan, stirring until the sugar dissolves. Immediately after removing buns from oven, brush them with glaze. Let them cool on the pan.

The glaze gives the buns a lovely sheen.
6. Stir together icing ingredients until smooth and pipe a cross on top of each cooled bun. If you don't have a piping bag, don't stress. Just fill a plastic sandwich bag with icing and cut off a small portion of one corner and then pipe out the icing.

Enjoy licking the sticky sweetness off your fingers!

Monday, March 21, 2011

Chewy Pretzels

I haven't made these in years! My dad went through a period where he was making them regularly with his church school group (and with us), and I don't think I've had them since then... which would make it a good 15 or so years ago.


So with March break time on my hands, and the latest issue of the LCBO Food & Drink in my kitchen, I got to work.

Chewy Pretzels

(slightly adapted from Food & Drink Spring 2011)

Ingredients

Dough

3½ cups all purpose flour
2½ tsp instant (or quick-rise) yeast (that's one package)
2 tsp salt
3/4 cup milk
2 tbsp unsalted butter
1 tbsp maple syrup
1/3 cup cold water

Boiling

8 cups water
½ cup baking soda
Coarse salt (about 1 tbsp)

Directions

1. To make dough, mix together flour, yeast and salt in the bowl of a stand-mixer (you can, of course, do this by hand too). In a microwaveable measuring cup, heat milk in microwave to almost boiling, add butter and stir until melted. Then mix in maple syrup and cold water. This will bring the temperature of the liquid down so it doesn't kill the yeast off.

2. With the dough hook on the stand mixer, start mixing away. Slowly add in the milk mixture. If you feel like you need additional liquid, you can add up to 3 more tbsp cold water. Add it in tablespoon at a time, and take it from there. This is a very stiff dough though, so don't add water prematurely. Once mixture has come together and has formed a smooth ball that's pulled away from the sides, let the machine run for an additional 3-5 minutes to develop the gluten. Turn off machine. Remove dough hook and cover bowl with plastic wrap. Let dough rise in place for about an hour or until doubled in bulk.

3. Remove the dough from the bowl, and knead a couple of times to deflate. Turn onto a lightly floured surface and divide dough into 9 balls.

I was worried about getting 9 balls right the first time, so I started by subdividing into 3.

4. Roll each ball into a long rope (about 18-24" long) that's thicker in the middle than it is at its ends.


5. Make a big U out of each rope. Twist the ends of the rope into... well... a twist. Try and keep the twist about 3 inches long, if possible. Then lift up the fat bottom of the pretzel and place ends appropriately. Place dough on baking sheet so ends are on top (not underneath) the pretzel. Repeat with all ropes, and leave 2" on all sides of pretzels on the baking sheets.


6. Loosely cover with plastic wrap. Let rise for 30 minutes, then transfer dough to the freezer. This will help the pretzels keep their shape when you boil them. Freeze for 2 hours on baking sheets. After this, you can either move on to step 7, or you can put the dough into freezer bags and save them for cooking at a later date.

7. Preheat oven to 375º.

8. Bring water and baking soda to a boil in a large (and I do mean large) pot (make sure it's either stainless steel or enamel, other metals will react to the baking soda and make the pretzels taste awful). The water will look foamy, like you've got epsom salts in it. Don't be alarmed. That's totally normal. Meanwhile, line a large baking tray (perhaps the one you used to freeze the pretzels on) with parchment paper.

9. Working one pretzel at a time, cook the dough first in the boiling water for 45-60 seconds. Remove using a slotted spoon; drain on a tea towel, without removing from spoon. Place on baking sheet and sprinkle with coarse salt. Repeat with remaining dough.


10. Once all pretzels are on baking sheet (again, leaving 2" around each), use a sharp knife to cut a slash in the thickest part of each pretzel.


11. Bake for 15 minutes, then rotate and bake for another 3 or until deeply browned. Let cool on a rack.


12. For a traditional condiment, mix 2 parts mayonnaise with 1 part mustard (grainy, yellow, your choice) and dip that pretzel away!

Friday, February 18, 2011

Italian Herb Bread

I love bread.

I love making it. The feeling as the dough becomes more and more firm and elastic beneath the heels of my hands makes me feel as though I'm back in my Nana's kitchen, even though I never once made bread there. She did it all. The act reminds me of her.

I love the way it makes my kitchen smell while it's baking. Fresh, yeasty, buttery, salty. Mostly, it smells homey.

Ultimately, I just love eating it. There's nothing better eating your own fresh bread. You can taste the effort and love.

Okay, maybe eating other people's fresh bread is good too. I'd certainly never say no.

already with a hunk missing
Anyway, when it came to this bread, I was all out of the Parmesan cheese called for. As I looked through the contents of the back of my fridge, hoping in vain to find a chunk of flavour back there, an idea stuck me.

I was looking for a savoury flavour, not necessarily cheese. I needed something umami.

That's when this ridiculously underused pantry staple (and by staple, I mean it's been in my cupboard since Valentine's day 2009) came in handy:


It's sea salt. And truffles.


Why I never use this salt, I don't know. It's awesome. I was concerned that the truffle flavour, being a delicate one, would be lost in the baking process, but let me assure you, it wasn't at all. I simply swapped out the regular salt for the truffle salt, omitted the cheese and went on with the recipe (feel free to keep the cheese yourself)

Not only did our kitchen smell of the glorious scent of bread, it smelled of truffles too.

Life is good.

Italian Herb Bread with Truffles

(adapted from this recipe at allrecipes.com)

Ingredients

1 (.25 ounce) package active dry yeast (that's 2¼ tsp)
1 cup warm water (110 degrees F/45 degrees C)
1 tablespoon white sugar
2 tablespoons olive oil
1-1/2 teaspoons salt
1-1/2 teaspoons dried basil
1-1/2 teaspoons dried oregano
1/2 teaspoon garlic powder
1/2 teaspoon onion powder
3 cups all purpose flour

(if you don't have truffle salt and want to use cheese, add in 1/3 cup grated Parmesan  with the flour)

Directions

Mix yeast, warm water, and white sugar together in a large bowl. Set aside for five minutes, or until mixture becomes foamy. 
Stir olive oil, salt, herbs, garlic powder, onion powder, cheese, and 3 cups flour into the yeast mixture. Gradually mix in the next three cups of flour. Dough will be stiff. 


Knead dough for 5 to 10 minutes, or until it is smooth and rubbery. Place in an oiled bowl, and turn to cover the surface of the dough with oil. Cover with a damp linen dish towel. Allow to rise for one hour, or until the dough has doubled in size. 


Punch dough down to release all the air. Shape into loaf. Place loaf on a greased cookie sheet, or into two greased 9 x 5 inch loaf pans. Allow to rise until doubled in size, about a 30 minutes. 


Bake at 350 degrees F (175 degrees C) for 35 minutes. Remove loaves from pan(s), and let cool on wire racks for at least 15 minutes before slicing. 

  
Excellent with butter, turned into croutons, or just ripped up in hunks and dunked in your favourite dip.

Or eat it plain. I'm not going to judge your bread choices.

Thursday, December 30, 2010

Nutty Oat Bread with Maple and a Bonus Soup Recipe

This is my second batch of the bread, and, barring some potentially over-toasted nuts, I think the tweaks I made this time round were big improvements to the loaf. Of course, this second one I was making for my family, not for a party, which meant that (of course) it turned out much better.

I should probably do this in reverse: test recipes on family, perfect for company.

As much as I thoroughly enjoy getting my hands dirty and taking out my frustration on dough, the fact that I'm still in Ottawa and have access to a bread machine (and am currently sporting an awesome blister from my failed croquembouche attempt) means I don't have to knead away. And I choose to take the easy way out.

Nutty Oat Bread with Maple

(Loosely adapted from Canada's Best Bread Machine Baking Recipes)

Ingredients

1 1/3 cups milk (1 cup milk, 1/3 cup water for traditional/non bread machine recipe)
1¼ tsp salt
3 tbsp maple syrup (the real stuff please, none of that Aunt Jemima nonsense)
2 tbsp butter (if you have walnut oil, which I didn't, you might want to use it instead)
1 cup whole wheat flour
2 cups all purpose flour (or bread flour)
½ cup quick cooking (not instant) oats, large or medium flake
¼ cup finely chopped nuts (I recommend either walnut or pecan)
1½ tsp bread machine yeast (if you're not going the bread machine route, I'd just use 2¼ tsp regular yeast)

Directions Bread Machine

1. (Totally optional, but highly recommended) Preheat the oven to 350º. Place oats and nuts on a baking tray and bake, stirring frequently for 10-15 minutes or until brown. Hello flavour country!


2. Measure ingredients into baking pan in the order recommended by the manufacturer. Insert baking pan into oven chamber. Select Dough Cycle. Let the machine do its thing.

3. Remove dough to a lightly floured surface. Let rest for 10-15 minutes.

4. Form the dough into a loaf shape (we're talking free form here). Place on a lightly greased baking sheet and let rise 30-45 minutes or until doubled in volume. Add a few decorative slashes to the top here, if you're so inclined.


5. (Totally optional step #2) Gently brush the top with water or milk and sprinkle with a few extra oats. 

5. Bake at 375º for 35-45 minutes or until loaf sounds hollow when tapped on the bottom. If you have an electric thermometer, you can test with it to see if the loaf is done. Once it reaches 190º, you're golden.

6. Let cool on rack before digging in!


Directions By Hand

Repeat as above, but substitute the following for step two!

2a) In a large bowl stir together1/3 cup warm water (about 100-110º) and ½ tbsp maple syrup. Once dissolved, sprinkle yeast over the top of the surface, and set aside for 5-10 minutes, until yeast blooms (gets all foamy).

2b) In a saucepan, stir together milk, butter, salt and remaining maple syrup and heat just until butter melts. Pour into yeast mixture. (Be sure that the milk mixture isn't too hot! Don't forget that yeast is a living thing and can be killed by high heat at this stage.) Stir together.

2c) Using a wooden spoon, stir in whole wheat flour, oats and 1½ cups white flour. Turn onto floured board and knead for 10 minutes, adding additional white flour, 1-2 tbsp at a time as needed. Form into a ball.

2d) Place dough in a greased bowl, rolling dough to coat with grease on all sides. Cover with tea towel and set aside in a draft free location to rise for about an hour, or until doubled in bulk.

2e) Proceed to step 3.

Bonus Recipe: Root Vegetable Soup


Ingredients

1 tbsp olive oil
1 medium onion, chopped
2 carrots, peeled and chopped
2 celery stalks, chopped
1 parsnip, chopped
1 sweet potato, roughly cubed
2 potatoes, roughly cubed
4 cups broth (I used leftover turkey stock)
juice of ½ lemon (or orange)
salt and pepper
3 leaves sage finely minced (optional)
1 green onion, minced (optional)

Directions

1. Heat olive oil over medium heat. Add onion, carrots and celery, stirring until beginning to soften.

2. Add parsnip, potatoes and broth. Bring to a boil, then reduce heat, cover and simmer for 20-25 minutes, or until tender.

3. Working in batches, puree soup in a blender until creamy (for a slightly coarser texture, use a hand blender)

4. Add lemon juice, salt and pepper to taste. For a sweeter soup, you might want to try orange juice instead of lemon.

5. Ladle into bowls and garnish with chopped sage and green onion. Serve with the Nutty Oat Bread!

Tuesday, November 23, 2010

Potato-Beer Bread

Moist, hearty and a great accompaniment for soup. This is another Beerbistro recipe, but let me tell you, the writers of the cookbook made some serious mistakes with this one. I'm a pretty decent bread maker (I do it a few times a month), so I could tell when things weren't going right. So, here's their ingredients with my instructions.


Ingredients

16 oz flour
1 tbsp sugar
½ tbsp salt
2¼ tsp active yeast (one package)
½ lb potato, cooked and mashed (about two small-medium sized ones)
2 tbsp softened butter
2/3 cup beer
½ cup buttermilk

Directions

In the bowl of an electric mixer with the dough hook attachment on, mix together flour through yeast. Keep mixing on low and add in the butter and the potato.

Add the beer and buttermilk to the bowl, turn the speed up to high and let it do its thing for 7 minutes. Over this time, I added about a ½ cup more flour to the dough to keep it from sticking. It should form an elastic ball that comes away from the sides of the bowl.

Transfer the dough to a lightly oiled bowl. Cover with a tea towel and let it stand in a warm, draft-free location for about 2 hours, or until the dough has doubled in size.

Punch the dough down. Remove from bowl, shape as desired and place on a greased baking pan. Let sit for another 15-20 minutes.

Preheat your oven to 350º. Bake loaf for 45-55 minutes, or until internal temperature reads 190º (use an instant read thermometer for this).

Let cool on rack.

Monday, October 25, 2010

Pan de Muerto

Ah... okay. This one had some disasters along the way to completion, but turned out tasty. It's a long recipe (although not hugely complex), and here's the link to it.

Even better? There's an audio sideshow!

So... here's what happened when I tried it. But first, for all the people who were too lazy to click the link: the recipe:

Pan de Muerto

For the bread
 
1/2 cup whole milk (I used ¼ cup each 1% and half & half)
2-3/4 oz. (5-1/2 Tbs.) unsalted butter, cut into small pieces
Two 4x1-inch strips of orange zest (use a vegetable peeler; avoid the white pith)
1 Tbs. orange blossom water
3 large eggs, lightly beaten
1/4 oz. (1-3/4 tsp.) active dry yeast
15-3/4 oz. (3-1/2 cups) unbleached all-purpose flour; more as needed
1/4 cup granulated sugar
1 tsp. kosher salt
Vegetable oil as needed
For the topping
2 oz. (4 Tbs.) unsalted butter, melted (I used 2½ tbsp)
1/4 cup granulated sugar

Make the dough Put the milk, butter, and orange zest in a small saucepan over medium heat; stir until the butter melts, 2 to 3 minutes. Remove from the heat and let cool until warm. Discard the orange zest, add the orange blossom water, and whisk in the eggs.


Or, you can add orange zest and strain it out later!
Dissolve the yeast in 1/4 cup lukewarm water (no hotter than 110°F) and let stand until the mixture bubbles slightly, 5 to 10 minutes. (If the yeast doesn’t bubble, discard it and start again with new yeast.)

Mix the flour, sugar, and salt on a work surface. Make a well in the center.

This is where things got awkward for me.
Gradually pour the yeast mixture and the milk mixture into the well while mixing with your hand.

Yeast mixture in? Okay! Milk mixture? Okay! Mixing? Uhm...

Or until the liquid leaks all over the place and your counter is a mess...

Knead until you have a nice, uniform dough, about 10 minutes. The dough should be smooth but still slightly sticky. If it seems too sticky, add more flour as needed.

Full recovery from the mess. It's good to know you can recover!

Put the dough in a large, lightly oiled bowl, cover with plastic wrap or a towel, and leave in a warm place (about 70°F) until doubled in size, 1 to 1-1/2 hours.

Shape the bread
 
Cut off a piece of dough about the size of a lemon and reserve. Divide the remaining dough in half and shape the pieces on a lightly floured surface into 2 rounds. Lightly oil a heavy-duty rimmed baking sheet or line it with parchment; put the dough rounds on it and flatten the tops with your hands.

With some of the reserved dough, form 2 balls the size of large marbles; set aside and cover with plastic. Divide the remaining dough into 6 pieces and roll them with your hands from the center out, making ropes that are slightly longer than the width of the loaves.

These little bits represent bones! You're going to lay them on top of the bread.

As you’re rolling, press with your index and middle fingers spread about 1 inch apart to make knobs that represent bones. Arrange 3 of the ropes on top of each dough round, overlapping the ropes in the center. Cover loosely with a cloth or plastic wrap and let rise in a warm place until doubled in size, about 45 minutes.


Ready to go in the oven!

Meanwhile, position a rack in the center of the oven and heat the oven to 350°F.

Dab a little cold water on the top center of each round where the ropes meet and put the reserved dough balls on top, pressing slightly so they adhere. Bake until the loaves have an even golden color, 30 to 40 minutes. Cover the loaves loosely with foil and continue to bake until their bottoms are browned and the internal temperature is 190°F, 10 to 15 minutes more. Remove from the oven and cool for a few minutes on a wire rack.

Gorgeous! And they smelled great.
Top the bread Brush the loaves all over with some of the melted butter.

Mmm. Glistening with butter!

Holding one from the bottom (if it’s too warm, use an oven mitt or a piece of cardboard), sprinkle half of the sugar all over the top, tilting the loaf slightly to help coat it evenly.

Make sure you get all the corners!
Repeat with the other loaf and remaining sugar.

The ball on top popped off of this one.
Cool to room temperature before serving. The bread is best eaten within a day of baking.

Ta Dah! The finished product!

All in all, I think this was a great recipe. It was relatively easy, with the exception of my failure with the well. Overconfidence will get you every time, I swear. I can't stress this enough, but the orange blossom water makes this bread! It lends it a gorgeous floral tone that's in no way overpowering. I would definitely make this one again!

Sunday, October 24, 2010

Coming tomorrow...

... Pan de Muerto


"You are now carrying my child."

"But how?"

"It is the mystery of the bread."

Saturday, September 04, 2010

Salted Caramel Orange Breakfast Rolls

Phil (after taking a bite): Alyson, I don't wish to alarm you, but if I weren't already married, I would marry these things and maybe keep you on the side as my mistress.

Me: Oh, are they good?

Him: Mmph. 

Me: I'll take it, since your mouth is full of caramel, that they are.

They are, people. Oh, they are. The buns soak up some of the caramel as they bake, and get all gorgeously glazed. The recipe is based on one over on Cooking Light (Pecan Rolls, or something like that) that I may have made more fatty.

You need fat in the morning though, right? Right?


This could be your breakfast.

Ingredients


Dough:
3/4  cup  warm milk
1/4  cup  granulated sugar
1/2  teaspoon  salt
1  package dry yeast (about 2 1/4 teaspoons)
1/4  cup  warm water
2 eggs
3  tablespoons  butter, melted and cooled
½ tsp vanilla
18  ounces  all-purpose flour (about 4 cups), divided
Cooking spray

Caramel
3/4  cup  packed dark brown sugar
3  tablespoons  butter, melted
2  tablespoons  hot water
½ tsp flake sea salt

Filling
2/3  cup  granulated sugar
zest of one orange
1 1/2  tablespoons  butter, melted


If you've never made your own bread before, I highly recommend doing it. I promise, it's not as hard as you'd think!

1. To prepare dough, combine the first 3 ingredients in a large bowl.

2. Dissolve yeast in 1/4 cup warm water in a small bowl; let stand 5 minutes. Stir yeast mixture into milk mixture. Add eggs, vanilla and 3 tablespoons melted butter; stir until well combined.

3. Weigh or lightly spoon flour into dry measuring cups; level with a knife. Add 16.8 ounces (about 3 3/4 cups) flour to yeast mixture; stir until smooth. Turn dough out onto a lightly floured surface. Knead until smooth and elastic (about 8 minutes); add enough of remaining flour, 1 tablespoon at a time, to prevent dough from sticking to hands (dough will feel slightly soft and tacky). Now, I did all of this in my kitchen aid mixer, except for a final quick kneading at the end.

4. If planning on eating the same day: Place dough in a large bowl coated with cooking spray; turn to coat top. Cover and let rise in a warm place (85°), free from drafts, 45 minutes. Punch dough down and turn over in bowl; lightly coat with cooking spray. Cover and let rise another 45 minutes. Punch dough down; cover and let rest 5 minutes.

How my dough looked after an overnight stay in the fridge.
Not how I'm used to seeing dough look, but it turned out
just fine!

If wanting a leasurely morning where you DON'T have to spend 2 hours waiting for your sweet deliciousness: Place dough in a large bowl coated with cooking spray; turn to coat top. Cover with plastic wrap and place in the fridge overnight. I punched the dough down once, just before going to bed, and as a consequence the dough didn't really rise again. The next morning, pull the dough out of the fridge, punch it down (if it needs punching), and let sit at room temperature while you get the other ingredients ready.

5. To prepare sauce, combine brown sugar, 3 tablespoons butter, and 2 tablespoons hot water in a small bowl; stir with a whisk until smooth.

Mmm. Soon to be caramel.
Scrape sugar mixture into a 13 x 9–inch baking pan coated with cooking spray (or two smaller pans, if your 9 x 13" one is rusty), spreading evenly over bottom of pan with a spatula. Sprinkle sugar mixture evenly with salt, and set aside.
Glorious salt.
Salt flakes in caramel.

You can (and I did) make the sauce in advance and keep it in the fridge overnight.

6. To prepare filling, combine 2/3 cup granulated sugar and zest in a small bowl.


Turn dough out onto a lightly floured surface; pat dough into a 16 x 12–inch rectangle. To be honest, I never measure, I just rolled it out until it felt right.

Looks big enough to me!

Brush surface of dough with 1 1/2 tablespoons melted butter. Sprinkle sugar mixture evenly over dough, leaving a 1/2-inch border.

Mmm. Sugar + zest = happy
Beginning with a long side, roll up dough jelly-roll fashion; pinch seam to seal (do not seal ends of roll).

All rolled up and ready to cut.

Cut roll into 1 inch (or so) slices.

I mark them off as I go before fully cutting them.

Arrange slices, cut sides up, in prepared pan. Lightly coat rolls with cooking spray; cover with  tea towel and let rise in a warm place (85°), free from drafts, 30 minutes or until doubled in size.
Ready to sit for 30 minutes.

7. Bake at 350º for 20-30 minutes until lightly brown. Pull out of oven and let stand for 1 minute before inverting onto a platter.

Letting cool so the caramel firms up a bit

8. Try to restrain yourself from eating them all.

Look at all those crevices for the caramel!
No. Seriously. It's harder than it looks.

Served on my Nana's china with nature's other perfect food: bacon.
Next time, I'm going to get a vanilla bean and replace the orange zest with the vanilla seeds. If you choose to go that route (salted vanilla caramel? Hello!), mix the seeds and sugar the night before (leave the pod in there too) to allow the sweet vanillay goodness to come through.

Try it. You'll be a god.
Related Posts Plugin for WordPress, Blogger...