August's bounty thrills me to no end. The markets and grocery stores are bursting with Ontario produce and the weather is just cool enough for me to be enthusiastic about standing over a pot of boiling water processing batches of preserves, pickles and canning fresh fruit.
The fact that, amid all the enthusiasm for urban homesteading, canning is having a huge comeback has been nothing but beneficial. It means that all those jars and lids that my mother and I used to have to scour the stores for are now ubiquitous to each of my local grocery and hardware stores.
It also means that, although I've made jam and preserves since I was a child, I'm by no means an expert and now, there's a ton of great information out there on the internet. Sites like Well Preserved and Food in Jars are great places to start. Some of my favourite recipes come from Yvonne Tremblay's book Prizewinning Preserves (also released as The Complete Idiot's Guide to Jams, Jellies and Preserves in the US - guess which name I like better?), in which she gives recipes that have won awards at the Royal Agricultural Fair. If you pick it up, try the pear, ginger and crème de cacoa jam. It's amazing.
I'm lucky that I grew up in a household where my mother canned fruit for winter every year (though she doesn't anymore, much to both my brother's and my chagrin). Going down to the basement and pulling out a mason jar of Ontario peaches on a wintry Sunday in the middle of February was always such a cause for excitement. They would make their way into some kind of dessert - crisp was always a favourite at our house - and for a few brief moments, we'd relive the flavours of summer.
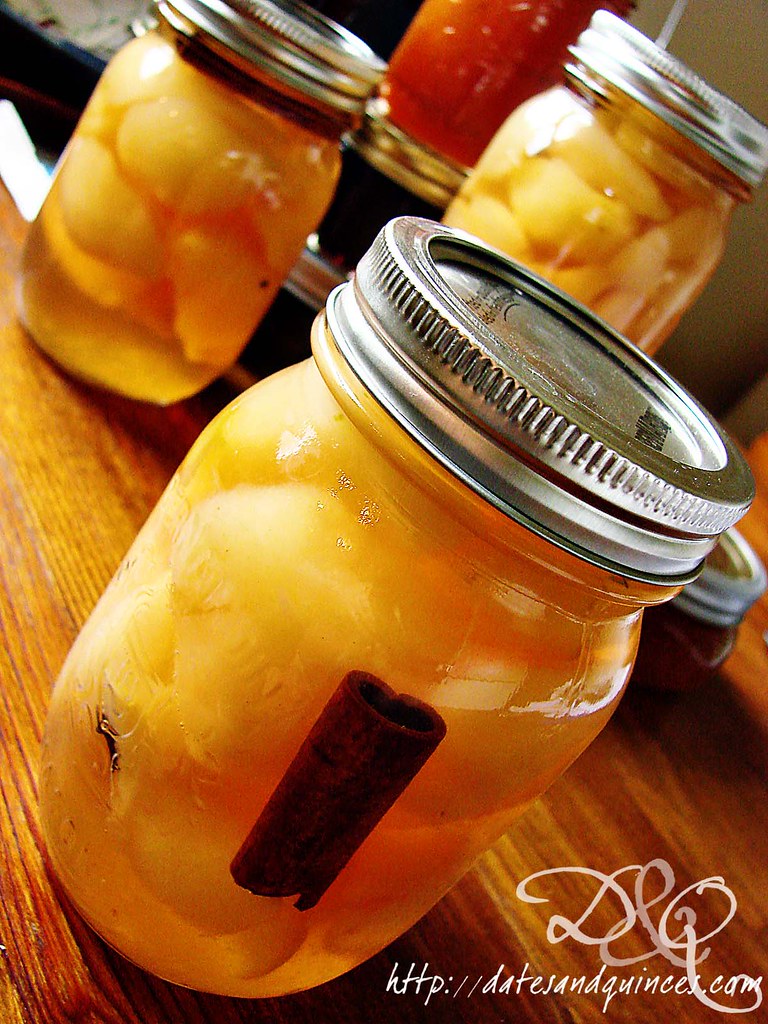
So, to kick off preserves week, I'm going to share a recipe for preserved pears. They're poached and then canned in a gorgeous Riesling and spice syrup. I used small sugar pears, but feel free to use larger ones as you see fit. Just don't make them too big, otherwise you might not get enough of them in your cans!
I can't wait to break into them one stormy January night.
For complete canning instructions and safety, please check out the USDA site or, for more basic instructions, check out Canadian Living's 101 guide.
Riesling Poached Spiced Pears
(from Canadian Living)
makes enough to fill 3 pint jars
Ingredients
4 lbs sugar pears
½ cup fresh lemon juice, divided
9 cups water, divided
3 cups granulated sugar
1½ cups Riesling (keep it in the family and pick up an Ontario wine!)
2 1" x 2" strips lemon rind
2 cinnamon sticks, broken in half
3 whole cloves
3 whole pods cardamon
Directions
1. Prep 3 pint sized mason jars according to canning technique listed above.
1. In a very large, non-reactive bowl, stir together ¼ cup lemon juice with 6 cups water. You'll use this bowl to put your peeled, cored pears into to prevent discoloration.
2. Peel and core pears, placing them in the lemon water. Try not to let the pears sit for more than 20 minutes in the water.
3. Meanwhile, in a large dutch oven over medium-high heat, stir together remaining 3 cups water and ¼ cup lemon juice with sugar and Riesling. Once sugar is dissolved, throw in lemon rind, cinnamon, cloves and cardamon. Bring to a boil, and set boil for 5 minutes. Drain pear halves and add to dutch oven. Return to boil and let cook for 5-15 minutes, cooking just until pears are tender. You don't want mushy ones, so keep an eye out.
4. Using a slotted spoon, remove pairs from pot and divide between the 3 prepped mason jars. Remove the lemon rind from the syrup and discard. Divide the cinnamon, cloves and cardamon evenly between the jars.
5. Return syrup to a boil, and boil hard for 10-15 minutes until syrup is reduced to 3 cups. Pour syrup over pears, leaving ½" of headspace between the liquid and the rim of the jar. Use a wet paper towel to remove and syrup on the rim. Failure to do so could result in an improper seal.
6. Seal and process in canner for 10 minutes. Remove, let cool and check that seals have popped. If any don't, place those jars in the fridge and use within a week.
The rest will keep a room temperature (though preferably in a coolish dark space) for a year.
Showing posts with label canadian living. Show all posts
Monday, August 22, 2011
Monday, July 25, 2011
Nectarine White Iced Tea
We're heading off to Salt Spring Island for my cousin's DIY island wedding on Thursday night, and I've finally, FINALLY, settled on the two recipes we'll be using for the iced tea and the lemonade. In one gigantic container, we'll be having some nectarine white iced tea, and in the other, some raspberry lemonade.
As I was making up the ingredient list, I realized we'd need 104 lemons.
That means 104 lemons need rolling, juicing and measuring to hopefully make 13 cups of fresh lemon juice. Yikes! Luckily, I should have some help in the kitchen... which is great, because although the recipes are kept to no more than 4 ingredients each (sugar, fruit, water, tea/lemons), there's steeping, straining, pureeing, etc.
Anyway, here's the recipe for Nectarine White Iced Tea. It's a Canadian Living recipe. They use peeled peaches, but I'm lazy and used unpeeled (but washed!) nectarines.
As I was making up the ingredient list, I realized we'd need 104 lemons.
That means 104 lemons need rolling, juicing and measuring to hopefully make 13 cups of fresh lemon juice. Yikes! Luckily, I should have some help in the kitchen... which is great, because although the recipes are kept to no more than 4 ingredients each (sugar, fruit, water, tea/lemons), there's steeping, straining, pureeing, etc.
Anyway, here's the recipe for Nectarine White Iced Tea. It's a Canadian Living recipe. They use peeled peaches, but I'm lazy and used unpeeled (but washed!) nectarines.
Main Ingredients:
canadian living,
drinks,
iced tea,
nectarine,
tea
Tuesday, July 12, 2011
Grilled Hanger Steak with My Favourite Marinade
One of the many, many things that I both love and hate about my local
(independent) grocery store is its selection of food. Sometimes, you'll
be overwhelmed with options, and sometimes, you'll go in for a flank
steak and be met with skirt and hanger steaks and nothing else.
This was the first time I've seen a hanger steak carried in our store, and I couldn't believe how inexpensive it was. If my reading of Bon Appetit is anything to go by, hanger steak has become really popular with chefs over the last few years for its depth of flavour. Its texture makes it a great steak to grill up for fajitas too.
I opted to marinate the steak before grilling it using my all time favourite marinade: a Pam Collacott recipe from way back in the day. This is both my mother's and my favourite recipe. Best of all, if you let the meat marinate overnight, you're practically guaranteed tenderness, regardless of the cut.
Pam Collacott's Budget Steak for a Bunch
(adapted from Canadian Living)
Ingredients
3 tbsp soy sauce
2 tbsp lemon juice
2 tbsp canola oil
1½ tbsp Worcestershire sauce
1 tbsp Dijon mustard
1 tbsp minced onion
1 small clove garlic, minced
½ tsp coarsely ground black pepper
¼ tsp dried thyme
1 lb steak (your choice of cut)
Directions
1. Whisk all ingredients except steak together in the bowl/bag you plan on marinating the meat in. Place meat into marinade, turning to coat. Let marinade in fridge for at least 4 hours, but preferably overnight.
2. Grill steak for 6 minutes, turning once for rare, about 8-9 minutes for medium and 12 for well done. Let rest for 5-10 minutes before cutting into thin slices.
In case you haven't seen hanger steak before, here's what the whole marinated and grilled looks like:
Deliciousness!
This was the first time I've seen a hanger steak carried in our store, and I couldn't believe how inexpensive it was. If my reading of Bon Appetit is anything to go by, hanger steak has become really popular with chefs over the last few years for its depth of flavour. Its texture makes it a great steak to grill up for fajitas too.
I opted to marinate the steak before grilling it using my all time favourite marinade: a Pam Collacott recipe from way back in the day. This is both my mother's and my favourite recipe. Best of all, if you let the meat marinate overnight, you're practically guaranteed tenderness, regardless of the cut.
Pam Collacott's Budget Steak for a Bunch
(adapted from Canadian Living)
Ingredients
3 tbsp soy sauce
2 tbsp lemon juice
2 tbsp canola oil
1½ tbsp Worcestershire sauce
1 tbsp Dijon mustard
1 tbsp minced onion
1 small clove garlic, minced
½ tsp coarsely ground black pepper
¼ tsp dried thyme
1 lb steak (your choice of cut)
Directions
1. Whisk all ingredients except steak together in the bowl/bag you plan on marinating the meat in. Place meat into marinade, turning to coat. Let marinade in fridge for at least 4 hours, but preferably overnight.
2. Grill steak for 6 minutes, turning once for rare, about 8-9 minutes for medium and 12 for well done. Let rest for 5-10 minutes before cutting into thin slices.
In case you haven't seen hanger steak before, here's what the whole marinated and grilled looks like:
Deliciousness!
Main Ingredients:
bbq,
beef,
canadian living,
dinner,
grilled,
hanger steak,
marinade,
soy sauce,
steak,
summer
Monday, July 11, 2011
Three Bean Salad with Corn and Red Peppers
Sometimes I think my mother and I are the only people on the planet who love bean salads. There's something so delightfully passé about them. I always associate them with the '80s... Does anyone else?
When I was in elementary school, we had several Canadian Living seasonal cooking magazines, and inevitably the summer ones had bean salads in them. Whenever the teachers had lunch & learn sessions at school, the library would be set up with tons of food with a mandatory gigantic bowl of bean salad. As a kid, I just assumed that they were making bean salads out of the Canadian Living magazines, because that was the logical assumption to make.
I'm all about the logic.
I'd lobby to bring back the bean salad into vogue. It's healthy, filling, fibre rich, and, when done right, colourful. Plus, it makes a quick and easy lunch to bring.
So, now, my go to bean salad recipe is based off a Canadian Living recipe: Red Barn Bean and Corn Salad. It serves 12 and keeps a decent amount of time in the fridge which especially important if you're, like me, not serving 12 people at once.
If you're alone in liking bean salads in your house, be prepared to be eating this for the better part of a week. It makes about 9 cups worth!
But, it's way better than those drenched salads from the supermarket, and you know you love it. So go ahead, grab a gigantic spoon and dig in.
Three Bean Salad with Corn and Red Peppers
(adapted from Canadian Living)
Ingredients
1 14oz can chickpeas, drained and rinsed
1 14oz can black beans, drained and rinsed
1 14oz can red kidney beans, drained and rinsed
½ cup finely chopped sweet onion
1 cup frozen corn, thawed
½ cup celery, chopped
1 red pepper, chopped
1 tbsp dried basil (you can use ¼ cup fresh, if you anticipate no leftovers)
¼ cup chopped fresh parsley
½ cup apple cider vinegar
3 tbsp olive oil
1 clove garlic, minced
1 tbsp Dijon mustard
1 tsp kosher salt
½ tsp freshly ground black pepper
Directions
1. Mix together first 9 ingredients, chickpeas through parsley in a large bowl. Toss well. In a measuring up, whisk together remaining ingredients. Pour over bean mixture, toss well and refrigerate for at least 1 hour to let flavours meld together.
How easy was that?
When I was in elementary school, we had several Canadian Living seasonal cooking magazines, and inevitably the summer ones had bean salads in them. Whenever the teachers had lunch & learn sessions at school, the library would be set up with tons of food with a mandatory gigantic bowl of bean salad. As a kid, I just assumed that they were making bean salads out of the Canadian Living magazines, because that was the logical assumption to make.
I'm all about the logic.
I'd lobby to bring back the bean salad into vogue. It's healthy, filling, fibre rich, and, when done right, colourful. Plus, it makes a quick and easy lunch to bring.
So, now, my go to bean salad recipe is based off a Canadian Living recipe: Red Barn Bean and Corn Salad. It serves 12 and keeps a decent amount of time in the fridge which especially important if you're, like me, not serving 12 people at once.
If you're alone in liking bean salads in your house, be prepared to be eating this for the better part of a week. It makes about 9 cups worth!
But, it's way better than those drenched salads from the supermarket, and you know you love it. So go ahead, grab a gigantic spoon and dig in.
Three Bean Salad with Corn and Red Peppers
(adapted from Canadian Living)
Ingredients
1 14oz can chickpeas, drained and rinsed
1 14oz can black beans, drained and rinsed
1 14oz can red kidney beans, drained and rinsed
½ cup finely chopped sweet onion
1 cup frozen corn, thawed
½ cup celery, chopped
1 red pepper, chopped
1 tbsp dried basil (you can use ¼ cup fresh, if you anticipate no leftovers)
¼ cup chopped fresh parsley
½ cup apple cider vinegar
3 tbsp olive oil
1 clove garlic, minced
1 tbsp Dijon mustard
1 tsp kosher salt
½ tsp freshly ground black pepper
Directions
1. Mix together first 9 ingredients, chickpeas through parsley in a large bowl. Toss well. In a measuring up, whisk together remaining ingredients. Pour over bean mixture, toss well and refrigerate for at least 1 hour to let flavours meld together.
How easy was that?
Saturday, April 30, 2011
Lemon-Almond Crunch Parfaits with Berries
This has been one of those weeks that feels like it just couldn't have ended soon enough! I haven't been online at all in the past few days - not even to respond to work emails. I'm swamped with after school clubs.
So, yes, I know I promised the appetizer recipe. But it's finally sunny out and I feel like celebrating with a dish that's bright and springy.
Whenever we have dessert with my parents and cousin, the dairy in the dessert recipes has to go, as my cousin has an allergy. Bring in, then, the edible oil product known as Cool Whip.
Let me be perfectly honest here: while under just about all circumstances, I would reject Cool Whip, this recipe was so good that, not only did I not mind about there being Cool Whip, I actually preferred it with it. It was lighter and brightly lemony.
Lemon-Almond Crunch Parfait with Berries
(adapted from Canadian Living)
Ingredients
Lemon Curd:
3 egg yolks 3 3egg yolkegg yolks
1 egg 1 1eggeggs
1/2 cup granulated sugar 1/2 1/2cup cup (125 mL) granulated sugar
1 tbsp granulated sugar 1 1tbsp tbspgranulated sugar
2 tsp finely grated lemon rind 2 2tsp (10 mL) finely grated lemon rind
1/2 cup lemon juice 1/2 1/2cup cupfresh (125 mL) lemon juice
1 pinch salt 1 1pinch pinchsalt
Almond Crunch:
1/4 cup all-purpose flour 1/4 1/4cup cupall-purpose flour
2 tbsp large-flake rolled oats 2 2tbsp tbsp(25 mL) large-flake rolled oats
1 tbsp packed brown sugar 1 1tbsp (15 mL) packed brown sugar
2 tbsp unsalted butter , cubed2 2tbsp tbsp(25 mL) unsalted butter, cubed
2 tbsp slivered almonds 2 2tbsp t (25 mL)slivered almonds
1. Almond Crunch: Preheat oven to 350º and line a baking sheet with parchment paper. In a large bowl, stir together flour, oats and brown sugar. Cut in butter until mixture is crumbly. Stir in almonds. Dump mixture onto baking sheet and bake for 12 minutes or until mixture is golden and crisp.
So, yes, I know I promised the appetizer recipe. But it's finally sunny out and I feel like celebrating with a dish that's bright and springy.
Whenever we have dessert with my parents and cousin, the dairy in the dessert recipes has to go, as my cousin has an allergy. Bring in, then, the edible oil product known as Cool Whip.
Let me be perfectly honest here: while under just about all circumstances, I would reject Cool Whip, this recipe was so good that, not only did I not mind about there being Cool Whip, I actually preferred it with it. It was lighter and brightly lemony.
Lemon-Almond Crunch Parfait with Berries
(adapted from Canadian Living)
Ingredients
3/4 3/4cup cupwhipping cream (or 1 tub light Cool Whip)
1 can (14 oz/398 mL) apricot halves in light syrup , drained and quartered1 pint raspberries, blackberries or a mixture of both, rinsed and thoroughly dried
Lemon Curd:
3 egg yolks 3 3egg yolkegg yolks
1 egg 1 1eggeggs
1/2 cup granulated sugar 1/2 1/2cup cup (125 mL) granulated sugar
1 tbsp granulated sugar 1 1tbsp tbspgranulated sugar
2 tsp finely grated lemon rind 2 2tsp (10 mL) finely grated lemon rind
1/2 cup lemon juice 1/2 1/2cup cupfresh (125 mL) lemon juice
1 pinch salt 1 1pinch pinchsalt
Almond Crunch:
1/4 cup all-purpose flour 1/4 1/4cup cupall-purpose flour
2 tbsp large-flake rolled oats 2 2tbsp tbsp(25 mL) large-flake rolled oats
1 tbsp packed brown sugar 1 1tbsp (15 mL) packed brown sugar
2 tbsp unsalted butter , cubed2 2tbsp tbsp(25 mL) unsalted butter, cubed
2 tbsp slivered almonds 2 2tbsp t (25 mL)slivered almonds
Directions
1. Almond Crunch: Preheat oven to 350º and line a baking sheet with parchment paper. In a large bowl, stir together flour, oats and brown sugar. Cut in butter until mixture is crumbly. Stir in almonds. Dump mixture onto baking sheet and bake for 12 minutes or until mixture is golden and crisp.
Do keep a close eye on it, because it will go from gorgeously brown to disastrously black in an instant.
2. Lemon Curd: In a heat proof bowl (you're going to be making a double boiler here, so choose your bowl appropriately), whisk together all lemon curd ingredients. Place over saucepan of simmering water and cook, whisking frequently, until mixture is thick enough to coat the back of a spoon. If you have an instant read thermometer, it should read 160ºF. Remove from heat and strain mixture through a fine mesh sieve into a clean bowl. Cover with plastic wrap, being sure to press wrap directly onto the surface of the curd. This will prevent a thick skin from forming.
3. To Assemble: Stir half the curd to break up. Mix in half the tub of Cool Whip. Stir to thoroughly incorporate. Gently fold in remaining half of the tub (alternatively, whip the cream and divide in half and proceed according to above directions).
Divide berries between 8 serving glasses. Top with lemon mixtures. Sprinkle with almond mixture. Serve with long handled spoons!
Monday, April 18, 2011
Hot Cross Buns
The first year we were living in Toronto, the Cobs bakery chain left about 10 coupons for free Hot Cross Buns in the mail boxes of our and our neighbours' mail boxes. Luckily for my husband and I, our neighbours kept throwing their coupons into the recycle bin by the boxes.
So we probably ate 7-8 free Hot Cross buns that year. It was fantastic. I love free food!
Now, as sad as I am that there haven't been coupons for the past couple of years, I have to admit, while Cobs' buns are good, they're not the best I've ever had.
Homemade is always better - especially because it'll fill your home with the sweet smell of cinnamon.
My version has no candied peel in it, but a combination of currants and sultanas along with the zest of an orange and lemon.
Hot Cross Buns
(adapted from Canadian Living and Martha Stewart)
Ingredients
Dough
3-1/2 cups all purpo½ 1/2cup cupgranulated sugar
1/4 cup warm water ¼ 1/4cup cupwarm water
1 pkg (15ml) active dry yeast 2¼ tsp pkg (15ml)active dry yeast (one package)
2 tbsp 2 2tbsp tbspcinnamon
1 tsp nutmeg 1 1tsp tspnutmeg
1/2 tsp salt ½ 1/2tsp (2 mL) salt
1/4 tsp ground cloves ¼ 1/4tsp tsp(1 mL) ground cloves
3/4 cup milk , warmed3/4 3/4cup (175 mL) milk, warmed
1/4 cup melted butter ¼ 1/4cupc (50 mL) melted butter
1 egg 1 1eggeggs
1 egg yolk 1 1egg yolkegg yolks
zest of one large orange
zest of one large lemon
3½ 3-1/2cups (875 mL) all purpose flour
1/2 cup dried currants ¼ 1/2cup eachcup (125 mL) dried currants and sultanas
1/4 cup chopped candied pe
Glaze
2 tbsp granulated sugar 2 2tbsp (25 mL) granulated sugar
2 tbsp water 2 2tbsp tbspwater
Icing
1/2 cup icing sugar ½ 1/2cup (125 mL) icing sugar
2 tsp water ½ - 1 tbsp fresh (10 mL) lemon juice
Directions
1. Mix 1 tbsp sugar, warm water and yeast in the bowl of a stand mixer. Let stand for 5 minutes, until yeast proofs. Using the dough hook, stir in remaining sugar with next 10 ingredients (through lemon zest).
2. Add flour, one cup at a time until a soft dough is formed. Add currants and sultanas and beat for about a minute. Remove dough from bowl and knead just to evenly distribute the fruit. Place in a greased bowl, tossing to grease all over. Cover with a tea towel and set aside in a warm, draft free location to rise until doubled in bulk, about an hour.
3. Divide dough into 10 equal sections. Form each into a smooth tight ball, stretching and pinching dough underneath to make tops smooth. Place 2 inches apart on a parchment lined baking sheet. Cover with tea towel and let rise again for about 30 minutes. Meanwhile, preheat oven to 400º.
4. Using a serrated knife or a pair of scissors, slice a cross into the top of each bun. Bake in oven for approximately 15 minutes or until golden brown.
5. Meanwhile, whisk glaze ingredients together in a small saucepan, stirring until the sugar dissolves. Immediately after removing buns from oven, brush them with glaze. Let them cool on the pan.
6. Stir together icing ingredients until smooth and pipe a cross on top of each cooled bun. If you don't have a piping bag, don't stress. Just fill a plastic sandwich bag with icing and cut off a small portion of one corner and then pipe out the icing.
Enjoy licking the sticky sweetness off your fingers!
So we probably ate 7-8 free Hot Cross buns that year. It was fantastic. I love free food!
Now, as sad as I am that there haven't been coupons for the past couple of years, I have to admit, while Cobs' buns are good, they're not the best I've ever had.
Homemade is always better - especially because it'll fill your home with the sweet smell of cinnamon.
My version has no candied peel in it, but a combination of currants and sultanas along with the zest of an orange and lemon.
Hot Cross Buns
(adapted from Canadian Living and Martha Stewart)
Ingredients
Dough
3-1/2 cups all purpo½ 1/2cup cupgranulated sugar
1/4 cup warm water ¼ 1/4cup cupwarm water
1 pkg (15ml) active dry yeast 2¼ tsp pkg (15ml)active dry yeast (one package)
2 tbsp 2 2tbsp tbspcinnamon
1 tsp nutmeg 1 1tsp tspnutmeg
1/2 tsp salt ½ 1/2tsp (2 mL) salt
1/4 tsp ground cloves ¼ 1/4tsp tsp(1 mL) ground cloves
3/4 cup milk , warmed3/4 3/4cup (175 mL) milk, warmed
1/4 cup melted butter ¼ 1/4cupc (50 mL) melted butter
1 egg 1 1eggeggs
1 egg yolk 1 1egg yolkegg yolks
zest of one large orange
zest of one large lemon
3½ 3-1/2cups (875 mL) all purpose flour
1/2 cup dried currants ¼ 1/2cup eachcup (125 mL) dried currants and sultanas
1/4 cup chopped candied pe
Glaze
2 tbsp granulated sugar 2 2tbsp (25 mL) granulated sugar
2 tbsp water 2 2tbsp tbspwater
Icing
1/2 cup icing sugar ½ 1/2cup (125 mL) icing sugar
2 tsp water ½ - 1 tbsp fresh (10 mL) lemon juice
Directions
1. Mix 1 tbsp sugar, warm water and yeast in the bowl of a stand mixer. Let stand for 5 minutes, until yeast proofs. Using the dough hook, stir in remaining sugar with next 10 ingredients (through lemon zest).
2. Add flour, one cup at a time until a soft dough is formed. Add currants and sultanas and beat for about a minute. Remove dough from bowl and knead just to evenly distribute the fruit. Place in a greased bowl, tossing to grease all over. Cover with a tea towel and set aside in a warm, draft free location to rise until doubled in bulk, about an hour.
3. Divide dough into 10 equal sections. Form each into a smooth tight ball, stretching and pinching dough underneath to make tops smooth. Place 2 inches apart on a parchment lined baking sheet. Cover with tea towel and let rise again for about 30 minutes. Meanwhile, preheat oven to 400º.
4. Using a serrated knife or a pair of scissors, slice a cross into the top of each bun. Bake in oven for approximately 15 minutes or until golden brown.
5. Meanwhile, whisk glaze ingredients together in a small saucepan, stirring until the sugar dissolves. Immediately after removing buns from oven, brush them with glaze. Let them cool on the pan.
![]() |
| The glaze gives the buns a lovely sheen. |
Enjoy licking the sticky sweetness off your fingers!
Wednesday, December 22, 2010
Coming home to your Mum's cooking
I guess I was technically coming home to MY mum's cooking.
On Sunday, I made the trip up to Ottawa from the comfort of Via 1 (that's first class, baby!). One of the things I love most about this trip is that you get to travel through Ontario's backyard.
And, by that I mean you get to see small town Ontario from the backs of people's houses. The less public side.
Best of all, the snow was just beginning to fall in gentle flakes. Yes, it was beginning to feel a lot like Christmas!
Once I got home, Mum had whipped up some amazing food! Her famous Raspberry Spinach Salad with Candied Almonds and Poppy Seed Dressing:
And her doubly famous Pavlova. If you're a meringue lover and haven't had pavlova, you haven't lived.
Mum's Pavolva
(Source: Joy of Baking/Best of Bridge)
On Sunday, I made the trip up to Ottawa from the comfort of Via 1 (that's first class, baby!). One of the things I love most about this trip is that you get to travel through Ontario's backyard.
And, by that I mean you get to see small town Ontario from the backs of people's houses. The less public side.
| Sitting inside Union Station |
Once I got home, Mum had whipped up some amazing food! Her famous Raspberry Spinach Salad with Candied Almonds and Poppy Seed Dressing:
| Taste Explosion! |
| Berries! Meringue! Cream! Yay! |
Mum's Pavolva
(Source: Joy of Baking/Best of Bridge)
Pavlova:
4 large (120 grams) egg whites
1 cup (200 grams) superfine (castor) sugar
1 teaspoon white vinegar
1/2 tablespoon cornstarch (corn flour)
Topping:
1 cup (240 ml) heavy whipping cream
1 1/2 tablespoons (20 grams) granulated white sugar
1/2 teaspoon pure vanilla extract
Fresh fruit - kiwi, strawberries, raspberries, blackberries, passion fruit, peaches, pineapple, or other fruit of your choice
Directions
Preheat oven to 250 degrees F (130 degrees C) and place rack in center of oven. Line a baking sheet with parchment paper and draw a 7 inch (18 cm) circle on the paper.
In the bowl of your electric mixer, with the whisk attachment, beat the egg whites on medium-high speed until they hold soft peaks. Start adding the sugar, a tablespoon at a time, and continue to beat until the meringue holds very stiff peaks. (Test to see if the sugar is fully dissolved by rubbing a little of the meringue between your thumb and index finger. The meringue should feel smooth, not gritty. If it feels gritty the sugar has not fully dissolved so keep beating until it feels smooth between your fingers). Sprinkle the vinegar and cornstarch over the top of the meringue and, with a rubber spatula, fold in.
Gently spread the meringue inside the circle drawn on the parchment paper, smoothing the edges, making sure the edges of the meringue are slightly higher than the center. (You want a slight well in the center of the meringue to place the whipped cream and fruit.)
Bake for 1 hour 15 minutes or until the outside is dry and takes on a very pale cream color. Turn the oven off, leave the door slightly ajar, and let the meringue cool completely in the oven. (The outside of the meringue will feel firm to the touch, if gently pressed, but as it cools you will get a little cracking and you will see that the inside is soft and marshmallowy.)
The cooled meringue can be made and stored in a cool dry place, in an airtight container, for a few days.
Just before serving gently place the meringue onto a serving plate. Whip the cream in your electric mixer, with the whisk attachment, until soft peaks form. Sweeten with the sugar and vanilla and then mound the softly whipped cream into the center of the meringue. Arrange the fruit randomly, or in a decorative pattern, on top of the cream. Serve immediately as this dessert does not hold for more than a few hours. (I actually disagree with this - the slight softness the meringue gets is totally tasty. I'm totally happy eating leftovers the next day!)
Serves 6 to 8.
Thursday, December 02, 2010
Christmas in the air!
Can anyone else feel it? We have lights up down a few of my school's hallways. I'm drinking mint tea and wearing long cardigans. The kids keep saying that the new versions of the national anthem that we've been playing all sound like Christmas carols.
I'm really excited about this weekend for a few reasons:
Spiced Chocolate Shortbread Pyramids
(Canadian Living)
Ingredients
6oz oz(170 g) bittersweet chocolate, chopped
1-1/2 (7 mL) vanilla
2-1/4 (550 mL) all-purpose flour
1/4 (50 mL) cornstarch
1 tsp (5 mL) cinnamon
1/2tsp (2 mL) pepper
1/2tsp (2 mL) ancho chili pepper
1/4 (1 mL) salt
Topping:
2 2oz oz(57 g) (57 g) bittersweet chocolate, melted
Preparation:
In heatproof bowl over saucepan of hot (not boiling) water, melt chocolate, stirring occasionally. Remove from heat; let cool.
In bowl, beat butter until fluffy; beat in chocolate until smooth. Beat in sugar and vanilla. In separate bowl, whisk together flour, cornstarch, cinnamon, pepper, ancho chili pepper and salt ; stir into chocolate mixture
On parchment paper, shape half of the dough into 10-inch (25 cm) log. Repeat for second log. Wrap and flatten to create triangular logs. Refrigerate until firm, about 2 hours, reshaping logs if necessary. (Make-ahead: Freeze in airtight container up to 3 weeks.)
Cut logs into generous 1/4-inch (5 mm) thick slices. Arrange, 1 inch (2.5 cm) apart, on parchment paper–lined baking sheets. (If dough softens, freeze for 15 minutes.)
Bake in 325°F (160°C) oven until firm, about 20 minutes. Let cool on pans on racks for 2 minutes. Transfer to racks; let cool completely.
Topping: Using piping bag or fork, drizzle cookies with chocolate; refrigerate until set, about 30 minutes.
Picture to come later today!
I'm really excited about this weekend for a few reasons:
- my parents are coming to town
- the Distillery District Christmas Market
- A Ross Petty pantomime (I haven't seen one live since 1991 - it's got Scott Thompson of Kids in the Hall fame in drag)
Spiced Chocolate Shortbread Pyramids
(Canadian Living)
Ingredients
6oz oz(170 g) bittersweet chocolate, chopped
1 cup (250 mL) butter, softened
1/4cup (50 mL) granulated sugar1-1/2 (7 mL) vanilla
2-1/4 (550 mL) all-purpose flour
1/4 (50 mL) cornstarch
1 tsp (5 mL) cinnamon
1/2tsp (2 mL) pepper
1/2tsp (2 mL) ancho chili pepper
1/4 (1 mL) salt
Topping:
2 2oz oz(57 g) (57 g) bittersweet chocolate, melted
Preparation:
In heatproof bowl over saucepan of hot (not boiling) water, melt chocolate, stirring occasionally. Remove from heat; let cool.
In bowl, beat butter until fluffy; beat in chocolate until smooth. Beat in sugar and vanilla. In separate bowl, whisk together flour, cornstarch, cinnamon, pepper, ancho chili pepper and salt ; stir into chocolate mixture
On parchment paper, shape half of the dough into 10-inch (25 cm) log. Repeat for second log. Wrap and flatten to create triangular logs. Refrigerate until firm, about 2 hours, reshaping logs if necessary. (Make-ahead: Freeze in airtight container up to 3 weeks.)
Cut logs into generous 1/4-inch (5 mm) thick slices. Arrange, 1 inch (2.5 cm) apart, on parchment paper–lined baking sheets. (If dough softens, freeze for 15 minutes.)
Bake in 325°F (160°C) oven until firm, about 20 minutes. Let cool on pans on racks for 2 minutes. Transfer to racks; let cool completely.
Topping: Using piping bag or fork, drizzle cookies with chocolate; refrigerate until set, about 30 minutes.
Picture to come later today!
Monday, November 29, 2010
Sponge Toffee
When I was younger, I went to a lovely church in Ottawa that had the best annual Bazaar on the planet. On the candy and sweets table, there would always be bags huge hunks of sponge toffee on sale for 50 cents. I would inevitably buy several and gorge myself on the burnt sugary goodness.
You know what I mean by sponge toffee, right?
If not, you definitely know it as the sweet honeycomb filling of a Crunchie Bar.
The real question is did you know how insanely easy it is to make it yourself?
No?
Well, it's insanely easy. You do need a thermometer for this, but I promise you, it's money well spent.
Canadian Living's Sponge Toffee
Bring to boil; cook, without stirring but brushing down side of pan occasionally with pastry brush dipped in cold water, until candy thermometer reaches hard-crack stage of 300°F (149°C), or when 1 tsp (5 mL) hot syrup dropped into cold water forms hard brittle threads, about 10 minutes.
Remove from heat. Standing back and averting face, whisk in baking soda. (Caramel will bubble and sputter and increase in volume.) Whisk in vanilla.
Or, if you only have a little chocolate, do a half dunk.
You know what I mean by sponge toffee, right?
If not, you definitely know it as the sweet honeycomb filling of a Crunchie Bar.
The real question is did you know how insanely easy it is to make it yourself?
No?
Well, it's insanely easy. You do need a thermometer for this, but I promise you, it's money well spent.
Canadian Living's Sponge Toffee
Ingredients
- 2-1/2 2-1/2cups cups(625 mL) (625 mL) granulated sugar
2/3 2/3cup cup(150 mL) (150 mL) white corn syrup
1/3 1/3cup cup(75 mL) (75 mL) water
4 4tsp tsp(18 mL) (18 mL) baking soda
2 2tsp tsp(10 mL) (10 mL) vanilla
Preparation:
In 12-cup (3 L) saucepan, stir together sugar, corn syrup and water over medium heat just until sugar dissolves.
Bring to boil; cook, without stirring but brushing down side of pan occasionally with pastry brush dipped in cold water, until candy thermometer reaches hard-crack stage of 300°F (149°C), or when 1 tsp (5 mL) hot syrup dropped into cold water forms hard brittle threads, about 10 minutes.
Remove from heat. Standing back and averting face, whisk in baking soda. (Caramel will bubble and sputter and increase in volume.) Whisk in vanilla.
![]() |
| This is why you need a very large pot! |
Pour into greased foil-lined 13- x 9-inch (3.5 L) metal cake pan. Let cool in pan on rack without disturbing, about 2 hours. Break into 1-1/2-inch (4 cm) pieces. (Make-ahead: Store layered between waxed paper in airtight container for up to 1 month.)
Now you could just stop there, but like most candies, this one really benefits from a good dunking in tempered chocolate (another occasion to use your thermometer!). Tempered chocolate is chocolate that has been melted, cooled and reheated to specific temperatures. By going through this process, when the chocolate cools it develops that crisp snap that we associate with chocolate bars.
Or, if you only have a little chocolate, do a half dunk.
The recipe makes 48 pieces (or so), but really that depends on how you break them up. However many you make, do try to restrain yourself from eating them all!
Wednesday, November 24, 2010
Marroni al Liquore
I wish I had better pictures of this, but frankly, the liqueur is sitting in my cupboard in a glass container. It's not exactly photogenic. But, once it has finished curing on December 5th, I'll be sure to post a few shots.
The Korean chestnuts turned out to be a bit of a dud. I just couldn't get them to peel correctly. They were too moist, really.
![]() |
| Italian Chestnut (left) and a Korean Chestnut (right) |
![]() |
| Peeling an Italian Chestnut |
Right now, I can tell you that I'm loving the vanilla beans suspended in the liquid! Pure heaven, I tells you.
![]() |
| Liquid Gold! |
I should warn you, this isn't a full strength liqueur - you do simmer the brandy with the spices for 1 minute.
Marroni al Liquore
(Canadian Living)
Ingredients
1-1/2 1-1/2cups cups(375 mL) (375 mL) granulated sugar
1 1cup cup(250 mL) (250 mL) water
4 4whole allspice
2 2clovecloves
2 2bay leafbay leaves
2-1/2 2-1/2cups cups(625 mL) (625 mL) prepared chestnuts
1 1bottle bottlebrandy (750 mls)
Preparation:
In wide saucepan, bring sugar, water, allspice, cloves, bay leaves and vanilla bean to boil over medium-high heat, stirring occasionally, until sugar is dissolved. Stir in chestnuts; reduce heat, cover and simmer for 30 minutes.Stir in brandy and bring to boil; reduce heat and simmer for 1 minute. Skim off any foam. Discard allspice, cloves, bay leaves and vanilla bean. Using slotted spoon, divide chestnuts among six 1-cup (250 mL) canning jars. Pour syrup over top. Seal jars with lids; let stand in cool dark place for 2 weeks before using. (Make-ahead: Store for up to 2 months.)
Friday, November 12, 2010
Mystery Revealed!
Remember that post I did this week with the apples and berries? Wanna see how that turned out?
I thought so.
See, I have an obsession. I love candy. Chocolate. Jujubes. Wine Gums. Fruit Pastilles.
Coarsely chop apples, including peels and cores but discarding seeds. In saucepan, cook apples, berries and water over medium heat, until apples are very soft, about 20 minutes.
In processor, purée apple mixture until almost smooth. Press through fine sieve to make 2 cups (500 mL) purée.
In clean saucepan, bring purée with sugar to boil over medium heat; boil, stirring often, until candy thermometer reaches gel point stage of 218°F (103°C), or when spoonful cooled on cold plate wrinkles and does not run together when separated with finger, 20 to 30 minutes.
Remove from heat. Immediately whisk in pectin. Pour into prepared pan. Let stand at room temperature, without disturbing, until set, 18 to 24 hours.
Turn out onto parchment paper–lined cutting board. Using greased sharp knife, trim edges to straighten. Cut into 42 cubes, cleaning and greasing knife after each cut.
I thought so.
Did someone say fruit pastilles? Homemade fruit pastilles?
![]() |
| Let the angels sing! |
Why, yes! Yes, they did.
Yep, it took 4 days to complete the recipe, but that's only because the pastilles had to dry out on the counter for most of that time.
They're delicious! Bursting with fruity goodness and waaaaaaay better than any packaged fruit pastilles... except maybe M&S ones. I do love those.
Berry Gelées (Canadian Living)
Ingredients
- 2 2large Granny Smith appleGranny Smith apples, (12 oz/375 g)
- 3 3cups cups(750 mL) (750 mL) frozen mixed berries
- 1/2 1/2cup cup(125 mL) (125 mL) water
- 2 2cups cups(500 mL) (500 mL) granulated sugar
- 1 1pouch pouch(85 g) liquid pectin
- Topping: 1/3 1/3cup cup(75 mL) (75 mL) granulated sugar
Preparation:
Line bottom and sides of 8-inch (2 L) square metal cake pan with parchment paper; set aside.Coarsely chop apples, including peels and cores but discarding seeds. In saucepan, cook apples, berries and water over medium heat, until apples are very soft, about 20 minutes.
In processor, purée apple mixture until almost smooth. Press through fine sieve to make 2 cups (500 mL) purée.
In clean saucepan, bring purée with sugar to boil over medium heat; boil, stirring often, until candy thermometer reaches gel point stage of 218°F (103°C), or when spoonful cooled on cold plate wrinkles and does not run together when separated with finger, 20 to 30 minutes.
Remove from heat. Immediately whisk in pectin. Pour into prepared pan. Let stand at room temperature, without disturbing, until set, 18 to 24 hours.
Turn out onto parchment paper–lined cutting board. Using greased sharp knife, trim edges to straighten. Cut into 42 cubes, cleaning and greasing knife after each cut.
![]() |
| All ready to sit and dry out! |
Topping: Place sugar in dish. Coat jellies in sugar. Let dry on rack for 3 days. (Make ahead: Store layered between waxed paper in airtight container for up to 2 weeks.)
Main Ingredients:
canadian living,
candy,
fruit pastilles,
gelees,
jellies,
vegan
Subscribe to:
Posts (Atom)


