The weather in Toronto has been ridiculously gorgeous this week. Just ridiculous. I walked around downtown in jeans, a t-shirt and flip flops today. I used to be able to bet that we'd always get one huge snowstorm in March. But over the past 3-4 years, that hasn't happened.
The influx of spring leaves me wanting lighter, brighter flavours. I want to gently poke my head out from beneath the culinary blanket of braised, rib sticking food. Emphasis on the gently. There's nothing pleasant about a rude awakening.
So, while revisiting an old Martha Stewart magazine in search of recipes for Easter (my parents and brother are staying with us this year!), I stumbled across a recipe for chard, sausage and lemon lasagne. It hit the right notes for me - bechemel sauce for comfort, lemons for brightness, tons of chard for veggie infused goodness (and seasonality - the chard at the shops are gorgeous right now) and sausage for that awesome hit of porky goodness.
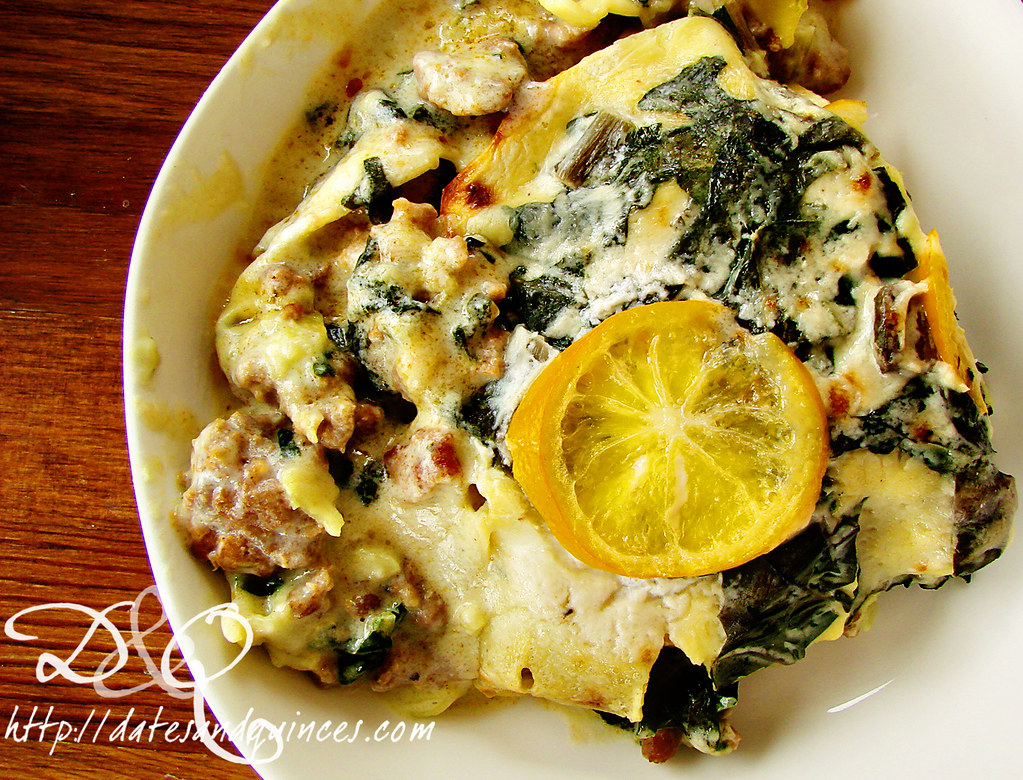
And, it came together and cooked in under an hour to boot. Rock on, Martha. For the record, I used Meyer lemons because that's what I had on hand. The original recipe calls for regular ones, but the advantage to the Meyers is you get a slightly different aroma and their skin is thinner, so they incorporate better.
Swiss Chard & Sausage Lasange with Meyer Lemons.
(from Martha Stewart Living)
Ingredients
2 tbsp butter
¼ cup flour
3 cups milk
1 cup finely grated Parmesan cheese
kosher salt and coarsely ground pepper
1 bunch chopped Swiss chard
1 lb sweet Italian sausages, casings removed
1 lemon, sliced paper thin
6 no boil lasagne noodles.
Directions
1. Melt butter in saucepan. Stir in flour and cook for two minutes. Gradually, whisk in milk and bring to a boil. Boil for one minute, stirring constantly. Remove from heat and stir in 3/4 cup of the Parmesan cheese, and season mixture with salt and pepper. Stir in the chard and set aside.
2. In a small saucepan cover lemon slices with several inches of water. Bring to a boil, reduce heat and simmer for 7 minutes. When finished, gently remove slices from pot with a slotted spoon and let drain on paper towel. Meanwhile, in a large skillet, cook Italian sausage, breaking up pieces with a wooden spoon as they cook.
3. Preheat oven to 350º.
4. To assemble lasagne, ladle ¼ cup of the sauce into the bottom of an 8"x8" baking dish. Top with two lasagne noodles. Layer 1 cup sauce and ½ the sausage mixture on top. Repeat with another layer of noodles, sauce and the rest of the sausage. Before adding the last two lasange noodles, top sausage with half of the lemon slices. Top with lasagne noodles, the rest of the sauce and the remaining lemon slices.
5. Cover pan with foil and bake for 30 minutes. Remove foil, sprinkle remaining Parmesan on top of lasagne and broil for 2-3 minutes, or until top is golden and bubbly. Remove from oven and let sit for 5 minutes before serving.
Showing posts with label quick dinner. Show all posts
Thursday, March 15, 2012
Saturday, June 04, 2011
A Smoky Chopped Salad for a Hot Day
Last week, the temperature in Toronto hit a brutal 40º C with the humidex.
Let me be clear on one thing: I am not one of those Canadians who sits around dreaming of the scorching summer sun. I like the heat; I hate the humidity.
Perhaps it's the fact that we have no outdoor space in our apartment (which means all cooking gets done inside), perhaps it's the lack of central air to cool ourselves off at night, perhaps it's the memory of the smell of the summer when the garbage collectors went on strike. Whatever the reason, I really, really dislike Toronto when the heat and humidity hits.
This is one of those recipes designed to embrace the flavour of the heat and humidity, but to avoid heating too much up in the kitchen.
The whole thing comes together really quickly, and you can keep any extra salad dressing in the fridge for 3 days.
Chicken & Chickpea Salad with Smoked Paprika Dressing
Ingredients
Dressing
2 tbsp apple cider vinegar
1 smashed clove garlic
1 tbsp olive oil
½ tsp kosher salt
¼ tsp freshly ground black pepper
½ tsp smoked paprika
½ tsp ancho chili powder
Salad
2 romaine hearts, washed, dried and chopped
2 cup mixed sprouts (pea, sunflower, radish, etc)
½ lb grilled boneless, skinless chicken thighs
½ 19 oz can chickpeas, rinsed
2 slices bacon, cooked and crumbled
2 oz blue cheese, crumbled
½ pint cherry tomatoes, halved
½ avocado, chopped
5-6 cremini mushrooms, sliced
optional: pickled jalapenos or green beans (I love Toorshi Hot and Savoury Green Beans)
Directions
1. Whisk together all dressing ingredients. Set aside and let sit for an hour so the garlic can infuse the dressing.
2. Toss together salad ingredients. Discard garlic clove and dress the salad. Serve on chilled plates.
That was dead easy, wasn't it?
Let me be clear on one thing: I am not one of those Canadians who sits around dreaming of the scorching summer sun. I like the heat; I hate the humidity.
Perhaps it's the fact that we have no outdoor space in our apartment (which means all cooking gets done inside), perhaps it's the lack of central air to cool ourselves off at night, perhaps it's the memory of the smell of the summer when the garbage collectors went on strike. Whatever the reason, I really, really dislike Toronto when the heat and humidity hits.
This is one of those recipes designed to embrace the flavour of the heat and humidity, but to avoid heating too much up in the kitchen.
The whole thing comes together really quickly, and you can keep any extra salad dressing in the fridge for 3 days.
Chicken & Chickpea Salad with Smoked Paprika Dressing
Ingredients
Dressing
2 tbsp apple cider vinegar
1 smashed clove garlic
1 tbsp olive oil
½ tsp kosher salt
¼ tsp freshly ground black pepper
½ tsp smoked paprika
½ tsp ancho chili powder
Salad
2 romaine hearts, washed, dried and chopped
2 cup mixed sprouts (pea, sunflower, radish, etc)
½ lb grilled boneless, skinless chicken thighs
½ 19 oz can chickpeas, rinsed
2 slices bacon, cooked and crumbled
2 oz blue cheese, crumbled
½ pint cherry tomatoes, halved
½ avocado, chopped
5-6 cremini mushrooms, sliced
optional: pickled jalapenos or green beans (I love Toorshi Hot and Savoury Green Beans)
Directions
1. Whisk together all dressing ingredients. Set aside and let sit for an hour so the garlic can infuse the dressing.
2. Toss together salad ingredients. Discard garlic clove and dress the salad. Serve on chilled plates.
That was dead easy, wasn't it?
Tuesday, March 22, 2011
Super Moist Turkey Burgers
This is a recipe born out of laziness and a desire for burgers ASAP. Sometimes, when you've got something in mind, nothing else will do.
I wanted turkey burgers, and I wanted them now. Beyond that, I wanted a hit of solid, bright flavour and a moist, juicy burger. Enter one of the simplest recipes I have made in a loooong time.
Secret ingredient? Because, when it comes to burgers, there often is.
Baba Ghanoush in the burger mix.
If you're thinking to yourself: huh, it looks like that burger has got a bite taken out of it, you'd be wrong.
There are three bites taken out of it. See?
Which should really tell you how hungry I was. Let me assure you, though, my love of these burgers doesn't stem from my hunger. These are really, really good.
Turkey Burgers with Baba Ghanoush
Ingredients
1 lb ground turkey
¼ cup baba ghanoush
2 tbsp chopped parsley
1 tbsp soy sauce
¼ tsp marmite (totally optional - use Worcestershire sauce in its place)
4 burger buns
lettuce
additional baba ghanoush
avocado slices
alfalfa or onion sprouts
Directions
1. Gently mix together turkey with next four ingredients (until marmite). Form into 4 patties with a quarter sized dent in the middle (this will prevent the burgers from bulging in the middle while cooking up) and place on a plate. Cover with plastic wrap and let chill in the fridge for 30 minutes or so. Because there's no real binder in these burgers, you have to handle them carefully, so letting them firm up in the fridge is an important step.
2. Heat a grill pan covered with cooking spray over medium heat. Cook burgers in pan, about 7-8 minutes per side.
Serve on buns with toppings of your choice! Some tomato or roasted garlic hummus would be great with these as well.
I wanted turkey burgers, and I wanted them now. Beyond that, I wanted a hit of solid, bright flavour and a moist, juicy burger. Enter one of the simplest recipes I have made in a loooong time.
Secret ingredient? Because, when it comes to burgers, there often is.
Baba Ghanoush in the burger mix.
If you're thinking to yourself: huh, it looks like that burger has got a bite taken out of it, you'd be wrong.
There are three bites taken out of it. See?
Which should really tell you how hungry I was. Let me assure you, though, my love of these burgers doesn't stem from my hunger. These are really, really good.
Turkey Burgers with Baba Ghanoush
Ingredients
1 lb ground turkey
¼ cup baba ghanoush
2 tbsp chopped parsley
1 tbsp soy sauce
¼ tsp marmite (totally optional - use Worcestershire sauce in its place)
4 burger buns
lettuce
additional baba ghanoush
avocado slices
alfalfa or onion sprouts
Directions
1. Gently mix together turkey with next four ingredients (until marmite). Form into 4 patties with a quarter sized dent in the middle (this will prevent the burgers from bulging in the middle while cooking up) and place on a plate. Cover with plastic wrap and let chill in the fridge for 30 minutes or so. Because there's no real binder in these burgers, you have to handle them carefully, so letting them firm up in the fridge is an important step.
2. Heat a grill pan covered with cooking spray over medium heat. Cook burgers in pan, about 7-8 minutes per side.
Serve on buns with toppings of your choice! Some tomato or roasted garlic hummus would be great with these as well.
Friday, March 18, 2011
Jerusalem Artichoke and Sausage Simmer with Lemons and Fennel
As we edge closer into spring, the season for Jerusalem artichokes (remember, also known as sunchokes) is drawing to a close. I really adore these knobbly little tubers. I love their texture, but mostly I love their artichoke-like flavour.
When cooking them, I like to leave their skin on (just scrub it a lot). They tend to fall apart if you don't.
Oh, and please keep in mind my earlier warning about gas. I don't want to turn you off these tasty babies, but they're definitely not for a romantic evening for two.
Jerusalem Artichoke and Sausage Simmer with Lemons and Fennel
(adapted from Nigel Slater - it's his week this week)
Ingredients
1 tbsp olive oil
4 good quality, herbal pork sausages
1 onion, peeled and cut into eighths (you want nice big hunks)
1 clove garlic, peeled and thinly sliced
½ lemon, cut lengthwise into 6-8 pieces
6-10 button mushrooms, halved
2/3 lb Jerusalem artichokes, scrubbed and cut in half
2 cups chicken stock or water (approx)
½ tsp (heaping) fennel seeds
salt and pepper to taste
Directions
1. Heat oil in a large, heavy pan over medium heat. Brown sausages on all sides, then remove from pan and reduce heat. Add in onion and get colour gently for 15-20 minutes until onion is soft enough to crush.
It's all about building flavour levels here.
2. Add in garlic, mushrooms, lemon and Jerusalem artichoke halves. Let brown slightly, then return sausages and any accumulated juices to pan. Throw in fennel seeds and a decent grinding of black pepper.
3. Add enough stock to cover artichoke mixture, bring to a boil, then reduce heat and simmer for about 30 minutes, or until artichokes are tender (they'll still be a bit toothsome, don't expect them to go the consistency of potatoes). Season with additional salt and pepper to taste and serve over a bed of steamed greens.
Nigel calls this a recipe for deepest, darkest winter, but I think the fennel and lemon brighten the whole thing up so nicely that it's a great recipe for the transition in Canada that some call Spring, but I like to call The Melting Season.
When cooking them, I like to leave their skin on (just scrub it a lot). They tend to fall apart if you don't.
Oh, and please keep in mind my earlier warning about gas. I don't want to turn you off these tasty babies, but they're definitely not for a romantic evening for two.
Jerusalem Artichoke and Sausage Simmer with Lemons and Fennel
(adapted from Nigel Slater - it's his week this week)
Ingredients
1 tbsp olive oil
4 good quality, herbal pork sausages
1 onion, peeled and cut into eighths (you want nice big hunks)
1 clove garlic, peeled and thinly sliced
½ lemon, cut lengthwise into 6-8 pieces
6-10 button mushrooms, halved
2/3 lb Jerusalem artichokes, scrubbed and cut in half
2 cups chicken stock or water (approx)
½ tsp (heaping) fennel seeds
salt and pepper to taste
Directions
1. Heat oil in a large, heavy pan over medium heat. Brown sausages on all sides, then remove from pan and reduce heat. Add in onion and get colour gently for 15-20 minutes until onion is soft enough to crush.
It's all about building flavour levels here.
2. Add in garlic, mushrooms, lemon and Jerusalem artichoke halves. Let brown slightly, then return sausages and any accumulated juices to pan. Throw in fennel seeds and a decent grinding of black pepper.
3. Add enough stock to cover artichoke mixture, bring to a boil, then reduce heat and simmer for about 30 minutes, or until artichokes are tender (they'll still be a bit toothsome, don't expect them to go the consistency of potatoes). Season with additional salt and pepper to taste and serve over a bed of steamed greens.
Nigel calls this a recipe for deepest, darkest winter, but I think the fennel and lemon brighten the whole thing up so nicely that it's a great recipe for the transition in Canada that some call Spring, but I like to call The Melting Season.
Monday, November 08, 2010
Okonomiyaki
This is, by far, one of my favourite quick dinner recipes of all times. I eat way too much of it each time we have it, but it's SO good, and SO ridiculously easy to make.
Phil even made the sauce from scratch because he forgot we had a bottle of it in the fridge.
So, okonomiyaki is a Japanese dish that's essentially a pancake batter mixed with cabbage, pickled ginger and other vegetables and meats. It's a very customizable dish! At okonomiyaki restaurants in Japan, the okonomiyaki is cooked on huge griddles in front of you. Some will have you do the cooking at low tables.
This recipe is based on one from The Japanese Kitchen, which was my first Japanese cookbook.
Sauce
¼ cup ketchup
1½ tbsp Worcestershire sauce
¼ tsp smooth Dijon mustard
2 tbsp mirin
1 tbsp sugar
1 tsp soy sauce
In small saucepan, mix all sauce ingredients together. Bring to a boil, reduce heat to low and simmer for 3 minutes. Remove from heat and set aside.
Batter
1 cup flour
2 tbsp potato starch
1 cup water (or dashi, if you have it)
½ tsp salt
Sift the flour together with the potato starch into a bowl. Add water and salt and mix. Divide the batter between two bowls.
Remaining ingredients
¼ large head shredded cabbage
¼ cup benishoga (pickled red ginger)
¼ cup sliced green onions
3 sliced bacon, chopped (set one piece aside)
2 eggs
Put half the cabbage, ginger, green onions and one piece chopped bacon into each bowl of batter. Press the center of each bowl to make a small depression. Break the eggs, and drop one into the center depression of each bowl.
Heat a large skillet, add 2-3 tbsp neutral flavoured oil and swirl to coat. When the oil is hot, dump out the excess. Reduce heat to low.
With a spoon, mix the batter and the other ingredients in one of the bowls. Raise the heat under the skillet to medium and pour all of the batter from the first bowl into the skillet. Spread the batter into a disk, about 6-7" in diameter. Top with half of the remaining chopped bacon, pressing it into the surface of the pancake. Cook the pancake over medium heat until the bottom is golden.
Now comes the fun part: the flipping. This is a two spatula job. Be quick and decisive. If the bottom is cooked enough, the whole thing shouldn't fall apart.
Once you've flipped it, press to flatten the bottom and cook until the other side is golden. While it's doing that, brush the top with the sauce. Transfer to a plate to keep warm in the over while you repeat the directions with the second bowl of ingredients.
Cut each pancake into six pieces, like a pizza, and serve hot. Phil and I just tend to cut it with our chopsticks and serve ourselves from the middle of the table.
Just for the record, I don't really use my chopsticks like that.
Phil even made the sauce from scratch because he forgot we had a bottle of it in the fridge.
![]() |
| The finished product. |
This recipe is based on one from The Japanese Kitchen, which was my first Japanese cookbook.
Sauce
¼ cup ketchup
1½ tbsp Worcestershire sauce
¼ tsp smooth Dijon mustard
2 tbsp mirin
1 tbsp sugar
1 tsp soy sauce
In small saucepan, mix all sauce ingredients together. Bring to a boil, reduce heat to low and simmer for 3 minutes. Remove from heat and set aside.
Batter
1 cup flour
2 tbsp potato starch
1 cup water (or dashi, if you have it)
½ tsp salt
Sift the flour together with the potato starch into a bowl. Add water and salt and mix. Divide the batter between two bowls.
Remaining ingredients
¼ large head shredded cabbage
¼ cup benishoga (pickled red ginger)
¼ cup sliced green onions
3 sliced bacon, chopped (set one piece aside)
2 eggs
Put half the cabbage, ginger, green onions and one piece chopped bacon into each bowl of batter. Press the center of each bowl to make a small depression. Break the eggs, and drop one into the center depression of each bowl.
Heat a large skillet, add 2-3 tbsp neutral flavoured oil and swirl to coat. When the oil is hot, dump out the excess. Reduce heat to low.
With a spoon, mix the batter and the other ingredients in one of the bowls. Raise the heat under the skillet to medium and pour all of the batter from the first bowl into the skillet. Spread the batter into a disk, about 6-7" in diameter. Top with half of the remaining chopped bacon, pressing it into the surface of the pancake. Cook the pancake over medium heat until the bottom is golden.
Now comes the fun part: the flipping. This is a two spatula job. Be quick and decisive. If the bottom is cooked enough, the whole thing shouldn't fall apart.
Once you've flipped it, press to flatten the bottom and cook until the other side is golden. While it's doing that, brush the top with the sauce. Transfer to a plate to keep warm in the over while you repeat the directions with the second bowl of ingredients.
Cut each pancake into six pieces, like a pizza, and serve hot. Phil and I just tend to cut it with our chopsticks and serve ourselves from the middle of the table.
![]() |
| The last piece of bacon shall be mine! |
Subscribe to:
Posts (Atom)


