Monday, February 28, 2011

Adventures with Purple Carrots

So, I bought a bag of locally produced heirloom carrots last week and was totally pleased with myself because, not only were they local AND heirloom AND organic, but they were also cheaper than a standard bag.

Inside the bag were three different kinds of carrots, a dark orange-red variety (can you tell I've little experience with heirloom varieties?), a purple one and a pale yellow carrot.

before peeling

all peeled up
 While I was making carrot kinpira this week, I decided I wanted to try it with a mixture of all three carrot varieties. It had the makings of pure awesome.

In my head, all I could see was the rainbow.


Totally pretty, huh? I mean, how often do you get to eat purple vegetables?


Doesn't it look somewhat freakish?

So, here's what I realized with this whole cooking experiment: the minute you throw a purple carrot into anything, prepare yourself to eat a whole lot of purple.

The kinpira ceased to have any colour other than purple.


Not only were the all the carrots purple post cooking, but my fingers were stained purple and a section of the couch where my husband dropped a sliver of carrot is also purple.

We sprayed the slip cover with stain remover. It's not coming out.

Moral of the story: treat purple carrots as you would beets. With respect. And wearing gloves if you don't want to walk around with purple fingers for two days.

Sunday, February 27, 2011

Caribbean Dutch Baby Pancakes

This morning, I reached for the apple I knew was in the fridge, only to discover that it was not there at all. But, you see, I needed that apple for the Dutch Baby Pancakes I was going to make for breakfast this morning.

I looked through the vegetable drawer, hoping that the apple had escaped and was hiding under the limp kale, but the only fruit I came across was a very happy mandarin orange.

It was far too delicious to put in the pancake. I have lunch plans for that orange.

I considered making the pancake without fruit, but that just felt pointless. The caramelized fruit is my favourite part of the whole Dutch Baby experience.


And then, sitting proudly on the top shelf of my fridge, the leftover pineapple spoke to me.

"Why not choose me and some coconut milk?" it said.


"Excellent." I responded and wondered why my fruit was speaking to me. Last time I'd checked, I wasn't living in a Jim Henson production.


Some allspice and cinnamon add a nice warmth to the whole recipe.

Caribbean Dutch Baby Pancakes (maybe that should be Dutch Caribbean...)

(based on this recipe)

Ingredients

1 knob butter (about a tbsp)
¼ fresh pineapple, peeled and cored
¼ cup brown sugar
1 tbsp water
¼ tsp cinnamon
¼ tsp allspice

3 eggs
3/4 cup coconut milk
3/4 cup flour
¼ tsp kosher salt
½ tsp vanilla extract

Directions

1. Preheat oven to 400º.

2. Slice the pineapple into ¼ - ½" thick rounds. Cut each round into quarters.

3. Heat a cast iron (or oven proof) skillet over medium heat, add butter. Once butter is melted, place the pineapple slices in the pan and let brown.

4. Once pineapple has browned on both sides, add brown sugar, water, cinnamon and allspice. Let the sugar mixture bubble away and reduce a little bit.

5. While the sugar mixture is reducing, whisk together remaining ingredients in a large bowl until smooth. Remove skillet from heat and pour batter over top of the fruit. Place skillet in oven and let cook until puffed and golden, about 20 minutes.


Sprinkle with icing sugar if desired!

Saturday, February 26, 2011

The Best Sushi...

... I've ever had was at the Tsukiji Fish Market (築地市場) in Tokyo.


The meal above cost 20$. I've never had fresher or more amazing sushi in my life... and I seriously doubt I ever will again. We ate it at 8:30 am at this tiny little shop on the outskirts of the market that seated no more than 8 people at any given time. Years later, the restaurant was profiled in The Guardian as part of their 50 Best Foods and Where to Get Them article.

Truth be told, we didn't know where we were eating at the time. We just walked in because there was a seat. The whole meal, all I could keep repeating was "Wow."

Also, while going through the pictures of that trip to Tokyo, I discovered that I once looked like this:


Hm. That blond hair definitely looks unnatural now... especially in the light of the train from Nakatsugawa to Nagoya.

Seriously, I look too young to have been living on my own for two years in a foreign country where I was illiterate.

Time is a cruel mistress, huh?

Friday, February 25, 2011

Homemade Reese's Almond Cups

Sometimes (read: usually), my recipes don't turn out nearly as good looking as the pictures that accompany the original recipe.

Case in point:


It's a Reese's Peanut Butter Cup, minus the peanut butter.

You couldn't tell, could you?

It's alright, my feelings aren't (too) hurt.

Even though it was ugly, it tasted awesome. Subbing in the almond butter was a great option, though I'm quite curious to try it with peanut butter too.

And, even though mine was ugly, the recipe was very easy.

Chocolate Covered Almond Cups

(slightly adapted from Design*Sponge)

Ingredients

½ lb dark chocolate (like callebault or, if you're not picky, get some chocolate chips)
½ lb dark chocolate bar with almonds
1 cup almond butter
1/2 cup powdered sugar, sifted
1/4 cup graham crackers, crushed
1 teaspoon sea salt

Directions

1. Either get yourself disposable muffin tins, or line a 12 count muffin pan with liners.

2. Melt the dark chocolate (the one without the nuts)  in a double boiler. Remove bowl from heat and turn off stove (but don't throw out the water, you'll need it later!)

3. Using a pastry brush, paint a layer of melted chocolate onto the bottoms and sides of the paper liners. Make the layers thick - you're forming the cup part of the chocolates, and it needs to be sturdy.

4. Put the muffin pan in the refrigerator for 20 minutes while you make the filling.

5. In a mixing bowl, combine the almond butter, crushed graham crackers, powdered sugar and salt. Stir with until well combined.

6. Chop the dark chocolate-almond bar up with a knife, or in a food processor. Be careful not to overheat the food processor and melt the chocolate (take it from one who speaks from experience). The almonds should be in small chunks at this point.

6. Return the bowl used to melt the first batch of chocolate to the top of the double boiler. Turn the heat to medium-high. Add the pieces of the dark chocolate-almond bar and melt.

7. Meanwhile, divide almond butter mixture into 12 even amounts.

8. Remove the muffin pan from the refrigerator. Put one mound into each paper liner. Smooth out with a spoon, or, if you're tactile like me, your fingers (making sure they're scrupulously clean).


 9. By now, the chocolate added to the double boiler should all be melted. Using a spoon, dollop the top of each almond butter mixture mound with a generous portion of chocolate.

10. If you're finicky, smooth the tops out. If you're not, do as I did and leave them crispy looking.


11. Place the muffin pan in the refrigerator. Within one hour, your cups should be set, depending how cold your fridge runs.

Because the chocolate here isn't tempered, you can expect to experience a bit of melting in your hands... but getting messy is half the fun of chocolate, isn't it?

Thursday, February 24, 2011

Ingredient of the Week: Kasha

We don't eat a lot of grains in our house. I'm not a pasta person by any stretch of the imagination, and before Japan, I just didn't get excited about rice. So, when it came to that starchy side, I was all about potatoes.

But in the last five or so years, we've really tried to incorporate more interesting grains into our diet. I've long since loved couscous and brown basmati rice, but having other grains like quinoa and bulgur on the dinner table has only started in the past couple of years.

I'm proud to say that in the little nook of our apartment my husband has christened Lentil Corner, we currently have basmati, brown and sushi rice along with Israeli couscous and black quinoa.

So, we're progressing along nicely with our alternative grains.

This week, we decided to buy some kasha. If you don't know, kasha is roasted buckwheat. It looks like little pyramid shaped grains. If you've ever had soba noodles, that distinctive grassy taste you're getting is from the buckwheat flour in it.


 I picked it up from a new bulk health store that just opened up around the corner from us. When I opened the bin, I was hit by that heady roasted, grassy aroma that reminded me instantly of the buckwheat tea I used to buy in Japan.

Soba Tea: source
But, instead of heading to Japan for today's flavour profile, we decided to head to Eastern Europe and a great recipe from Mark Bittman.

Kasha with Golden Brown Onions

(Mark Bittman: recipe source here)

Ingredients

3 cups chopped onion
3 tablespoons neutral oil, like grapeseed or corn
1 egg or 2 tablespoons natural oil, like grapeseed or corn (I went the egg route)
1 cup kasha
Salt and freshly ground black pepper
2 cups chicken, beef, or vegetable stock or water, warmed
1 to 2 tablespoons butter (optional) 

Directions

1. Sauté the onion in a large skillet. Make sure the skillet has a lid, because you're going to cover the onion almost immediately and cook for about 15 minutes, until the onion is dry and almost sticking to the pan.  Almost, but not quite. Don't worry, the steam created by the cooking onion should prevent it. Add the 3 tablespoons oil, raise the heat to medium-high, and cook, stirring, until the onion is nicely browned, another 15 minutes or so.

2. If you've decided to go the egg route, beat it, then toss it in a bowl with the kasha.  (If not, skip on down to step 3).  Heavily season mixture with salt and pepper and place in a large, deep skillet or pot over medium heat. Cook, stirring, until the mixture smells toasty, about 3 minutes. Proceed to step 4.

3. If you're using the 2 tablespoons oil instead of egg, put it in a heavy, deep skillet over medium-high heat.  When hot, add the kasha, along with some salt and pepper, and cook, stirring, until the mixture smells toasty, about 3 minutes.

4-Turn the heat way down,, carefully add the stock, and stir once.  Cover and cook until the liquid is absorbed, about 15 minutes.  Turn off the heat.  Stir in the onion, taste, and adjust the seasoning.  Serve or let the kasha sit for up to 30 minutes before serving. (This step makes it a great choice for a make-ahead meal)


When you're ready to serve, fluff with a fork, adding the butter if you like at the same time. Works great with braised red cabbage. While I made Bittman's recipe for braised red cabbage from the same cookbook, I wasn't as enamoured with it as I have other recipes - more specifically this recipe. So, I recommend you try that one out.


The kasha needs something sweet and tangy to play off its earthiness!

Wednesday, February 23, 2011

Slow Cooked Baked Beans

If you happen to have a few hours on your hands to let the oven work it's magic, and you're in the clutches of a winter storm, I have just the antidote: baked beans.


Now, to be clear, these aren't your canned Heinz variety. And, while I'm sure they'd be very good on toast, they're even better paired with a spicy sausage, cornbread and some coleslaw. Yes, the flavour profile is the same (molasses, tomato, bacon) as those canned, but these taste infinite better and the consistency of the bean is toothsome and not mushy at all, because you'll be using dried beans.

Wait a minute, I can practically hear you saying through my computer screen, did you say dried beans? Don't beans require soaking time?

Good news, my friends, use a small bean (I used navy beans) and you can just dump them in to the pot. The great advantage to this is they cook in the flavoured liquid, which means they're infused inside and out with sweet, smoky goodness.

I adapted this recipe from a vegetarian version by Mark Bittman. He uses konbu (seaweed) to tenderize the beans and add some of that earthy flavour that the traditional version gets from bacon.

Since I had the bacon (and since it was the good stuff), I decided to use it. I mean, I have the konbu too... but in a competition of bacon vs seaweed, I'm going to declare bacon the winner.

You know what the best part of this is? It's just so darned simple. There are very, very few ingredients.

missing: molasses, salt and pepper
Few ingredients = easy prep. And we all love easy prep, don't we? Once this is in the oven, there's very little left for you to do other than to stir it and check on the water levels.

Baked Beans

(adapted from Mark Bittman's How to Cook Everything Vegetarian)

Ingredients

½ lb slab bacon, chopped
½ -1 tbsp canola oil
2 medium onions, chopped
¼ cup tomato paste
6 cups water
¼ cup molasses
2 tsp mustard powder
1 lb small dried beans (like navy)
2 tsp salt
pepper to taste
(optional: a minced chipotle in adobo sauce, or replace with molasses with maple syrup and throw a chopped apple in)

Directions

1. Preheat oven to 300º.

2.. In a dutch oven placed over medium heat, cook bacon until fat is rendered, about 7 minutes. Remove bacon with a slotted spoon and set aside. Add enough canola oil to the fat in the pan to make 3 tbsp oil total. It's possible you won't need to add any extra at all or may have to remove some fat.

Bacon fat. It's flavour country.

3. Add onions to the fat and sauté until softened and just beginning to turn brown, about 5 minutes more.


Stir in tomato paste, and cook for about 1 minute, stirring to pick up all the brown goodness at the bottom of the pan.

tomato paste in a tube, where have you been all my life?


 Stir in water, molasses, mustard powder and beans (do not add the salt yet, this will result in a tough bean).


Cover dutch oven with lid and place in the oven for 1 hour.


4. Check on beans after the first hour in the oven. Stir and check on water level. They should still be covered by an inch or so of liquid. If they aren't, add some more water. Return to oven for another hour.

not cooked yet!
 5. After they've spent two hours in the oven, stir the beans again and check on the liquid level. Cover and bake for an additional hour, stirring and checking the liquid level every 30 minutes or so. The beans should become tender between hours 2 and 3 in the oven. It took mine closer to the 3 hour mark.

Beans are plumping up nicely.
 6. Once the beans are tender, remove the lid from the dutch oven and crank the heat up to 400º. Stir in salt and pepper. If you want to add more mustard or molasses, feel free to do that here too. You want to reduce all that liquid now, so return the pot to the oven and let cook for about 30 minutes more, or until the sauce is thick.

Perfectly thick sauce and tender beans
Like just about all things that are slow cooked, these are much better the following day. If you want to be really authentic about the whole deal, make some steamed brown bread.

Tuesday, February 22, 2011

Coconut Thumbrint Cookies with Mango-Ginger-Lime Jam

Last week, my friend Lindsay sent me a couple of jars of her preserves: a raisin chutney (yum! I have a cheese platter calling its name) and a mango-lime-ginger jam of her own creation.


Now, I love tropical flavours, and I adore mango, so I was super excited to try it out.

And, it was delicious. As always.

But, if you're simply eating your preserves on toast, you're really missing out on half the fun of a jar of great jam. I was in a baking mood and knew that I wanted something tropical but easy. Thumbprints seemed to be the way to go.

Seriously, I think this recipe came together in about 10 minutes.


Coconut Thumbprint Cookies with Mango Lime Ginger Jam

Ingredients

½ cup unsalted butter
½ cup sugar
1 tsp vanilla
1 egg yolk
1¼ cups all purpose flour
¼ tsp salt
1 egg white, lightly beaten
1¼ cups flaked coconut (I used unsweetened)
¼ cup jam

Directions

1. Preheat oven to 300º. Line a baking sheet with parchment paper or a silpat baking mat.

2. Cream together butter and sugar. Once light and fluffy, add in vanilla and egg yolk. Blend. Then add in flour, mixing until combined.


3. Roll the dough into 20 balls and place on baking sheet. These cookies won't spread too much, so you don't need too much room between them.


4. Place beaten egg white in one shallow dish and coconut into another. Working with one ball at a time, roll dough first into egg white, then into coconut. Place each back onto the baking sheet.


Once all balls are covered with coconut, make an indent in the centre of each, using your thumb (hence the name thumbprint cookies). This little well will be where you put the jam.


5. Spoon ¼-½ tsp jam into the well of each cookie. Be careful not to overfill the centres; you don't want the jam to leak out all over the cookie sheet. It has a tendency to burn then.


Take a moment to admire all those cookies with jewel-like toppings. You're a genius!


6. Bake in oven for about 25 minutes, or until just lightly golden and firm to the touch. Because we have a temperamental oven, I started keeping a close eye on mine at about the 20 minute mark and they were finished at 27 minutes. Remove to rack and let cool.


Serve with tea and try not to eat too many at once!

Monday, February 21, 2011

Almond Cranberry Oatmeal Bars

Most of the time, I reach for food because I'm craving a specific flavour profile. If I want something vibrant, I'll usually hit up something with a ton of fresh herbs. If I'm looking for something smoky, I'll make something involving bacon.


Every once in a while though, I find myself craving something that relates to an image or colour. After this morning's post about cherry blossoms, I found myself staring into the pantry on the search for something pink.

The closest I could come was cranberries - of which there were very few left. But it wasn't just pink I was after, but something slightly floral too. Almond extract would suit that purpose.


Oatmeal Almond Cranberry Bars

(loosely inspired by epicurious)

Ingredients

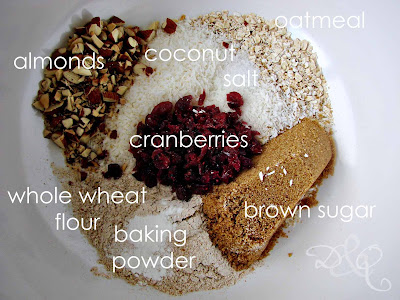
1 cup oats
½ cup flour (I used whole wheat because it was closer to the front of the cupboard than white)
½ cup brown sugar
¼ cup chopped dried cranberries
¼ cup chopped toasted almonds
¼ cup flaked unsweetened coconut
¼ tsp baking powder
¼ tsp salt
5 tbsp unsalted butter, melted and cooled
3 tbsp almond butter
1 egg
½ tsp almond extract
½ tsp vanilla

Directions

1. Preheat oven to 350º. Line an 8x8 pan with aluminum foil (make sure you have an overhang so you can easily remove the bars later) and grease with butter.

2. In a large bowl, stir together first eight ingredients (through salt).


3. In a separate bowl, stir together remaining ingredients.


4. Pour wet ingredients over dry. Stir until just together. Dump mixture into pan, and pat into place.


5. Bake for 20-25 minutes. Lift the foil and bars out of the pan, and let cool on a rack.


Cut into 16 squares.


The almond extract adds a lovely sweetness and tone to these oatmeal bars, and the almond butter helps to keep them moist.

Really though, this is a very adaptable recipe. You could replace the almonds and cranberries with chocolate chips and walnuts, with dried apricots and pecans, with just about anything. Why not try white chocolate and cranberry?

Longing for Spring

Last Friday, as I was walking back from an unsuccessful attempt to find freeze-dried strawberries from the St. Lawrence market, Toronto was in the throes of its first hint of spring.

It was 9 degrees and gorgeous.

Practically t-shirt weather, I tell you.

And now, with the threat of snow looming, all I can think about is this:

Sakura tree
 The picture above was taken in my tiny little Japanese village back in 2006. This particular tree was down the hill from my house.


I just love these double blossom sakura trees. They have these huge pink puffball blooms. Gorgeous.

While I loved the trees in my town, the most beautiful, magical cherry blossom experience though was, hands down, found in Kyoto.

The Philosopher's Walk
We had a picnic this trip along the river of the Philosopher's Walk. Crackers, wine, prosciutto, cheese (real cheese!), olives, cookies. It was heaven on earth; the perfect hanami party.

Hanami (花見) literally means flower viewing. In short, people go out to sit beneath the trees, eat lots of food and get quite drunk all in celebration of the fleeting beauty of the cherry blossoms. Lanterns get strung up, trees are illuminated. If you're watching the flowers at night, it's called yozakura (夜桜), which literally means night sakura. At this point, you'll probably see a few businessmen stagger down the streets singing at the tops of their lungs.

Even on a hazy day, Kiyomizudera looked pretty awesome.

Kiyomizudera

Kiyomizudera
But, best of all, was the night we arrived in Kyoto. The trees were in full blossom and totally illuminated. It was, hands down, one of the most magical, otherworldly experiences I've ever had.


I remember thinking to myself as we walked down the perfumed streets, blossoms gently falling in the wind, that this was what walking through Narnia must have felt like for Lucy. I don't know that I've ever felt so full of wonder and joy by a place.

Sunday, February 20, 2011

Thanks to Taste T.O.

For the shout-out in their round-up this week. Very cool indeed.

A Quick Work Post

Over lunch this week, some fellow teachers and I were talking about the U.S. teacher who kept a blog that ranted about her students. Don't get me wrong, I think everyone has a right to vent. And I do think many students are disengaged and lazy - though I wouldn't stab them behind their backs. I just finished parent-teacher interviews last night, and I've got to say the one thing parents and I seemed to repeat over and over again is: "____child's name_____ is a very bright student, but is choosing to be lazy because they know they can get by with the bare minimum".

I'm pretty upfront about the whole attitude thing.

But, in spite of the laziness and the whining, over my few years of teaching, I've noticed the following: the more creative and engaged I am in what I'm teaching, the more engaged my students are. And when they're engaged, they aren't whining or lazy.

I know, you're shocked by the correlation. You get back what you put out there.

It's always easiest to judge what others do. As teachers, we're quick to blame the students for being bored, we're quick to blame parents for not controlling them, and we're quick to blame each other for not teaching like we teach.

It's easy to judge.

It's not easy to be self-reflective, as Ms. Monroe seems to have proven in spades.

Friday, February 18, 2011

A Cross-Blogging Shout-out

So, remember Ethiopian Night (and by that, I mean Ethiopian House)?

Check out the rest of Lindsay's ethnograze day. You've gotta love eating your way across a city!

Italian Herb Bread

I love bread.

I love making it. The feeling as the dough becomes more and more firm and elastic beneath the heels of my hands makes me feel as though I'm back in my Nana's kitchen, even though I never once made bread there. She did it all. The act reminds me of her.

I love the way it makes my kitchen smell while it's baking. Fresh, yeasty, buttery, salty. Mostly, it smells homey.

Ultimately, I just love eating it. There's nothing better eating your own fresh bread. You can taste the effort and love.

Okay, maybe eating other people's fresh bread is good too. I'd certainly never say no.

already with a hunk missing
Anyway, when it came to this bread, I was all out of the Parmesan cheese called for. As I looked through the contents of the back of my fridge, hoping in vain to find a chunk of flavour back there, an idea stuck me.

I was looking for a savoury flavour, not necessarily cheese. I needed something umami.

That's when this ridiculously underused pantry staple (and by staple, I mean it's been in my cupboard since Valentine's day 2009) came in handy:


It's sea salt. And truffles.


Why I never use this salt, I don't know. It's awesome. I was concerned that the truffle flavour, being a delicate one, would be lost in the baking process, but let me assure you, it wasn't at all. I simply swapped out the regular salt for the truffle salt, omitted the cheese and went on with the recipe (feel free to keep the cheese yourself)

Not only did our kitchen smell of the glorious scent of bread, it smelled of truffles too.

Life is good.

Italian Herb Bread with Truffles

(adapted from this recipe at allrecipes.com)

Ingredients

1 (.25 ounce) package active dry yeast (that's 2¼ tsp)
1 cup warm water (110 degrees F/45 degrees C)
1 tablespoon white sugar
2 tablespoons olive oil
1-1/2 teaspoons salt
1-1/2 teaspoons dried basil
1-1/2 teaspoons dried oregano
1/2 teaspoon garlic powder
1/2 teaspoon onion powder
3 cups all purpose flour

(if you don't have truffle salt and want to use cheese, add in 1/3 cup grated Parmesan  with the flour)

Directions

Mix yeast, warm water, and white sugar together in a large bowl. Set aside for five minutes, or until mixture becomes foamy. 
Stir olive oil, salt, herbs, garlic powder, onion powder, cheese, and 3 cups flour into the yeast mixture. Gradually mix in the next three cups of flour. Dough will be stiff. 


Knead dough for 5 to 10 minutes, or until it is smooth and rubbery. Place in an oiled bowl, and turn to cover the surface of the dough with oil. Cover with a damp linen dish towel. Allow to rise for one hour, or until the dough has doubled in size. 


Punch dough down to release all the air. Shape into loaf. Place loaf on a greased cookie sheet, or into two greased 9 x 5 inch loaf pans. Allow to rise until doubled in size, about a 30 minutes. 


Bake at 350 degrees F (175 degrees C) for 35 minutes. Remove loaves from pan(s), and let cool on wire racks for at least 15 minutes before slicing. 

  
Excellent with butter, turned into croutons, or just ripped up in hunks and dunked in your favourite dip.

Or eat it plain. I'm not going to judge your bread choices.
Related Posts Plugin for WordPress, Blogger...