Showing posts with label onions. Show all posts

Tuesday, August 16, 2011

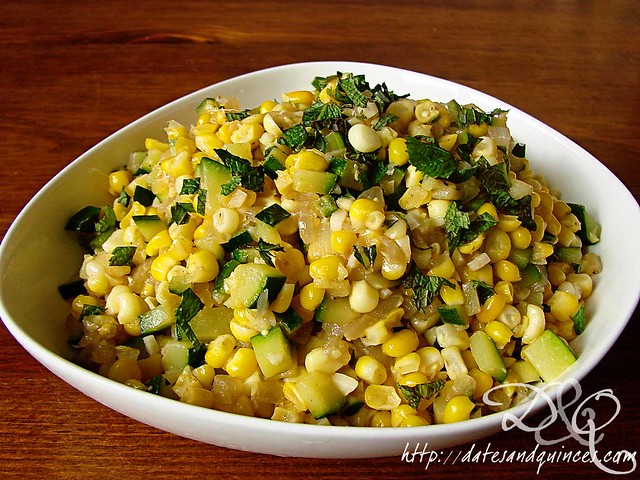
Corn Sauté with Sweet Onion and Zucchini

This is resoundingly one of my go-to August dishes. It's safe to say that it's my mother's too, because she called me asking for the recipe just as I was whipping this up.

It's best with fresh corn on the cob, so make it up while the corn is fresh!


It serves 4 as a side dish, but my husband and I have been known to just chow down on it alone for dinner.

Corn Sauté with Sweet Onion and Zucchini

(lightly adapted from Fine Cooking)

Ingredients

1 tbsp butter, divided
½ tbsp olive oil
1 tsp kosher salt, divided
1 medium sweet onion, finely diced
1 medium zucchini, finely diced
2 heaping cups fresh corn kernels, cut from about 4 ears
2 cloves garlic, minced
½ tsp ground corianger
½ tsp ground cumin
juice of ¼ lemon
3 tbsp chopped fresh mint
freshly ground black pepper

Directions

1. In a dutch oven or very large skillet, melt ½ tbsp butter with ½ tbsp olive oil over medium-low heat. Add in onion and ½ tsp salt. Cover and cook for 5 minutes, stirring occasionally, until onion is translucent. Remove heat and cook, stirring occasionally, for an additional 3 minutes, until onion is beginning to brown. Add in zucchini, and continue cooking until zucchini begins to shrink and lose some of its moisture, about 3 minutes more.

2. Add in remaining ½ tbsp butter, corn kernels, garlic and remaining ½ tsp of salt. Cook, stirring frequently until corn becomes bright, tender and caramelizes slightly, about 5 minutes. Add in coriander and cumin and cook for 30 seconds, until fragrant. Remove pan from heat. Stir in lemon juice and 1 tbsp mint. Let sit for 2 minutes, then add in black pepper and additional salt to taste. Serve with additional mint sprinkled on top.

Sunday, April 17, 2011

A Japanese Inspired Soba Recipe

April is one of those months that teases. After cold winter nights and endless amounts of snow and frost, April is that month that whispers sweet nothings and tells you, soon, soon it'll all be over. She takes your hand and shows you the deep blue hyacinths and vibrant yellow crocuses, her sweet, blossom scented breath caresses your cheek.

And then, as you turn to meet her lavender eyes, she knees you in the crotch and punches you in the stomach with wild, blisteringly cold rain storms.

Heck, as I write this, sleet is bashing against our windows. Earlier this week, some of my students were wearing shorts.

This recipe is that warm blanket used on shock victims. Sink into its warmth and stay out of April's mood swings.


Soba with Beef and Onions in Shiitake Broth

(inspired by The Japanese Food Report)

Ingredients

3 cups water, divided
6 dried shiitake mushrooms
½ package (4g) dashi powder
4 tbsp soy sauce, divided
2 tbsp mirin
½ lb thinly sliced beef
1 medium onion, thinly sliced vertically
3 tbsp sake
2 tbsp sugar
4 oz dried soba noodles
shichimi spice powder to taste (Japanese 7 spice chili powder)
1 green onion, finely sliced

Directions

1. Bring 1 cup water to a boil in a small saucepan. Soak dried mushrooms in water for 30 minutes. Remove mushrooms from liquid and set aside. Stir in 1½ cups water, dashi powder, 2 tbsp soy sauce and mirin. Bring to a simmer and keep warm on back burner while you prepare the rest of the recipe.

2. Cut rehydrated shittake mushrooms into 5-6 slices each.

2. Place beef, onion, mushrooms remaining soy sauce, ½ cup water, sugar and sake in a frying pan, and bring to a simmer. Let cook until beef is cooked, onion is meltingly tender and liquid is almost completely evaporated, about 10 minutes. Remove from heat and set aside.

3. Cook soba noodles in a large pot of boiling water until al dente, between 6-8 minutes. Divide between two large bowl. Top noodles with beef mixture. Gently ladle broth over noodles. Garnish with shichimi and green onions.

Wednesday, April 13, 2011

Caramelized Onion Galette with Sour Cream Pastry

There are a lot of things that I'm terrible at in the kitchen and pastry is resoundingly one of them. Pies are the bane of my existence.

In my defence, there are lots of things I'm good at too. Like dirtying too many pots.

Galette style pastry is far more up my alley. Its free form shape is forgiving to those with clumsy, rough hands such as myself. I've made many of these throughout the years, and always chalk the cracks and leaks up to the fact that it's supposed to be rustic.

That's what I tell people anyway. They seem to believe me.

Although, perhaps they won't now that I've confessed my secret.

... I probably should have thought this through.


I will admit, I love this galette. The sour cream makes the pastry fairly strong. The trade-off, of course, is less flakiness, but I'm just happy to have a dough I can work with. Plus, it's a tangy so it plays off the onions really well.

The directions look long, but this doesn't take a lot of effort to pull together, I promise.

Caramelized Onion Galette with Sour Cream Pastry

Ingredients

Dough

1 2/3 cup pastry flour (or all purpose if you don't mind a sturdier [read tougher] crust - it still tastes great)
½ tsp salt
3 tbsp chilled, cubed, unsalted butter
½ cup sour cream
1 tbsp fresh lemon juice
1-3 tbsp ice water

Filling

1 tbsp olive oil
1½ lbs peeled and sliced sweet onion
2 tsp dried thyme
½ tsp kosher salt
¼ tsp freshly ground black pepper
¼ cup crumbled feta cheese (I use Ewenity sheep's feta)
¼-½ cup shredded P'tit Basque sheep's cheese (or use a good melting cheese like gouda or fontina)
1 egg, lightly beaten.

Directions

For Dough

1. Combine flour and salt in food processor and pulse to combine. Pulse in butter until mixture is coarse. In a separate bowl, stir together sour cream and lemon juice. Add to food processor and pulse again, until mixture is just incorporated. Add ice water, 1 tablespoon at a time. Pulse until mixture is moist and crumbly, but don't go so far as to let it form a ball.

2. Dump mixture onto a piece of plastic wrap and pat gently into a 5" circle. Wrap tightly and refrigerate until ready for use, at least 20 minutes. (Now is the ideal time to start the filling.)

3. Slightly overlap two sheets of plastic wrap. Place dough circle on top and cover with two more sheets of overlapped plastic wrap. Roll the dough, still covered with plastic wrap, into a 12" circle. Place on baking sheet and put in the freezer for 5 minutes, or until plastic can easily be removed. Remove top sheet of wrap and place dough, wrap side up on a baking sheet lined with parchment paper. Remove remaining plastic wrap.

For Filling

1. Preheat oven to 425º.

2. In a large frying pan, heat oil over low heat. Add onions, thyme, salt and pepper and cook gently, stirring occasionally, over low heat for 20-30 minutes, or until caramelized. Remove from heat.

3. Sprinkle feta cheese over centre of pastry, leaving a 2 inch border around the outside. Top with onion mixture. Sprinkle P'tit Basque over top. Fold edges of pastry up to partially enclose the filling, pleating as you go. Brush pastry with egg. Bake in oven for 25-30 minutes, or until golden brown.


I highly recommend serving this with a tart salad, something with arugula and either a lemon vinaigrette or something with sherry vinegar.

I mixed 1 tbsp hazelnut oil, 1 tbsp canola oil, 1 tbsp sherry vinegar, 1 tsp Dijon mustard with a pinch each of sugar and kosher salt for an easy vinaigrette. With mixed bitter greens, toasted hazelnuts and more sheep's feta, the salad was the perfect accompaniment to the sweet galette.

Monday, January 17, 2011

Potato Pizza

If you know me, you know I love Nigel Slater. The man - gah - he makes me love food and cooking more than I already do, which seems like a pretty big thing, because my baseline level of loving food is pretty high.

When I was in my first year of kindergarten, my taecher wrote on my report card:

Alyson likes making lists of food.

And not much has changed.

So yes, I adore Nigel. His recipes are reliable and accessible and he makes me wish I had a garden. He also has a great recipe for a thin crust potato pizza.


It's the perfect antidote to a cold night when your pantry is almost bare.

Potato Pizza

Adapted from Nigel Slater's Real Food

Ingredients

3 tbsp whole wheat flour
225 grams white flour
½ tsp salt
2¼ tsp yeast (or one 7g package)
1 tbsp milk
2 tbsp olive oil
½ cup warm water

5 fingerling potatoes, thinly sliced
2 tbsp olive oil
1 onion, sliced
5 sprigs thyme
a hunk of cheese that you have lying around in your fridge, sliced or roughly torn up
shavings of parmesan
bonus: truffle salt

Directions

1. Stir together flours and salt in the bowl of a stand mixer fitted with a dough hook. Mix in yeast. Add milk and oil and water. Mix for 5 or so minutes, until dough pulls away from the side of the bowl and is smooth and elastic. (Alternatively, you can do this by hand!)

2. Remove dough from mixer bowl. Grease a new bowl. Place dough in it, tossing to coat with oil. Cover and set aside in a warm, draft-free place for 30 minutes.

3. Place potato slices in a pot of cold, salted water. Bring to a boil over high heat. Reduce and simmer for 5 minutes. Remove from heat and drain.

4. Heat oil over low heat. Add onions and cook, stirring frequently, until golden.

Side note: is there anything better than the smell of frying onions?


And those golden, crispy bits? That's the stuff dreams are made of.


5. Preheat oven to 450º. If you have a pizza stone, place it in the oven now, before you start heating the darned thing up. If you don't have a pizza stone, don't worry about this step!

6. Roll out pizza dough into a 12-14" circle-ish shape. Feel free to not care about symmetry. (If you're not using a pizza stone, transfer the dough to a baking sheet here.) Top with onions, potatoes, cheeses, thyme and a healthy splattering of more olive oil. Transfer to pizza stone.


7. Bake for 17-20 minutes, or until cheese is golden an bubbly. Sprinkle with truffle salt for an added element of class and denial that your cupboards are bare. (You've got truffle salt! You can take on the world!)


As an added lesson here: place the onions on the bottom. I put mine on top of everything and they got a little... overly crispy. Not so sexy, I must say.
Related Posts Plugin for WordPress, Blogger...