One of the great things about having my mornings in class is I'm forced to get up at the same time as I do when I teach. Now, I know some of you are putting your hands up to say, what the heck? There's method in my madness, I promise.
When I have time off, I stay up late. And then I sleep in. And my sleep cycle gets pushed further and further out of whack.
I don't like it when my sleep schedule gets pushed out of whack.
Believe it or not, I like productive mornings. It's so nice to get everything out of the way right at the beginning!
Plus, it means I don't have to feel guilty for my daily afternoon naps.
It's all about having guilt free naps.
Yesterday, after a drama class filled with some interpretive dance on war/peace to Zoe Keating, I walked to the library for my annual summer library reading binge. I wasn't carrying any bags on me, so I only picked up a few books, one of which was the French Women Don't Get Fat cookbook.
This recipe (if you can call it that) isn't from the book, but was inspired by her several recipes using the en papillote technique. For those of you not familiar with en papillote, it means you take meat or fish and place it, along with other flavourful ingredients, in parchment paper packages which are then baked in the oven. This steams the meat inside, but also infuses it with whatever ingredients you've thrown in along with it.
I opted for chicken with lemons, parsley (although, if you have fresh rosemary, all the better), olives, sundried tomatoes and capers.
The brilliance of this recipe, is that there really isn't one. Use what you've got on hand; just keep it to no more than 2 tbsp of toppings, plus something beneath the chicken to infuse from below. Sautéed shallots or spinach would make a great base. A few cloves of garlic in there with some lemon and lots of black pepper? Delish!
And the bonus? No added oils!
The packages are made by creating a circle out of parchment and layering all the ingredients on one half of the circle.
You then fold the other side of the paper over to create a half moon shape. Fold the sides up along the edge of the circle so it looks like this:
Bake in the oven on a baking tray at 400º for about 30 minutes.
If you're into theatrics, give everyone at the table a pair of scissors and allow them to cut a cross into the top of the package and then tear it open. The big reveal is half the fun.
Do be careful of the steam though. There's a lot of it trapped in there!
Showing posts with label chicken. Show all posts
Friday, July 15, 2011
Thursday, July 14, 2011
Tsukune (つくね): an izakaya favourite
Whenever Phil and I went to Daikichi's in his town Tokishi, there were a few standard dishes that we often ordered. And, because it was an izakaya (Japanese pub), it meant that there was lots of delicious food on sticks.
I really, really miss Daikichi's. In fact, about a year ago (almost to the day!), I said about the same thing.
It was a hole in the wall, the guys who ran the place smoked over the food as they grilled it, its tiny booths and stools were often packed with drunk salarymen and attractive young women (who were probably not their wives) and we enjoyed copious amounts of sake, beer and meat on sticks.
We occasionally got eggplant and onion too... but mostly we ordered meat on sticks.
Until recently, I haven't tried to recreate Daikichi's. Anything I do won't live up to the memory in my mind.
Anyway, we always got the chicken-cheese (grilled chicken thighs with a cheese slice on top and special mildly spicy sauce) and the aspara-bacon (grilled bacon wrapped asparagus), and usually got another dish, tsukune.
I attempted those this week, and they're about as authentic as they're going to get given that:
a) I'm not chain smoking over the skewers and
b) I don't have a grill
Tsukune (つくね) are essentially very smooth chicken meatballs seasoned with ginger, sesame and green onion, dipped repeatedly in tare (垂れ) and grilled until dry in between dips. Tare is basically the awesome older brother of the insipid teriyaki sauce we have here.
When I moved to Japan and asked about buying teriyaki sauce in the grocery store, I was met by a round of blank stares. Ask for tare.
Better yet, don't buy it from the grocery store. It's dead easy to make.
Now, I like my tsukune well browned with the tare. Those found at Daikichi's tend to be less assertive. Also, I have yet to perfect the art of perfectly spherical meatballs.
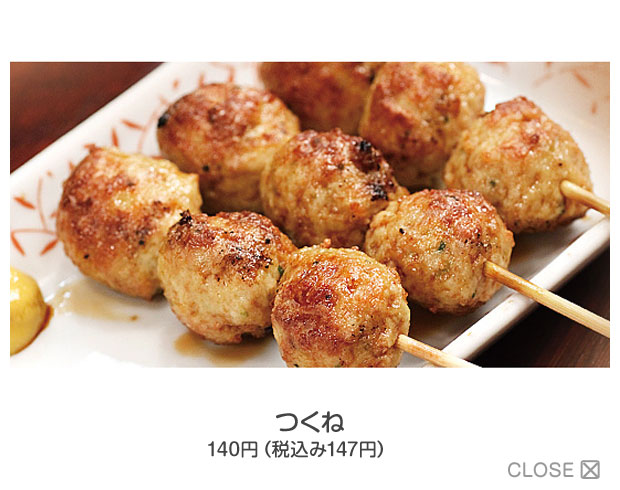
Anyway, you can see where the inspiration was and where I ended up, and frankly, I'm really happy with this recipe!
Here are a few pictures of our favourite joint:
I heard that, after we left Japan, the Daikichi's in Phil's neighbourhood closed down. Clearly our consumption of sake and food on sticks kept the place afloat!
Tsukune: Grilled Chicken Meatballs
(from Hiroko Shimbo's Japanese Kitchen)
Ingredients
1 lb ground chicken or turkey
½ tsp kosher salt
½ tsp finely ground black pepper
2 green onions, both green and white parts, minced
1½ tsp freshly grated ginger
1 egg white, lightly beaten
2 tsp sesame oil
1 tbsp canola oil
sansho pepper (optional)
tare sauce (recipe below)
Directions
1. Begin by soaking 8 bamboo skewers in water for 15 minutes. Set aside.
2. Using a food processor, pulse ground chicken until it forms a coarse paste. Add in salt and black pepper, and pulse again. Alternatively, you can use your hands to squeeze the mixture over and over again (we're talking a good 5 minutes or so) and it'll achieve similar results. Remove mixture from food processor, stir in ginger and green onions. Once they are evenly distributed, mix in the egg white and sesame oil. Divide the mixture into 16 evenly sized balls.
3. Heat 1 tbsp canola oil in a large, non-stick frying pan. Working in batches, cook tsukune for 1 minute or so on each side or just until they're white and firm. You don't actually want to finish cooking them at this stage; you'll finish them off either on the grill or beneath the broiler.
4. Heat the grill on medium high heat or turn on your oven's broiler, making sure the rack is placed about 3-4" below the element. While you're waiting for it to heat up, remove bamboo skewers from water, and thread 2 tsukune onto each. Once your cooking medium is hot, grill or broil the tsukune, for 1 minute. Flip over and repeat on the other side.
5. Once tsukune have been cooked on each side, flip again, and brush with tare. Place back on grill or under broiler and cook until dry, about 1 minute. Remove, flip and brush again with tare. Repeat this procedure once more on each side of the tsukune, ensuring the balls are dry before applying the next coating of tare.
Serve piping hot with a sprinkle of sansho pepper.
Tare: Basting sauce for Yaki-tori
Ingredients
¼ cup sake
1/3 cup + 2 tbsp mirin
1 tbsp granulated sugar
1/3 cup + 2 tbsp soy sauce
optional: add in one dried shiitake mushroom
Directions
1. In a small pot, bring sake and mirin to a boil. Add in the sugar. Cook, stirring until sugar is dissolved. Add the soy sauce (and the mushroom if using) and bring to a boil. Reduce heat and simmer for 30 minutes. Sauce will be thick and glossy. Remove mushroom (feel free to eat it, it's super tasty) and use right away or keep in the fridge for up to a month.
I really, really miss Daikichi's. In fact, about a year ago (almost to the day!), I said about the same thing.
It was a hole in the wall, the guys who ran the place smoked over the food as they grilled it, its tiny booths and stools were often packed with drunk salarymen and attractive young women (who were probably not their wives) and we enjoyed copious amounts of sake, beer and meat on sticks.
We occasionally got eggplant and onion too... but mostly we ordered meat on sticks.
Until recently, I haven't tried to recreate Daikichi's. Anything I do won't live up to the memory in my mind.
Anyway, we always got the chicken-cheese (grilled chicken thighs with a cheese slice on top and special mildly spicy sauce) and the aspara-bacon (grilled bacon wrapped asparagus), and usually got another dish, tsukune.
I attempted those this week, and they're about as authentic as they're going to get given that:
a) I'm not chain smoking over the skewers and
b) I don't have a grill
Tsukune (つくね) are essentially very smooth chicken meatballs seasoned with ginger, sesame and green onion, dipped repeatedly in tare (垂れ) and grilled until dry in between dips. Tare is basically the awesome older brother of the insipid teriyaki sauce we have here.
When I moved to Japan and asked about buying teriyaki sauce in the grocery store, I was met by a round of blank stares. Ask for tare.
Better yet, don't buy it from the grocery store. It's dead easy to make.
Now, I like my tsukune well browned with the tare. Those found at Daikichi's tend to be less assertive. Also, I have yet to perfect the art of perfectly spherical meatballs.
![]() |
| Daikichi's tsukune |
Here are a few pictures of our favourite joint:
![]() |
| A friend outside Daikichi |
![]() |
| Inside our Daikichi's |
![]() |
| My very young, red faced, and hairier husband fans the grilled goods. |
Tsukune: Grilled Chicken Meatballs
(from Hiroko Shimbo's Japanese Kitchen)
Ingredients
1 lb ground chicken or turkey
½ tsp kosher salt
½ tsp finely ground black pepper
2 green onions, both green and white parts, minced
1½ tsp freshly grated ginger
1 egg white, lightly beaten
2 tsp sesame oil
1 tbsp canola oil
sansho pepper (optional)
tare sauce (recipe below)
Directions
1. Begin by soaking 8 bamboo skewers in water for 15 minutes. Set aside.
2. Using a food processor, pulse ground chicken until it forms a coarse paste. Add in salt and black pepper, and pulse again. Alternatively, you can use your hands to squeeze the mixture over and over again (we're talking a good 5 minutes or so) and it'll achieve similar results. Remove mixture from food processor, stir in ginger and green onions. Once they are evenly distributed, mix in the egg white and sesame oil. Divide the mixture into 16 evenly sized balls.
3. Heat 1 tbsp canola oil in a large, non-stick frying pan. Working in batches, cook tsukune for 1 minute or so on each side or just until they're white and firm. You don't actually want to finish cooking them at this stage; you'll finish them off either on the grill or beneath the broiler.
4. Heat the grill on medium high heat or turn on your oven's broiler, making sure the rack is placed about 3-4" below the element. While you're waiting for it to heat up, remove bamboo skewers from water, and thread 2 tsukune onto each. Once your cooking medium is hot, grill or broil the tsukune, for 1 minute. Flip over and repeat on the other side.
5. Once tsukune have been cooked on each side, flip again, and brush with tare. Place back on grill or under broiler and cook until dry, about 1 minute. Remove, flip and brush again with tare. Repeat this procedure once more on each side of the tsukune, ensuring the balls are dry before applying the next coating of tare.
Serve piping hot with a sprinkle of sansho pepper.
Tare: Basting sauce for Yaki-tori
Ingredients
¼ cup sake
1/3 cup + 2 tbsp mirin
1 tbsp granulated sugar
1/3 cup + 2 tbsp soy sauce
optional: add in one dried shiitake mushroom
Directions
1. In a small pot, bring sake and mirin to a boil. Add in the sugar. Cook, stirring until sugar is dissolved. Add the soy sauce (and the mushroom if using) and bring to a boil. Reduce heat and simmer for 30 minutes. Sauce will be thick and glossy. Remove mushroom (feel free to eat it, it's super tasty) and use right away or keep in the fridge for up to a month.
Monday, July 04, 2011
A Cool Salad of Herbs and Yogurt with Honey Sriracha Tempeh
I love, love, LOVE it when leftovers from dinner provide the perfect next-day lunch. Last night, we chowed down on Bon Appetit's Yogurt Marinated Chicken and Cucumber-Mint Raita from Epicurious. Both were amazing, and highly recommended. I set aside one of the two chicken breasts that I'd grilled last night for today's lunch.
Originally intending to make a sandwich with the chicken and raita, I found myself wilting in the heat and instead cravings something fresher. So, a salad it was!
I marinated a package of tempeh in sriracha, lime, honey and shallot to play off the balance of cool herbs in the raita. Grilled and served opposite the cold chicken, the salad totally hit the spot.
Hello summer! Aren't you looking colourful? Heirloom Ontario tomatoes, carrots, snow peas, lettuce, cucumber, romaine and butter lettuce, plus fresh mint to garnish. Man, oh man, was this some seriously tasty stuff. I'm planning on making a massive batch of raita up to dip veggies in this week.
Honey Sriracha Tempeh
Ingredients
1 block tempeh, cut into 16 slices
2 tbsp honey
2 tbsp sriracha
2 tbsp lime juice
1 shallot, minced
¼ tsp kosher salt
Directions
1. Whisk together honey, sriracha, lime juice and shallot. Place in a ziploc bag with tempeh. Marinate in fridge for at least 1 hour, preferably overnight.
2. Remove tempeh from marinade. Sprinkle with salt and grill over medium heat for 2 minutes on each side, just until grill marks form. Cut into chunks and sprinkle over salad.
Is there anything more beautiful than summer's produce? I think not.
Originally intending to make a sandwich with the chicken and raita, I found myself wilting in the heat and instead cravings something fresher. So, a salad it was!
I marinated a package of tempeh in sriracha, lime, honey and shallot to play off the balance of cool herbs in the raita. Grilled and served opposite the cold chicken, the salad totally hit the spot.
Hello summer! Aren't you looking colourful? Heirloom Ontario tomatoes, carrots, snow peas, lettuce, cucumber, romaine and butter lettuce, plus fresh mint to garnish. Man, oh man, was this some seriously tasty stuff. I'm planning on making a massive batch of raita up to dip veggies in this week.
Honey Sriracha Tempeh
Ingredients
1 block tempeh, cut into 16 slices
2 tbsp honey
2 tbsp sriracha
2 tbsp lime juice
1 shallot, minced
¼ tsp kosher salt
Directions
1. Whisk together honey, sriracha, lime juice and shallot. Place in a ziploc bag with tempeh. Marinate in fridge for at least 1 hour, preferably overnight.
2. Remove tempeh from marinade. Sprinkle with salt and grill over medium heat for 2 minutes on each side, just until grill marks form. Cut into chunks and sprinkle over salad.
Is there anything more beautiful than summer's produce? I think not.
Saturday, June 04, 2011
A Smoky Chopped Salad for a Hot Day
Last week, the temperature in Toronto hit a brutal 40º C with the humidex.
Let me be clear on one thing: I am not one of those Canadians who sits around dreaming of the scorching summer sun. I like the heat; I hate the humidity.
Perhaps it's the fact that we have no outdoor space in our apartment (which means all cooking gets done inside), perhaps it's the lack of central air to cool ourselves off at night, perhaps it's the memory of the smell of the summer when the garbage collectors went on strike. Whatever the reason, I really, really dislike Toronto when the heat and humidity hits.
This is one of those recipes designed to embrace the flavour of the heat and humidity, but to avoid heating too much up in the kitchen.
The whole thing comes together really quickly, and you can keep any extra salad dressing in the fridge for 3 days.
Chicken & Chickpea Salad with Smoked Paprika Dressing
Ingredients
Dressing
2 tbsp apple cider vinegar
1 smashed clove garlic
1 tbsp olive oil
½ tsp kosher salt
¼ tsp freshly ground black pepper
½ tsp smoked paprika
½ tsp ancho chili powder
Salad
2 romaine hearts, washed, dried and chopped
2 cup mixed sprouts (pea, sunflower, radish, etc)
½ lb grilled boneless, skinless chicken thighs
½ 19 oz can chickpeas, rinsed
2 slices bacon, cooked and crumbled
2 oz blue cheese, crumbled
½ pint cherry tomatoes, halved
½ avocado, chopped
5-6 cremini mushrooms, sliced
optional: pickled jalapenos or green beans (I love Toorshi Hot and Savoury Green Beans)
Directions
1. Whisk together all dressing ingredients. Set aside and let sit for an hour so the garlic can infuse the dressing.
2. Toss together salad ingredients. Discard garlic clove and dress the salad. Serve on chilled plates.
That was dead easy, wasn't it?
Let me be clear on one thing: I am not one of those Canadians who sits around dreaming of the scorching summer sun. I like the heat; I hate the humidity.
Perhaps it's the fact that we have no outdoor space in our apartment (which means all cooking gets done inside), perhaps it's the lack of central air to cool ourselves off at night, perhaps it's the memory of the smell of the summer when the garbage collectors went on strike. Whatever the reason, I really, really dislike Toronto when the heat and humidity hits.
This is one of those recipes designed to embrace the flavour of the heat and humidity, but to avoid heating too much up in the kitchen.
The whole thing comes together really quickly, and you can keep any extra salad dressing in the fridge for 3 days.
Chicken & Chickpea Salad with Smoked Paprika Dressing
Ingredients
Dressing
2 tbsp apple cider vinegar
1 smashed clove garlic
1 tbsp olive oil
½ tsp kosher salt
¼ tsp freshly ground black pepper
½ tsp smoked paprika
½ tsp ancho chili powder
Salad
2 romaine hearts, washed, dried and chopped
2 cup mixed sprouts (pea, sunflower, radish, etc)
½ lb grilled boneless, skinless chicken thighs
½ 19 oz can chickpeas, rinsed
2 slices bacon, cooked and crumbled
2 oz blue cheese, crumbled
½ pint cherry tomatoes, halved
½ avocado, chopped
5-6 cremini mushrooms, sliced
optional: pickled jalapenos or green beans (I love Toorshi Hot and Savoury Green Beans)
Directions
1. Whisk together all dressing ingredients. Set aside and let sit for an hour so the garlic can infuse the dressing.
2. Toss together salad ingredients. Discard garlic clove and dress the salad. Serve on chilled plates.
That was dead easy, wasn't it?
Tuesday, May 31, 2011
A Caramelized Chicken Stir-Fry
On the one hand, I feel like I should be apologizing for all these Gwyneth Paltrow based dishes. On the other, they've all turned out really well.
Stir-fries aren't a popular dish in our house on account of my husband not really being into them. But, I really like them, and I'm the cook, so sometimes he just has to put up with what I put on the table.
He went back for seconds, so that should tell you a little something about this recipe!
Now, Gwyneth brands this as "the best chicken stir-fry" and I don't know that I agree that it's the best, but it is very good. I'll give her that. I'll also give her that this recipe comes together about as quickly as your local Chinese take-out joint would take to deliver to your house.
You might as well just make it, if you ask me!
Chicken Stir Fry
(mildly adapted from My Father's Daughter)
Ingredients
1 lb boneless, skinless chicken thighs, cut into 3/4" cubes
2 tbsp potato starch (you can use cornstarch instead)
coarse salt
freshly ground pepper
1 tbsp canola oil
6 large cloves garlic, minced
¼ cup minced ginger
4 green onions, minced
¼ tsp hot pepper flakes
½ cup unseasoned rice vinegar
½ cup dark brown sugar
2 tbsp soy sauce
¼ cup chopped fresh cilantro
Directions
1. Toss chicken cubes with potato starch and a healthy pinch of salt and a generous seasoning of pepper. Set aside.
2. Heat the oil in a large non-stick wok. Add the garlic, ginger, green onions and chile flakes and cook for about 1 minute. Add the chicken cubes and cook, stirring occasionally for 5 minutes. Add in the vinegar and sugar and additional black pepper. Allow to boil for about 3 minutes, or until the sugar has really caramelized and the whole sauce is thick and sticky. Stir in the soy sauce, cook for an additional minute and then remove from heat. Sprinkle with cilantro and serve immediately.
Makes enough for 3-4, depending on their appetites.
We ate it with sticky rice with tossed with cooked kale and soy sauce.
Stir-fries aren't a popular dish in our house on account of my husband not really being into them. But, I really like them, and I'm the cook, so sometimes he just has to put up with what I put on the table.
He went back for seconds, so that should tell you a little something about this recipe!
Now, Gwyneth brands this as "the best chicken stir-fry" and I don't know that I agree that it's the best, but it is very good. I'll give her that. I'll also give her that this recipe comes together about as quickly as your local Chinese take-out joint would take to deliver to your house.
You might as well just make it, if you ask me!
Chicken Stir Fry
(mildly adapted from My Father's Daughter)
Ingredients
1 lb boneless, skinless chicken thighs, cut into 3/4" cubes
2 tbsp potato starch (you can use cornstarch instead)
coarse salt
freshly ground pepper
1 tbsp canola oil
6 large cloves garlic, minced
¼ cup minced ginger
4 green onions, minced
¼ tsp hot pepper flakes
½ cup unseasoned rice vinegar
½ cup dark brown sugar
2 tbsp soy sauce
¼ cup chopped fresh cilantro
Directions
1. Toss chicken cubes with potato starch and a healthy pinch of salt and a generous seasoning of pepper. Set aside.
2. Heat the oil in a large non-stick wok. Add the garlic, ginger, green onions and chile flakes and cook for about 1 minute. Add the chicken cubes and cook, stirring occasionally for 5 minutes. Add in the vinegar and sugar and additional black pepper. Allow to boil for about 3 minutes, or until the sugar has really caramelized and the whole sauce is thick and sticky. Stir in the soy sauce, cook for an additional minute and then remove from heat. Sprinkle with cilantro and serve immediately.
Makes enough for 3-4, depending on their appetites.
We ate it with sticky rice with tossed with cooked kale and soy sauce.
Main Ingredients:
caramelized,
chicken,
fast,
gwyneth paltrow,
stir-fry
Wednesday, May 25, 2011
Another Cottage Recipe: Huli Huli Chicken
One of the things I miss about not being in a house with a yard is a barbecue. With hints of sun finally appearing after what feels like a month (or more) of rain, all I want is to be able to stand outside and cook my food.
On the second floor apartment without a balcony, this dream gets deferred until I'm at the cottage. Over the May long weekend, I knew there was no way I was going to let the throngs of mosquitoes that like to come out at the dinner hour keep me inside. And, as much as I hate applying DEET, sometimes, you've just got to make the hard choices.
I chose flank steak, burgers and Huli Huli Chicken. And, in spite of the DEET, I have at least 5 bites around my ankles.
But, I stand by my decision. The chicken was worth it.
Huli Huli Chicken is one of those fantastic Hawaiian recipes that has about a million variations. The short? Barbecued chicken marinated with (amongst other things) pineapple juice, soy sauce, ginger and garlic. We chose to spice it up considerably with the sriracha.
Huli Huli Chicken
(adapted from Norah's Menus)
Ingredients
Marinade
4 cups water
1 cup soy sauce (I like to use low sodium here)
½ tablespoon vegetable oil (you can use sesame if you like)
3 garlic cloves, minced
1" knob fresh ginger, grated or finely minced
2 lbs boneless, skinless chicken thighs or breasts
Sauce
2/3 cup pineapple juice (the fresher, the better)
2 tbsp brown sugar
2 tbsp cup soy sauce
2 tbsp cup ketchup
2 tbsp cup rice vinegar
2 garlic cloves, minced
1" knob ginger, freshly grated
1 teaspoons sriracha
1 cup each applewood and hickory wood chips (soaked 30 minutes)
Directions
1. In a large, nonreactive dish, whisk together the marinade ingredients (water, soy sauce, oil, ginger and garlic). Add chicken and marinate for at least an hour, but no more than 8. The chicken will be too salty if you let it sit for longer.
2. In a saucepan, stir together sauce ingredients (juice through sriracha). Bring to a boil over medium heat, then reduce heat and simmer until sauce is reduced to approximately ½ cup. This will take anywhere between 20-30 minutes. Set aside.
3. Using tinfoil to create foil packages for your wood chips. This step is essential in creating a smokey chicken. It really makes the dish. The size of the package doesn't really matter, so long as the wood is packed in nicely. Cut several slits in the top of the package so the smoke can escape.
4. Place foil package on bbq burners (Norah has great instructions if you're using other kinds of barbecues), and fire up the grill, with all elements on high. While the grill is heating up (and preferably before the wood is smoking), oil the grill. I find the easiest way to do this is to dip some paper towel in oil and use tongs to swab it across the grates.
5. Once wood packet is smoking, reduce elements to low on all sides and place chicken on grill. Move quickly, because you don't want the smoke to escape. You can discard the marinade at this point.
6. Depending on the thickness of your chicken (and your cut), grill for about 15 minutes (8 per side), or until internal temperature registers 165º. Resist the urge to peek at the chicken. You'll be paid off by flavour in the long run. Brush with sauce and let brown for 1-2 minutes extra. Serve with any extra sauce.
On the second floor apartment without a balcony, this dream gets deferred until I'm at the cottage. Over the May long weekend, I knew there was no way I was going to let the throngs of mosquitoes that like to come out at the dinner hour keep me inside. And, as much as I hate applying DEET, sometimes, you've just got to make the hard choices.
I chose flank steak, burgers and Huli Huli Chicken. And, in spite of the DEET, I have at least 5 bites around my ankles.
But, I stand by my decision. The chicken was worth it.
Huli Huli Chicken is one of those fantastic Hawaiian recipes that has about a million variations. The short? Barbecued chicken marinated with (amongst other things) pineapple juice, soy sauce, ginger and garlic. We chose to spice it up considerably with the sriracha.
Huli Huli Chicken
(adapted from Norah's Menus)
Ingredients
Marinade
4 cups water
1 cup soy sauce (I like to use low sodium here)
½ tablespoon vegetable oil (you can use sesame if you like)
3 garlic cloves, minced
1" knob fresh ginger, grated or finely minced
2 lbs boneless, skinless chicken thighs or breasts
Sauce
2/3 cup pineapple juice (the fresher, the better)
2 tbsp brown sugar
2 tbsp cup soy sauce
2 tbsp cup ketchup
2 tbsp cup rice vinegar
2 garlic cloves, minced
1" knob ginger, freshly grated
1 teaspoons sriracha
1 cup each applewood and hickory wood chips (soaked 30 minutes)
Directions
1. In a large, nonreactive dish, whisk together the marinade ingredients (water, soy sauce, oil, ginger and garlic). Add chicken and marinate for at least an hour, but no more than 8. The chicken will be too salty if you let it sit for longer.
2. In a saucepan, stir together sauce ingredients (juice through sriracha). Bring to a boil over medium heat, then reduce heat and simmer until sauce is reduced to approximately ½ cup. This will take anywhere between 20-30 minutes. Set aside.
3. Using tinfoil to create foil packages for your wood chips. This step is essential in creating a smokey chicken. It really makes the dish. The size of the package doesn't really matter, so long as the wood is packed in nicely. Cut several slits in the top of the package so the smoke can escape.
4. Place foil package on bbq burners (Norah has great instructions if you're using other kinds of barbecues), and fire up the grill, with all elements on high. While the grill is heating up (and preferably before the wood is smoking), oil the grill. I find the easiest way to do this is to dip some paper towel in oil and use tongs to swab it across the grates.
5. Once wood packet is smoking, reduce elements to low on all sides and place chicken on grill. Move quickly, because you don't want the smoke to escape. You can discard the marinade at this point.
![]() |
| See that sweet smoke? Hello flavour country! |
Tuesday, May 17, 2011
Chicken Simmer with Spinach, Capers and Onions
Cleaning out the fridge is almost always an exercise in experimentation. This recipe was born out of the need to do something with some bone-in chicken thighs and some leftover pizza sauce (really just whole tomatoes and garlic simmered together).
A sort through the fridge revealed half a bag of spinach, half a sweet onion, a little leftover pesto and some capers. I opted to save the pesto for another day and came up with this little number.
Chicken Simmered with Spinach, Capers and Onions
Ingredients
Rub for Chicken
1 tsp ground fennel seeds
1 tsp dried basil
½ tsp ground coriander
¼ tsp salt
¼ tsp freshly ground pepper
1 lb bone-in, skinless chicken thighs, trimmed of excess fat
1 tbsp olive oil
½ large onion, chopped
1 cup pasta/pizza sauce
½ cup full bodied red wine
2 tbsp capers, drained and rinsed
4 cups fresh spinach, washed and torn into bite size pieces
3 oz spaghetti
¼ cup fresh basil
freshly grated Parmesan for serving
Directions
1. Combine all rub ingredients together in a small bowl. Rub all over chicken thighs.
2. Heat oil in a large skillet over medium heat. Brown chicken thighs, 2-3 minutes on each side. Don't worry about cooking all the way through, you just want to get a good colour going. Remove chicken from pan. Add in onion and sauté until translucent.
3. Pour in wine and deglaze the pan for about 30 seconds. You don't want it to all evaporate though. Stir in pasta sauce and capers. Return chicken to pan. Bring sauce to a simmer, reduce heat, cover and cook, turning chicken once, for about 20 minutes or until chicken is cooked and tender.
4. Meanwhile, bring a large pot of water to a full boil and cook pasta, about 12 minutes. Drain and set aside.
5. Remove chicken from pan and pull meat from bones, discarding fat and bones. Add spinach to skillet, cover and let cook until wilted, about 2 minutes. Return chicken meat to pan. Toss to incorporate. Add in pasta and toss again.
Serve with basil and Parmesan and the rest of the bottle of wine. Makes enough for 2 for a rainy weekend dinner.
A sort through the fridge revealed half a bag of spinach, half a sweet onion, a little leftover pesto and some capers. I opted to save the pesto for another day and came up with this little number.
Chicken Simmered with Spinach, Capers and Onions
Ingredients
Rub for Chicken
1 tsp ground fennel seeds
1 tsp dried basil
½ tsp ground coriander
¼ tsp salt
¼ tsp freshly ground pepper
1 lb bone-in, skinless chicken thighs, trimmed of excess fat
1 tbsp olive oil
½ large onion, chopped
1 cup pasta/pizza sauce
½ cup full bodied red wine
2 tbsp capers, drained and rinsed
4 cups fresh spinach, washed and torn into bite size pieces
3 oz spaghetti
¼ cup fresh basil
freshly grated Parmesan for serving
Directions
1. Combine all rub ingredients together in a small bowl. Rub all over chicken thighs.
2. Heat oil in a large skillet over medium heat. Brown chicken thighs, 2-3 minutes on each side. Don't worry about cooking all the way through, you just want to get a good colour going. Remove chicken from pan. Add in onion and sauté until translucent.
3. Pour in wine and deglaze the pan for about 30 seconds. You don't want it to all evaporate though. Stir in pasta sauce and capers. Return chicken to pan. Bring sauce to a simmer, reduce heat, cover and cook, turning chicken once, for about 20 minutes or until chicken is cooked and tender.
4. Meanwhile, bring a large pot of water to a full boil and cook pasta, about 12 minutes. Drain and set aside.
5. Remove chicken from pan and pull meat from bones, discarding fat and bones. Add spinach to skillet, cover and let cook until wilted, about 2 minutes. Return chicken meat to pan. Toss to incorporate. Add in pasta and toss again.
Serve with basil and Parmesan and the rest of the bottle of wine. Makes enough for 2 for a rainy weekend dinner.
Wednesday, May 04, 2011
My Husband's Favourite Curry Recipe
We got this recipe from the people who make Perfect Taste Curry Powder. Now, I don't usually go in for premade spice mixes, but we tried their stuff at a tasting at our local grocery store last year, and were blown away by depth of flavour of the spicy blend. Served with their caramelized onion chutney (which is the finest I have purchased to date), this really is a winner.
Plus, they work out of Niagara-on-the-Lake, which I think is all kinds of awesomely local.
The original recipe is significantly higher in oil, meat and sodium content, so I reduced all of them.
Ground Chicken Curry with Potatoes and Chickpeas
(adapted from Perfect Taste)
Ingredients
3 tbsp canola oil
2 medium onions, sliced
2" ginger, peeled and minced
5 cloves garlic, peeled and minced
3 tbsp mild curry paste
1 tbsp hot curry powder (preferably Perfect Taste)
1 lb ground chicken
1 28-oz can whole, peeled tomatoes
1 large waxy potato, peeled and diced
1 19-oz can chickpeas, rinsed and drained
1 tsp salt
2 cups water
1 palmful cilantro, chopped
Directions
1. Heat oil over medium heat. Add onion and cook until golden brown, add ginger and garlic and stir until just fragrant. Do NOT let it colour. Add in curry paste and powder. Mix well with onion mixture. Add meat and stir to break up large chunks. Let brown, and then add tomatoes with their juices, potato, chickpeas, salt and water. Stir well. Bring to a boil, then reduce heat and simmer gently for 30 minutes for a quick dinner, or 1 hour if you want something with more flavour.
Serve, sprinkled with cilantro, with basmati rice, chutney and naan. We find it makes between 6-8 servings.
Plus, they work out of Niagara-on-the-Lake, which I think is all kinds of awesomely local.
The original recipe is significantly higher in oil, meat and sodium content, so I reduced all of them.
Ground Chicken Curry with Potatoes and Chickpeas
(adapted from Perfect Taste)
Ingredients
3 tbsp canola oil
2 medium onions, sliced
2" ginger, peeled and minced
5 cloves garlic, peeled and minced
3 tbsp mild curry paste
1 tbsp hot curry powder (preferably Perfect Taste)
1 lb ground chicken
1 28-oz can whole, peeled tomatoes
1 large waxy potato, peeled and diced
1 19-oz can chickpeas, rinsed and drained
1 tsp salt
2 cups water
1 palmful cilantro, chopped
Directions
1. Heat oil over medium heat. Add onion and cook until golden brown, add ginger and garlic and stir until just fragrant. Do NOT let it colour. Add in curry paste and powder. Mix well with onion mixture. Add meat and stir to break up large chunks. Let brown, and then add tomatoes with their juices, potato, chickpeas, salt and water. Stir well. Bring to a boil, then reduce heat and simmer gently for 30 minutes for a quick dinner, or 1 hour if you want something with more flavour.
Serve, sprinkled with cilantro, with basmati rice, chutney and naan. We find it makes between 6-8 servings.
Main Ingredients:
chicken,
chickpeas,
curry,
perfect taste,
Potatoes
Thursday, April 07, 2011
Chicken and Broccoli Pasta Bake with Pesto
Once the choice pieces of a roast are used up in salads or sandwiches, what's left often doesn't amount to much. The casserole has long been the go-to for the budget cook who has limited key ingredients and needs to stretch them as far as possible.
Heck, it's the go to for many who aren't budget cooks because they're easy and comforting. Really, it's a win-win situation for all parties concerned.
What I struggle with when I look for casserole recipes is the number that call for processed ingredients. I'll be honest, we don't keep cans of soup in our cupboards. So, I'm often left not having those ingredients that are deemed staples.
Thankfully, I remembered this recipe from Cooking Light from about a decade ago that had a homemade cheese sauce base! With the exception of the pesto I threw in, there's no processed ingredients here!
Chicken and Broccoli Pasta Bake with Pesto
(inspired by an old recipe from Cooking Light)
Ingredients
1 head broccoli florets, cut into bite size pieces
3 cups (give or take) cubed roasted chicken
4 cups cooked pasta (about 8 oz uncooked)
½ yellow or red pepper, chopped
¼ cup fresh basil, chopped
1 tbsp olive oil
1 shallot, minced
2 cloves of garlic, minced
¼ cup flour
2 cups milk
1 cup shredded Parmesan cheese
¼ cup pesto, plus additional for serving
salt and pepper to taste
Directions
1. Preheat oven to 350º. Spray an 8"x8" casserole dish with cooking spray.
2. Steam broccoli florets briefly (4 minutes or so), or until vibrant green. Toss with chicken, pasta, pepper and basil.
3. Heat olive oil in a medium saucepan over medium heat. Sauté shallots and garlic for 3-4 minutes, or until softened. Sprinkle flour over top and cook for 1 minute, stirring constantly. Grab a whisk, and begin to pour the milk in slooooowly, whisking constantly. Doing this will prevent lumps. Once all milk is incorporated, cook, stirring constantly, until mixture is thick enough to coat the back of a spoon. Remove pan from heat and stir in cheese and pesto. Let melt and then pour mixture over pasta-broccoli-chicken mixture. Toss to coat and place in casserole dish.
4. Bake, uncovered, for about 20 minutes or until bubbly. Serve with an additional dollop of pesto.
Heck, it's the go to for many who aren't budget cooks because they're easy and comforting. Really, it's a win-win situation for all parties concerned.
What I struggle with when I look for casserole recipes is the number that call for processed ingredients. I'll be honest, we don't keep cans of soup in our cupboards. So, I'm often left not having those ingredients that are deemed staples.
Thankfully, I remembered this recipe from Cooking Light from about a decade ago that had a homemade cheese sauce base! With the exception of the pesto I threw in, there's no processed ingredients here!
Chicken and Broccoli Pasta Bake with Pesto
(inspired by an old recipe from Cooking Light)
Ingredients
1 head broccoli florets, cut into bite size pieces
3 cups (give or take) cubed roasted chicken
4 cups cooked pasta (about 8 oz uncooked)
½ yellow or red pepper, chopped
¼ cup fresh basil, chopped
1 tbsp olive oil
1 shallot, minced
2 cloves of garlic, minced
¼ cup flour
2 cups milk
1 cup shredded Parmesan cheese
¼ cup pesto, plus additional for serving
salt and pepper to taste
Directions
1. Preheat oven to 350º. Spray an 8"x8" casserole dish with cooking spray.
2. Steam broccoli florets briefly (4 minutes or so), or until vibrant green. Toss with chicken, pasta, pepper and basil.
3. Heat olive oil in a medium saucepan over medium heat. Sauté shallots and garlic for 3-4 minutes, or until softened. Sprinkle flour over top and cook for 1 minute, stirring constantly. Grab a whisk, and begin to pour the milk in slooooowly, whisking constantly. Doing this will prevent lumps. Once all milk is incorporated, cook, stirring constantly, until mixture is thick enough to coat the back of a spoon. Remove pan from heat and stir in cheese and pesto. Let melt and then pour mixture over pasta-broccoli-chicken mixture. Toss to coat and place in casserole dish.
4. Bake, uncovered, for about 20 minutes or until bubbly. Serve with an additional dollop of pesto.
Wednesday, April 06, 2011
Easy Roast Chicken
By god, do I love a Sunday roast. There's just so much you can do with the leftovers during the week! Sunday is becoming, more and more, the day when we cook meat. We use up the remainder during the week for salads, sandwiches, other recipes, but ultimately, if we're going to eat meat during the week, it's because we did something with it on Sunday.
I guess that's indicative of our shift towards a more plant-grain based diet.
But, there's something about Sundays that call for a roast. Perhaps it's the free time, perhaps it's because that's always what my mother did. Whatever the reason, I'm happy to carry on doing things this way!
Roast Chicken with Garlic, Lemon and Smoked Paprika
(adapted from Cooking Light)
Ingredients
1 roasting chicken
2 teaspoons unsalted butter, softened
1/2 teaspoons dried thyme
1 teaspoon smoked paprika
1 teaspoon ground coriander
2 teaspoons extra-virgin olive oil
3/4 teaspoon kosher salt
1/4 teaspoon freshly ground black pepper
2 garlic cloves, minced
1 shallot, peeled and halved
½ lemon, quartered
Directions
1. Preheat oven to 350º. Rinse chicken under tap, then pat dry with paper towel. Carefully loosen the skin around the breast and legs by pushing fingers between skin and meat. You'll find it generally separates pretty easily.
2. In a small bowl, combine butter with next 7 ingredients (through garlic), blending to form a paste. Rub on both chicken meat under skin and on top of the skin itself. Try to get as much of the garlic under the skin as possible, so it doesn't burn.
3. Truss chicken. Place on a rack in a roasting pan (or do as I do and use a rack on a cast iron skillet) breast side up, and stuff cavity with shallot and lemon pieces. Cook at 350º for 45-60 minutes, or until temperature at thickest part of the thigh reads 158-160º (or so). Raise the heat to 450º and cook for an additional 15 minutes, or until temperature of thigh reads 165º. Remove from pan and let stand 10 minutes before carving so that juices can redistribute.
You can drain off the fat from the pan and make gravy using the pan drippings. The flavours here make an especially delicious one. Any leftovers of the gravy could be used to make a totally excellent poutine.
I guess that's indicative of our shift towards a more plant-grain based diet.
But, there's something about Sundays that call for a roast. Perhaps it's the free time, perhaps it's because that's always what my mother did. Whatever the reason, I'm happy to carry on doing things this way!
Roast Chicken with Garlic, Lemon and Smoked Paprika
(adapted from Cooking Light)
Ingredients
1 roasting chicken
2 teaspoons unsalted butter, softened
1/2 teaspoons dried thyme
1 teaspoon smoked paprika
1 teaspoon ground coriander
2 teaspoons extra-virgin olive oil
3/4 teaspoon kosher salt
1/4 teaspoon freshly ground black pepper
2 garlic cloves, minced
1 shallot, peeled and halved
½ lemon, quartered
Directions
1. Preheat oven to 350º. Rinse chicken under tap, then pat dry with paper towel. Carefully loosen the skin around the breast and legs by pushing fingers between skin and meat. You'll find it generally separates pretty easily.
2. In a small bowl, combine butter with next 7 ingredients (through garlic), blending to form a paste. Rub on both chicken meat under skin and on top of the skin itself. Try to get as much of the garlic under the skin as possible, so it doesn't burn.
3. Truss chicken. Place on a rack in a roasting pan (or do as I do and use a rack on a cast iron skillet) breast side up, and stuff cavity with shallot and lemon pieces. Cook at 350º for 45-60 minutes, or until temperature at thickest part of the thigh reads 158-160º (or so). Raise the heat to 450º and cook for an additional 15 minutes, or until temperature of thigh reads 165º. Remove from pan and let stand 10 minutes before carving so that juices can redistribute.
You can drain off the fat from the pan and make gravy using the pan drippings. The flavours here make an especially delicious one. Any leftovers of the gravy could be used to make a totally excellent poutine.
Monday, February 07, 2011
Chicken Wings with Soy-Brown Sugar-Sriracha Sauce
One of my goals this year is to purchase my food with a conscious effort to know exactly where it comes from. I believe I mentioned Rowe Farms before in my the post about the best roast chicken ever, but they're definitely worth mentioning again.
Their meat is locally raised (Guelph), hormone-free, antibiotic-free, hormone-free, nitrate-free... I could go on and on, but you might as well just read it for yourselves.
Anyway, they just opened a retail shop on Bloor, just a few blocks from our apartment.
And that makes me a very happy shopper. We don't buy tons of meat, but when we do, I like knowing it's from them.
This recipe was originally intended to be done in a crock pot and finished in the oven, but as I don't own a slow cooker I had to improvise. I slow cooked the wings for 3 hours in my Le Crueset enamelled cast iron dutch oven at 180º to mimic the conditions of a slow cooker.
Superbowl Chicken Wings
(adapted from Cooks Country)
Ingredients
1 lb chicken wings, tips removed
Rub
1" piece ginger, grated
1 clove garlic
1 tbsp packed brown sugar
1 tsp soy sauce
½ - 1 tsp sriracha
Sauce
1 tbsp water
1 tbsp tomato paste
2 tbsp brown sugar
1 tbsp soy sauce
½ tsp - 1 tbsp sriracha (if you like it spicy add the tbsp)
Directions
Their meat is locally raised (Guelph), hormone-free, antibiotic-free, hormone-free, nitrate-free... I could go on and on, but you might as well just read it for yourselves.
Anyway, they just opened a retail shop on Bloor, just a few blocks from our apartment.
![]() |
| Image from: West Annex News |
This recipe was originally intended to be done in a crock pot and finished in the oven, but as I don't own a slow cooker I had to improvise. I slow cooked the wings for 3 hours in my Le Crueset enamelled cast iron dutch oven at 180º to mimic the conditions of a slow cooker.
Superbowl Chicken Wings
(adapted from Cooks Country)
Ingredients
1 lb chicken wings, tips removed
Rub
1" piece ginger, grated
1 clove garlic
1 tbsp packed brown sugar
1 tsp soy sauce
½ - 1 tsp sriracha
Sauce
1 tbsp water
1 tbsp tomato paste
2 tbsp brown sugar
1 tbsp soy sauce
½ tsp - 1 tbsp sriracha (if you like it spicy add the tbsp)
Directions
1. MAKE RUB Pulse together all rub ingredients in a food processor or mini chopper.
Add mixture to dutch oven. Add chicken and toss until combined.
2. COOK AND COOL Cover and cook on low until fat renders and chicken is tender, 3 to 4 hours.
Using slotted spoon, remove wings and transfer to clean plate. Let wings cool 20 minutes (or cool briefly and refrigerate up to 24 hours).
3. SAUCE AND BROIL Adjust oven rack to lower-middle position and heat broiler. Set wire rack inside rimmed baking sheet and spray rack with baking spray. Whisk water, tomato paste, remaining sugar, remaining soy sauce, and remaining cayenne in bowl. Add half of sauce to bowl with cooled wings and toss gently to coat.
Arrange wings, skin side up, on prepared rack. Broil until wings are lightly charred and crisp around edges, 10 to 15 minutes.
Flip wings, brush with remaining sauce, and continue to broil until well caramelized, about 3 minutes. Serve.
And I promise you it'll look like this at the end...
Urp. Nom, nom, nom!
Arrange wings, skin side up, on prepared rack. Broil until wings are lightly charred and crisp around edges, 10 to 15 minutes.
Flip wings, brush with remaining sauce, and continue to broil until well caramelized, about 3 minutes. Serve.
And I promise you it'll look like this at the end...
Urp. Nom, nom, nom!
Main Ingredients:
chicken,
slow cooked,
soy,
sriracha,
wings
Saturday, January 22, 2011
The Best Roast Chicken I've Had in a Year (at least)
One of the things I love most about winter cooking is roasting a gorgeous bird. As part of our New Year's resolution, Phil and I are trying to buy locally produced meat as often as possible. And if it's free range and antibiotic free to boot, even better!
So when he picked up a gorgeous Rowe Farms chicken last weekend, I knew we were in for a treat... I just didn't realize how amazing this bird was going to be.
I'd like to think it's a combination of this recipe and the bird's providence.
And don't get me started on the sandwiches we made throughout the week with the leftovers. The chicken was moist, perfectly salty and blow-your-mind-tasty. I swear to you, I've never cooked a bird like this before. It puts all those tiny little things you can buy at Loblaws to shame.
So, though this bird cost us 12$ as opposed to 8$, I think those extra 4$ were well worth it.
Two days after roasting it, I made chicken stock with the leftover carcass, some shallots, carrots celery and a bay leaf. After simmering away on the stove for 2 hours, we were left with an intensely chickeny stock. Gorgeous. We got a lot of meals out of that bird - not to mention two litres of stock sitting in my freezer right now!
As a side note, this really is a great way to do potatoes. Cooking them first and throwing them in around the bird lets them soak up all those delicious juices (and fats) and get extra crispy in the oven. They're everything a roast potato should be!
Crisp Skinned Chicken with Rosemary Potatoes
(from Martha Stewart Living January 2011)
Ingredients
6 russet potatoes, peeled and cut crosswise, 3/4 inch thick
Coarse salt
Extra-virgin olive oil
1/2 teaspoon cornstarch
1 whole chicken (about 4 1/2 pounds)
1 tablespoon unsalted butter, softened
1 small bunch fresh rosemary
3 sprigs fresh sage (my addition)
Directions
Preheat oven to 450 degrees. Cook potatoes in salted boiling water until tender, 11 to 13 minutes. Drain. Return potatoes to pot, and shake over low heat to dry and fluff. Coat with oil, and season with salt.
Mix together 1 1/2 teaspoons salt and the cornstarch. Pat chicken dry with paper towels. Rub skin with butter, and season with salt mixture.
So when he picked up a gorgeous Rowe Farms chicken last weekend, I knew we were in for a treat... I just didn't realize how amazing this bird was going to be.
I'd like to think it's a combination of this recipe and the bird's providence.
And don't get me started on the sandwiches we made throughout the week with the leftovers. The chicken was moist, perfectly salty and blow-your-mind-tasty. I swear to you, I've never cooked a bird like this before. It puts all those tiny little things you can buy at Loblaws to shame.
So, though this bird cost us 12$ as opposed to 8$, I think those extra 4$ were well worth it.
Two days after roasting it, I made chicken stock with the leftover carcass, some shallots, carrots celery and a bay leaf. After simmering away on the stove for 2 hours, we were left with an intensely chickeny stock. Gorgeous. We got a lot of meals out of that bird - not to mention two litres of stock sitting in my freezer right now!
![]() |
| Glorious Chicken |
Crisp Skinned Chicken with Rosemary Potatoes
(from Martha Stewart Living January 2011)
Ingredients
6 russet potatoes, peeled and cut crosswise, 3/4 inch thick
Coarse salt
Extra-virgin olive oil
1/2 teaspoon cornstarch
1 whole chicken (about 4 1/2 pounds)
1 tablespoon unsalted butter, softened
1 small bunch fresh rosemary
3 sprigs fresh sage (my addition)
Directions
Preheat oven to 450 degrees. Cook potatoes in salted boiling water until tender, 11 to 13 minutes. Drain. Return potatoes to pot, and shake over low heat to dry and fluff. Coat with oil, and season with salt.
Mix together 1 1/2 teaspoons salt and the cornstarch. Pat chicken dry with paper towels. Rub skin with butter, and season with salt mixture.
![]() |
| Close up of the butter and salt mixture. |
Stuff some rosemary into cavity. Pile remaining rosemary on a rimmed baking sheet.
Place chicken, breast side up, on rosemary, and tuck wings under. Tie legs together with kitchen twine. Scatter potatoes around chicken. Roast for 30 minutes.
![]() |
| Oven ready |
Remove from oven, and flip potatoes. Return to oven, rotating sheet. Roast until chicken juices run clear and an instant-read thermometer inserted into the thickest part of a thigh reaches 165 degrees, about 30 minutes more. Let chicken rest for 10 minutes before serving. If potatoes aren't golden, toss with rosemary, and return to oven.
Main Ingredients:
chicken,
martha stewart,
Potatoes,
roast
Tuesday, August 10, 2010
Quick & Easy
Sometimes you want your dinner in a hurry.
And you have peaches that are quickly moving toward over-ripe.
This is the recipe for you: Pepper Jack, Chicken and Peach Quesadillas
We served this with the spinach salad (okay, so it was spinach and red peppers) with Cooking Light's recommended dressing:
Cumin-Lime Dressing
Combine 1 tablespoon fresh lime juice, 1 tablespoon extra-virgin olive oil, 1/8 teaspoon salt, 1/8 teaspoon freshly ground black pepper, and 1/8 teaspoon ground cumin in a large bowl. Toss with your desired salad ingredients.
Quick, easy, tasty. Works for me!
And you have peaches that are quickly moving toward over-ripe.
This is the recipe for you: Pepper Jack, Chicken and Peach Quesadillas
| Don't skimp on the honey-lime sour cream! Extra tastiness ahoy! |
Cumin-Lime Dressing
Combine 1 tablespoon fresh lime juice, 1 tablespoon extra-virgin olive oil, 1/8 teaspoon salt, 1/8 teaspoon freshly ground black pepper, and 1/8 teaspoon ground cumin in a large bowl. Toss with your desired salad ingredients.
Quick, easy, tasty. Works for me!
Tuesday, May 18, 2010
Bento #2 and #3
Okay, I'm not going to lie. I think I used the wrong recipe for number two. The karaage (Japanese friend chicken) was oishiikunai. Not delicious at all. So I'm not going to bother posting that disaster. This bring us to bento #3:
Not bad, huh? I was stuffed by the end of it!
Recipes after the jump.
Top layer: sake grilled shiitake, pickled daikon, miso marinated grilled chicken
Bottom layer: rice with wakame (not visible) and steamed broccoli
Not bad, huh? I was stuffed by the end of it!
Recipes after the jump.
Main Ingredients:
bento boxes,
chicken
Sunday, February 21, 2010
This past weekend, I went a little nuts on the baking. With Lent having begun this past Wednesday, I made a promise that I would start tracking what I was eating every day. This is, of course, all in a bid to become bikini ready for the summer.
Realistically, I know that I'm not going to get ripped, or lose those twenty pounds I've been slacking off about. I do hope that I walk out of the next six weeks with more accountability and less binging on sweets.
Okay, back to what I was originally talking about: this weekend. Saturday I made Maple Walnut Quick Bread. I was really hoping the recipe was going to be worth the effort because I had to drop seven dollars on walnut oil. The result? Delicious, moist bread with a pronounced maple flavour. P. and I had it toasted with some of this summer's Pear, Maple & Walnut Conserve. Definitely a winner.
While P. was still sleeping this morning, I whipped up a batch of Lime-Raspberry Muffins based on this recipe from Cooking Light. I replaced 1/3 of the all purpose flour with whole wheat and mistakenly mixed in the raspberries instead of placing them on top of the batter. I was pleasantly surprised to see that a) the raspberries didn't sink and b) the addition of the whole wheat flour didn't make the muffins heavy at all. Frankly I feel like the texture was more cupcake like than muffin like. In any case, I'll definitely make them again.
Later today, I whipped up a batch of Honey Oatmeal Bread using the recipe that I got in the instruction book with my Kitchen Aid mixer. This one resulted in a very heavy, dense bread that was a bit leaden. But, that's possibly my fault as I may have gone overboard with my whole wheat substitution here. I used it for ½ of the flour called for. Either way, I think I'll stick with my Canadian Living recipe from now on.
Finally, I roasted a chicken (free-range and local and only 1.99$ a lb!) using a recipe from an old Fine Cooking magazine and that was the best I've made in ages... perhaps ever! I've never been able to afford a free range bird before, so I suspect that the way the bird was raised has a lot to do with the taste. Anyway, the short version of the recipe:
I've never done started a roast upside down before, but it makes so much sense! The result spoke for itself. Nom. Nom. Nom.
Realistically, I know that I'm not going to get ripped, or lose those twenty pounds I've been slacking off about. I do hope that I walk out of the next six weeks with more accountability and less binging on sweets.
Okay, back to what I was originally talking about: this weekend. Saturday I made Maple Walnut Quick Bread. I was really hoping the recipe was going to be worth the effort because I had to drop seven dollars on walnut oil. The result? Delicious, moist bread with a pronounced maple flavour. P. and I had it toasted with some of this summer's Pear, Maple & Walnut Conserve. Definitely a winner.
While P. was still sleeping this morning, I whipped up a batch of Lime-Raspberry Muffins based on this recipe from Cooking Light. I replaced 1/3 of the all purpose flour with whole wheat and mistakenly mixed in the raspberries instead of placing them on top of the batter. I was pleasantly surprised to see that a) the raspberries didn't sink and b) the addition of the whole wheat flour didn't make the muffins heavy at all. Frankly I feel like the texture was more cupcake like than muffin like. In any case, I'll definitely make them again.
Later today, I whipped up a batch of Honey Oatmeal Bread using the recipe that I got in the instruction book with my Kitchen Aid mixer. This one resulted in a very heavy, dense bread that was a bit leaden. But, that's possibly my fault as I may have gone overboard with my whole wheat substitution here. I used it for ½ of the flour called for. Either way, I think I'll stick with my Canadian Living recipe from now on.
Finally, I roasted a chicken (free-range and local and only 1.99$ a lb!) using a recipe from an old Fine Cooking magazine and that was the best I've made in ages... perhaps ever! I've never been able to afford a free range bird before, so I suspect that the way the bird was raised has a lot to do with the taste. Anyway, the short version of the recipe:
- Preheat oven to 450 degrees.
- Place bird right side up on roasting rack, rub with ½ tbsp olive oil and sprinkle with ½ tsp each salt (I used some of my fancy pants Cyprus Sea Salt from Williams Sonoma because I didn't have any coarse salt in the hosue) and freshly ground pepper.
- Flip bird over, so the breast is facing down. Rub back with ½ tbsp olive oil and ½ tsp salt and pepper.
- Roast for 30 mins. Then, pull out of the oven and turn the bird over so the breast is now facing up. I used sturdy tongs to do this.
- Roast another 30 minutes, or until a thermometer reads 165 when inserted into the thickest part of the thigh.
- Let rest on plate, tented with foil for about 10-15 minutes before carving.
I've never done started a roast upside down before, but it makes so much sense! The result spoke for itself. Nom. Nom. Nom.
Main Ingredients:
chicken,
muffins,
quick bread,
yeast bread
Subscribe to:
Posts (Atom)


